Showing posts with label Snacks. Show all posts

Wednesday, March 6, 2013

Musselman's #AppleSauceInstead and A Giveaway!

It's March! How are those New Year resolutions working for ya? I confessed a couple months ago that I don't make resolutions because I'm bound to break them, however I still care about my health and what I eat. I gained weight while pregnant then dropped 35 pounds after Hayden was born. Slowly, that weight has been creeping back on and it's frustrating.  I'm not a runner and I don't have a gym membership and I was not blessed with a teenage boys' metabolism, however I can still make smart decisions about the way I snack and that's where Musselman's applesauce comes in. 


I was sent 3 varieties of Musselman's applesauce (Original, Natural and Cinnamon) as part of their #ApplesauceInstead campaign. All you have to do is swap a snack for a cup of Musselman's applesauce- that's it! I'm not a big snacker but I do eat chips with sandwiches for lunch and I like my dessert. I'm trying to be healthier about my decisions and reach for applesauce instead. Mr. H has been packing it in his lunch and Hayden loves it too! The Natural applesauce only has 50 calories 4 oz. and the Original and Cinnamon (my favorite!) only has 90. It's naturally fat and cholesterol free and is very low in sodium. 


Along with my applesauce, I also received a Musselman's branded yoga ball. That thing is so fun! I have to be honest though and tell you I fell off several times and laughed along the way but you just gotta get back up and try again, right? Hayden likes to bounce on it too. So as the year progresses, rather than obsess about my weight I'll just think twice about grabbing the Cheetos or the Oreos and choose #AppleSauceInstead. 

Would you like to win a Musselman's prize pack? One winner will be chosen at random and will receive 3 varieties of applesauce along with a yoga ball. 

All you have to do is leave me a comment and tell me what you'll replace with Musselman's applesauce. One winner will be chosen at the end of the week. 


Visit Musselman's on Facebook for more info about healthy snacking.

Thursday, January 31, 2013

Superbowl Round Up


Superbowl Sunday is in a few days! I have no earthly idea which teams are playing, but I know there will be balls and sweaty men wearing tight uniforms playing catch. Football is not my thing, but eating yummy foods at Superbowl parties is! I've compiled several recipes, both sweet and savory, that I've made over the years that are simple and great for feeding crowds. Here they are in no particular order. 

One-Bowl Brownies- Basic homemade brownies, with or without nuts that come together in s snap.  

Goldfish Bowl Bites- These goldfish crackers are coated in butter and Ranch seasoning. Addicting and great for snacking. 

Cheesy Spinach and Artichoke Dip- Gooey, cheesy and warm form the oven. Tasty with crackers, chips or veggie dippers. 

Soft Pretzels- I could eat these everyday. I love a warm, chewy pretzel. These are versatile and can be made  into a sweet or salty treat. 

Rolo Stuffed Ritz Crackers- Two ingredients. Ready in 10 minutes or less. Sweet and salty- yes, please!

Motherload Cookie Bars- These bars have something for everyone. 4 layers of cookie dough, together in one bar, then drizzled with chocolate. mmm!


Pepperoni Pizza Puffs- These pizza puffs are the most popular recipe on my blog, thanks to Pinterest. Pepperoni not your thing? Use sausage or veggies. 

Cap'n Crunch Peanut Butter Bars-  No bake and fuss free. marshmallows combine with creamy peanut butter to coat crunchy cereal. 

Aunt Nette's Scramble Dogs- My blog friend Jeanette used to make these scramble dogs. It's like a decomposed chili dog with the crunch of oyster crackers, served in a bowl. Messy man food!


Sopaipilla Cheesecake Bars- If you love cinnamon sugar and cheesecake, these are for you! Make them the day before you need them. 

Baked Corn Dog Muffins- I love corn dogs but don't eat them often because they're deep fried and no so healthy. These use cornbread and your favorite wieners and are baked in muffin tins. 


Bruschetta Burgers- Probably one of my favorite burgers ever. The garlicky tomato topping and the pesto mayo make these special. 

Buffalo Chicken Dip- The name says it all. Buffalo chicken flavors in a dip!

Cheesy Ranch BLT Dip- Cheese. Ranch Dressing. Bacon. Spinach. Tomato. On warm crusty bread. I could eat this hot dip as a meal. 

Crockpot BBQ Pulled Pork- Let the crockpot do the work for you! Juicy, spicy shredded pork sandwiches.

Ham and Swiss Sliders- These are fun and simple and both kids and adults like them. Toast them in the oven to melt the cheese and the buttery mustard topping soaks into the bread. Ohhh! 

Chocolate Sybil Cake- Also known as Texas Sheetcake. Chocolate cake, topped with rich chocolate frosting them sprinkled with pecans. Heaven help me. 

__________________________

Hope you guys eat well this weekend. What are you planning on making?

Tuesday, September 18, 2012

Hayden's 1st Birthday Party!


As I mentioned in the last post, we celebrated Hayden's birthday last Saturday with a party at our home. We had friends and family over for food, cake and fun. I'm not big into character themed birthday parties and cakes and since Hayden doesn't have much of an opinion yet regarding these kinds of things, I did what I wanted- and that was simple and classic party food, made pretty. 

As part of the decoration, Mr. H and I made a photo banner of Hayden, starting with a photo from when he was just hours old all the way up until 12 months. I love it!

I went for a buffet style setup so everyone could take and eat what they wanted, and used the cake as the centerpiece of the table. Here's what I made: 


Last November I made a chocolate layer cake for a family friend (Hi Marnie!) and loved that cake so much. It really was one of the best chocolate cakes I've ever had and what sets it apart from others is that it's made with copious amounts of brown sugar. I knew I wanted that cake for Hayden's birthday so, I increased the recipe 1.5x and baked it in two 12-inch pans. I used a double recipe of my favorite cream cheese buttercream for the frosting because I wanted to be able to tint it a soft robin's egg blue. 

One of my favorite photos from Hayden's party- I love the grin on his face as he feeds Autumn a rice krispie treat!

I fell in love with the Bunting Banner that Christa from Mini Baker made for a wedding shower cake a few weeks ago. I contacted her and we emailed back and forth and she made a custom birthday banner that read "Happy 1st Hayden" complete with hand painted blue stars. It turned out better than I expected and complimented the cake and decor. If you want one of your own, head on over to Mini Baker's Etsy Shop, browse around at her handmade items and place your order! She's got some cute stuff over there. Thanks Christa for working with me on such short notice- it turned out perfectly!


Hayden dug into his cake like a pro. At first it was just fingers in the frosting, then before you knew it he was shoving handfuls of the stuff into his mouth. Then he got to the cake part and started sharing with his Daddy and Autumn and was starting to make a mess on the floor. I don't really know why he started crying, but it was funny. A naked baby covered in cake with teary eyes is enough to make a sucker out of anyone. Silly boy. 

And lastly here's a picture of the three of us, just after singing Happy Birthday. It was a great day and we're so blessed that we made it through Hayden's first year in tact and without any major injuries, growing better with each passing day. Happy Birthday Hayden, We love you!

And thank you to all of you who supported us, cheered  us on and offered words of encouragement  throughout the past year. We appreciate each and every one of you!

Saturday, May 19, 2012

A Tasty Snack and A Winner


Hope everyone has has a nice week. I feel like it was just Mother's Day and now it's the weekend again. We had a great Mother's Day and took Hayden to the park to play on the swings for the first time. He was a little hesitant but he had fun and kept trying to eat the chain links (ewww!). The rest of the week was filled with doctor visits and appointments and I was kept very busy. I did manage to squeeze in a much needed haircut since I hadn't trimmed my hair since before Hayden was born! Needless to say, I did not get to bake up anything new this week so I'm sharing a treat I made earlier in the year. 


Mr. H loves this snack. His mom has been making Goldfish Bowl Bites for as far back as I can remember. She serves it in a giant glass round bowl that looks like a Goldfish bowl and she covers it with yellow plastic wrap that she's had in the cupboard for the last 10 years, that she inherited from her mother-in-law. It's kind of funny, but that never ending roll of Plastic wrap is finally used up. haha! My mother-in-law hasn't made these in awhile so when Mr. H gets the craving we whip up a batch together. 


This snack is buttery, crunchy salty, and loaded with Ranch flavor. The original recipe calls for pretzel crackers but those aren't my favorite so we just use the plain and cheddar Goldfish. You can use any combination you'd like, though I would avoid those with extra flavoring like the pizza and extra cheesy ones. We also like to add a bit more Ranch powder and pecans but that's just personal preference. My changes are noted below. My favorite thing about this recipe is when you get a clump of crackers that get a bit more love from the butter and Ranch topping. As they bake those pieces get nice and crusty and pack a punch of flavor. I like to dig those fishies out and eat them first- so good! This recipes makes a lot and would be good for large crowds, parties, or school events but could easily be halved. Enjoy!


Goldfish Bowl Bites
Printer Friendly Version
  • 2 (6 ounce) bags plain Goldfish® crackers* (see note)
  • 1 (6 ounce) bag cheddar Goldfish® crackers
  • 1 (6 ounce) bag pretzel Goldfish® crackers
  • 1 cup pecan halves (I double this)
  • 1/2 cup butter or margarine, melted
  • 1 teaspoon Worcestershire sauce
  • 1 envelope (3 Tablespoons) Ranch salad dressing mix (I use 4 Tbsp.) 
Preheat oven to 250 degrees F.

Combine crackers and pecans in large shallow roasting pan. Combine melted butter, Worcestershire and Ranch dressing mix. Pour over crackers; gently stir to coat. 

Bake 60 minutes, stirring every 15 minutes.

Once evenly toasted, remove from oven and allow to cool completely before serving.  

NOTE: Any combination of of Goldfish crackers will do. You just need 4 six-ounce bags. I like to use 2 plain, a bag of Cheddar and a bag of the baby Goldfish crackers. 


And the winner of the Chinet Bakeware is #42- Andrew's Mom of Mad Rantings of Andrew's Mom. Congratulations. Please email me with your address as soon as you can. Oh and send me your recipe for Mac and Cheese too :-)

Tuesday, January 18, 2011

Some Call It Crack

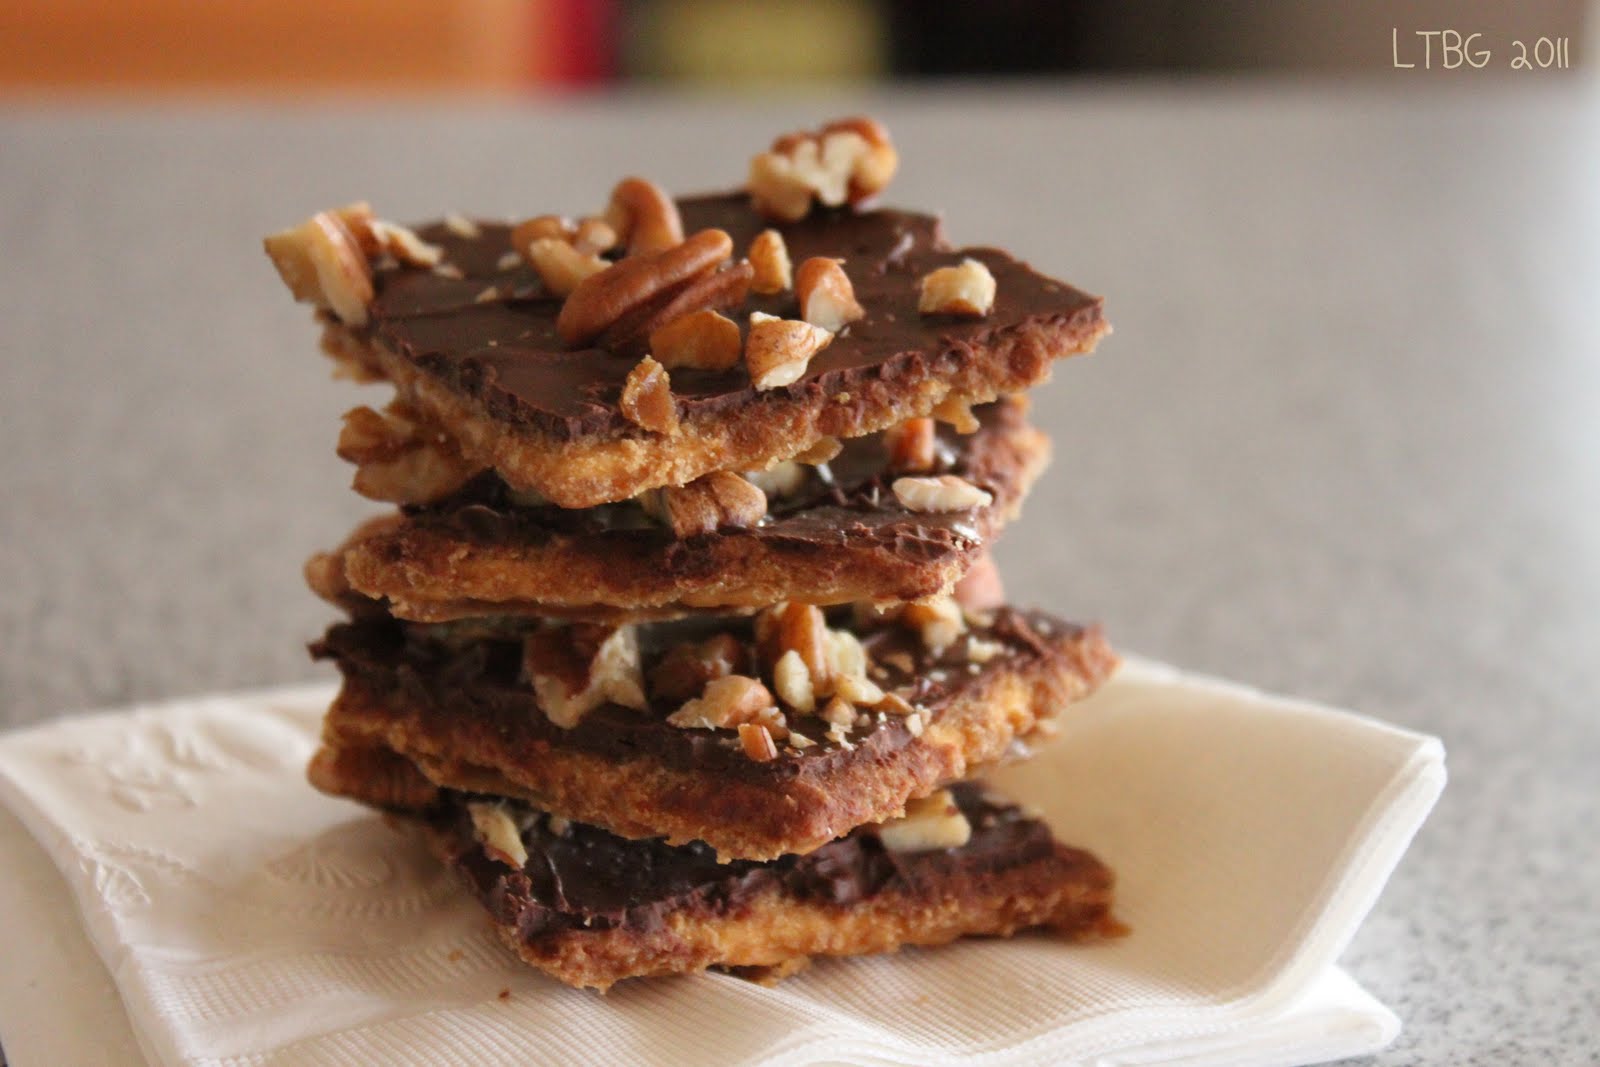
For my 100th post (2 years ago) I shared a recipe for Graham Break-Aways. It's a layered snack of graham crackers, buttery toffee, chocolate with a sprinkling of nuts on top. It's a decadent treat that my husband adores. I like them too, but I saw this recipe for saltine toffee and thought I'd give it a try. It's basically the same concept with salty crackers on the bottom instead of the grahams. And since we bought a case of Saltines from Sam's Club, I thought this was a good idea!

I did make a boo-boo when it came to the recipe though. It calls for 1 cup one butter, and I mistook that as 1 stick even though I read the recipe about 3 times as I was making it. I didn't realize my mistake until after I had taken them out of the oven- my bad! The saltine toffee was good but I'm sure it could have been better with the extra stick of butter...that's a no brainer! I liked these but still prefer the the ones made with grahams simply because of the texture of the cracker. Definitely super sweet and addicting though- some have even refereed to it as crack. Try it and decide for yourself!

Saltine Toffee from All Recipes

Printer Friendly Version

  • 35 saltine crackers (4 ounces)
  • 1 cup butter
  • 1 cup dark brown sugar
  • 2 cups semisweet chocolate chips
  • 3/4 cup chopped pecans

Preheat oven to 400 degrees F.

Line a cookie sheet with foil and spray with non-stick cooking spray. Spread out saltine crackers in single layer.

In a saucepan combine the sugar and the butter. Bring to a boil and boil for 3 minutes. Immediately pour over saltines and spread to cover crackers completely.

Bake at 400 degrees F for 5 to 6 minutes. Remove from oven and sprinkle chocolate chips over the top. Let sit for 5 minutes. Spread melted chocolate and top with chopped nuts.

Cool completely and break into pieces.

Saturday, September 4, 2010

Sliders and Pops: A Labor Day Two-fer

It's finally September and cooler weather is here! I feel like half of America wants Fall to be here already and the other half is wishing Summer would stick aound just a little longer. I fall somewhere in between. Autumn is my favorite season (and dog!) so I wish it for it year-round but I'm not quite ready for Summer to be over. I just wish we had cooler temps. I'm not a fan of 105 degree days, where are the 80's? Heck the other day it was after 9pm and still in the 90's- that's crazy!

This menu reminds me of Summer. It's simple and fuss free and can be eaten with your hands. Both can be made ahead of time and require very little time to get them on in your belly. Of course they can be prepared and eaten any time of year but I think they're perfect for rounding out the last few days of Summer. They can be eaten as snacks or as a full meal and kids love them as much as the adults do too. The nice thing about these recipes is you can make as many or as few you need.

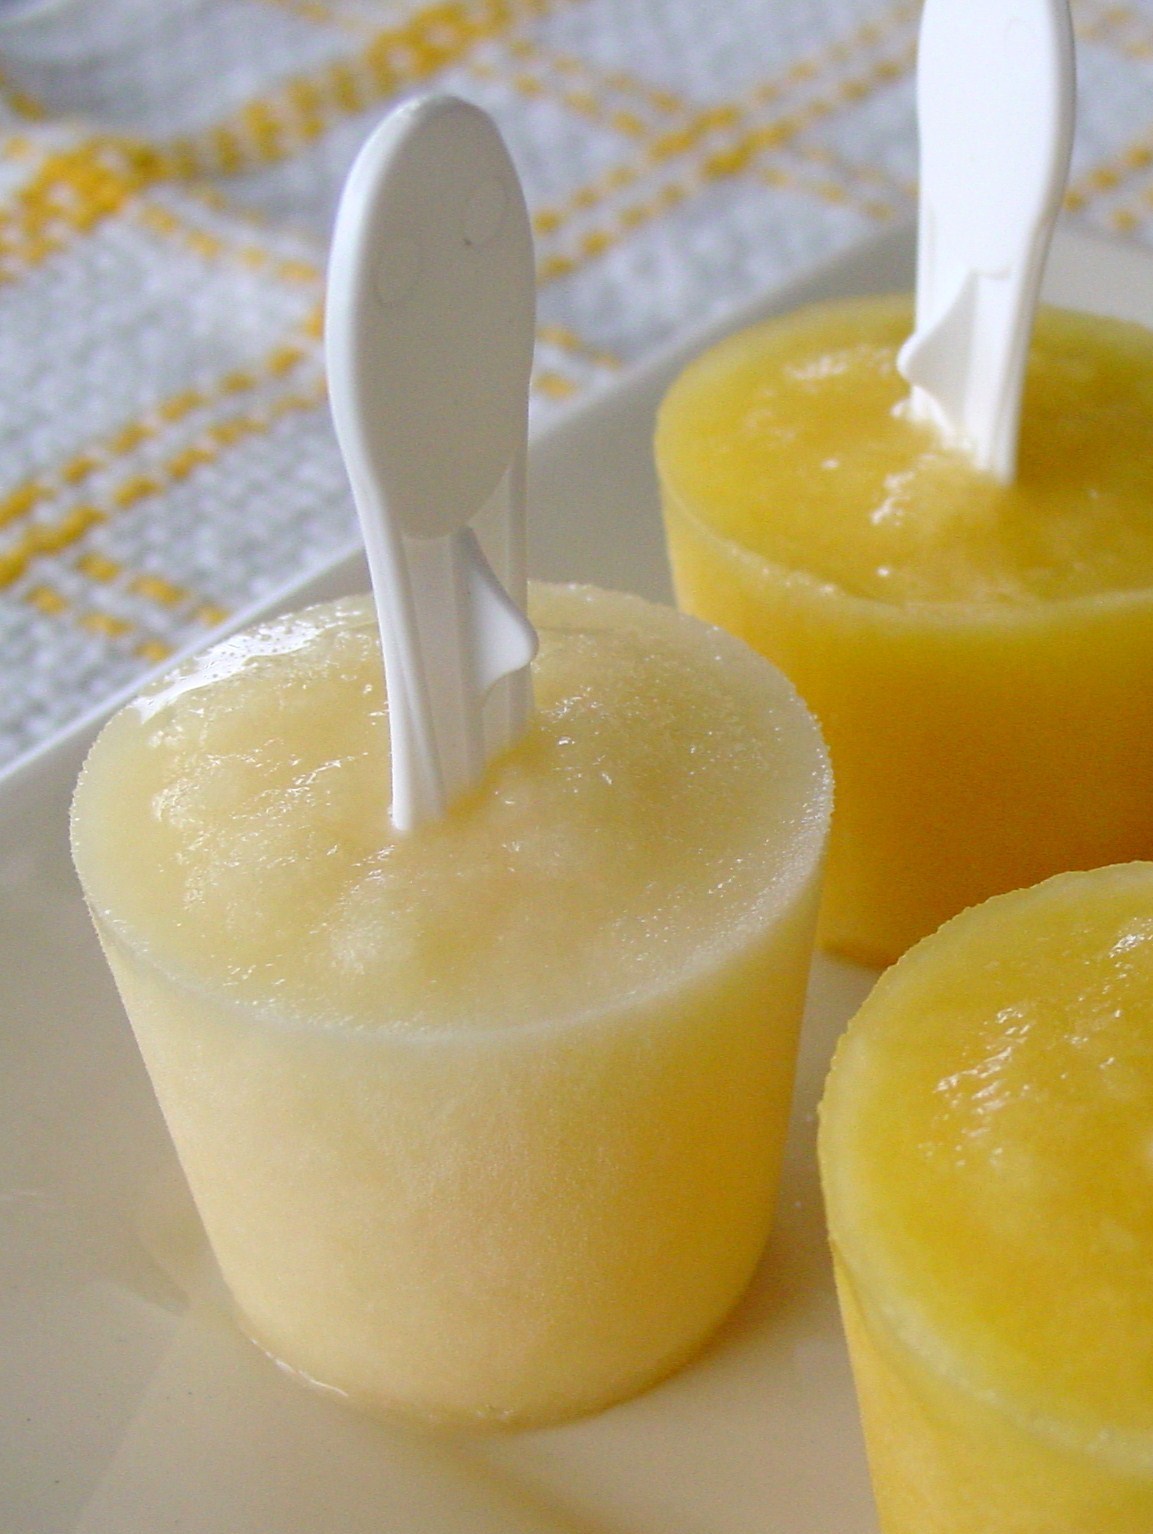
I made these ham and swiss sliders on sweet Hawaiian bread, but any soft white dinner roll will do. There's not one element that stands out above the other, but it's the buttery poppyseed mustard sauce that tops it all off that makes it unique. These popsicles taste like a slice of fresh pineapple. The original recipe called for milk but I did an experiment and made half with pineapple juice and those turned out to be better looking and tasting. And you don't need any fancy molds to make them, just fill up paper cups and put a stick in them. Make enough to feed your family or a crowd this Labor Day!

Ham and Swiss Sliders adapted from Christy

  • 12 good white dinner rolls (I used Hawaiian rolls)
  • 12 pieces good honey ham
  • 12 small slices Swiss cheese
  • 3 Tbsp. mayonnaise
  • 3 Tbsp. miracle whip

Poppy seed sauce:

  • 1 1/2 tsp. poppyseeds
  • 2 tsp. yellow mustard
  • 1/2 stick butter, melted
  • 1/2 tsp. dried minced onion or 1 1/2 tsp. fresh minced onion
  • 1/4 tsp. Worcestershire sauce

In a small bowl, mix together mayonnaise and miracle whip. Cut the rolls in half and place cut side up. Spread onto both sides of the center of each roll. Place a slice of ham and a slice of Swiss inside of each roll. Close rolls and place them into a large baking dish or heavy cookie sheet. Place very close together.

In a medium bowl, whisk together all of the poppy seed sauce ingredients. Pour evenly over all of the sandwiches. Let sit 10 minutes or until butter sets slightly.

Cover with foil and bake at 350 degrees for 12-15 minutes or until cheese is melted. Uncover and cook for 2 additional minutes. Serve warm.

NOTE: Sandwiches can be assembled a day ahead and kept in the fridge ready to bake.

Pineapple Pops adapted from Everyday Food

  • 3 cups fresh pineapple chunks (or one 14.5-ounce can chunks packed in juice, drained)
  • 1/3 cup pineapple juice or milk
  • ¼ cup sugar

In a food processor, combine pineapple chunks, juice or milk, and sugar; pulse until almost smooth, with some chunks of pineapple remaining.

Pour half the mixture into a medium bowl (or a glass measuring cup for easy pouring). Pulse remaining mixture until completely smooth; add to mixture in bowl.

Divide evenly among eight 3-ounce molds or paper cups, and insert wooden sticks. Freeze until solid, at least 4 hours or up to 2 weeks (cover with plastic wrap).

NOTE: The original recipe calls for milk to be added to the pops. I made half a batch with milk and the other with the reserved pineapple juice from the can. The juice was hands down more flavorful!

Hope you have a wonderful Labor Day weekend!

Thursday, February 4, 2010

Snack Time

Mr. h and I were out and about shopping and spending the day together and I was craving a snack. I couldn't decide if I wanted salty or sweet though. After thinking about it for a while I declared that I wanted cinnamon tortilla crisps. My hubby looked at me like I was crazy, which happens more often than one might think :-)

So the next day while I was lounging in my jammies at home and he was out and about, I made the cinnamon sugar tortilla chips. They're crispy, crunchy, lightly salted (if you use salted butter) buttery and addicting. And the good news is they last for weeks in an airtight container.

You could easily adapt this sweet chip into something savory, by using olive oil and kosher salt or ranch dressing powder or taco seasoning. Maybe even switching it up and using a flavored tortilla and rubbing it with garlic. Would be excellent with a bowl of guac if that's your thing. Really the possibilities are endless. Have fun with this and serve for a crowd- this makes a ton!

Cinnamon Sugar Chips adapted from Martha Stewart

  • 6 tablespoons unsalted butter, melted
  • 1 tablespoon sugar
  • 3/4 teaspoon ground cinnamon
  • 12 flour tortillas, (10 inches in diameter)

Preheat oven to 375 degrees. Stir together butter, sugar, and cinnamon in a small bowl*(see note). Brush tortillas with cinnamon sugar/butter mixture, and cut each into 8 wedges (A pizza cutter works nicely here).

Arrange wedges in a single layer on a baking sheet, and bake until crisp, 10 to 12 minutes. Let chips cool on a wire rack before serving.

NOTE: I so didn't follow the directions! I cut the tortillas into wedges, placed them on my baking sheet, brushed them with butter then sprinkled them with cinnamon sugar. I obviously didn't read the recipe before I started these. ha ha! but it actually worked out fine. I think I had cinnamon toast on my mind. It's your choice to follow the directions or be a rebel and do it my way :-)

Related Posts with Thumbnails