Showing posts with label Birthdays. Show all posts

Friday, November 15, 2013

Hayden's 2nd Birthday- A Radio Flyer Tricycle Party


My sweet little mischievous boy turned two years old in September. We celebrated with a Radio Flyer red tricycle themed cake and party. I like themed parties but I'm not one to purchase character cups, plates, banners and tablecloths- that's just not my style. So I made a fondant covered tricycle cake, and chose solid red and turquoise accents to bring it all together.  Read on for more details.


I wanted to incorporate some of Hayden's favorite things at his party, which just happened to include cake, cookies, lemonade, milk, hot dogs with ketchup, pretzels and cheese. I made a bunting banner to hang over the table using patterned scrapbook that read "Happy Birthday Hayden". I also set up a lemonade stand and made a bunting for that that said "Lemonade 5 cents" I used this bunting template and Baker's twine to hang it. I loved how they turned out. So much so that I still haven't taken them down :-)

For the buffet I served: 

  1. Hot dogs with mustard and ketchup (served out of a Radio Flyer wagon)
  2. Tortilla chips and pretzels
  3. Veggies with ranch dip
  4. Cheese cubes
  5. Birthday cake (chocolate cake with vanilla buttercream covered in Marshmallow Fondant)
  6. Brown butter and spice rice krispies treats
  7. Fresh fruit cups
  8. Decorated sugar cookies and red and aqua Sixlets
  9. Whole and 2% milk served in glass Frappuccino bottles
  10. Raspberry and regular lemonade
My wonderfully talented friend, Kathia from Pink Little Cake, made the tricycle, cat and star Hayden decorated sugar cookies for me. If you haven't been to her blog, go check her out. She does amazing work. She also made the cute little scalloped tags that I used on Hayden's party favors which included Cheez-its, fruit snacks, raisins, and a drink mix.  My friend Becky from Goods by Gert custom made the letter H for me. I ordered Hayden's "two" shirt from Best Birthday Ever shop on Etsy. Thank you Kathia and Becky!


This was my first time covering a cake in fondant, though I have worked with fondant before. I was a little worried, but in the end it turned out great and the fondant I used was really forgiving. Any mistakes I made, I was able to cover up with a cloud or the green grass. This was really fun to make and this colors were so bright and vibrant. The actual fondant was quite tasty too. 


It was a great day shared with close family and I'm so grateful to have had my Dad and step mom there to celebrate with us along with. Hayden is a truly blessed boy. 


Wednesday, October 16, 2013

Ice Cream Cone Cupcakes & The Pillsbury Giveaway Winner


Yesterday, October 15th, was Infant and Pregnancy Loss Awareness Day. It's a day to remember all the babies that left this world too soon. I lit a candle for my boys and set out a few things that remind me of them. In my cookbook, I shared my story about how I got into blogging, and my struggle with becoming a mom to a live baby. I questioned whether or not to add this to the book because I know many people are uncomfortable with death and some will think that it's irrelevant to baking. However, for me, this is my reality and I never would have started this blog or have written a cookbook if it weren't for the loss of my sons. Losing them made me see things differently, made me love deeper, and opened my life up to so many more opportunities. 

To stabilize the cones, line a cupcake pan with foil, cut a small hole in the center of each indention and place the cone snugly in the center. Don't make the hole too big or the cones will wobble. 
I made these ice cream cone cupcakes for my first born Sam's 6th angel birthday. I've always wanted to make cupcakes in ice cream cones for him and this was finally the year. I had some leftover vanilla buttercream that was tinted a lovely shade of sky blue from a previous project, so I used that to top them. The chocolate malted cupcakes come from Martha's Cupcakes. They were good but the malt flavor was very mild. A malted frosting would be nice on these, maybe even a few malted milk balls, if you're a fan of those. I opted for colorful sprinkles because I imagine any 6 year old boy of mine would love that. 

I love you Sam. Thinking of you and Jack, today and always.

Chocolate Malted Cupcakes 
from Martha's Cupcakes

  • 2 1/4 cups all-purpose flour
  • 3/4 cup unsweetened Dutch-process cocoa powder
  • 1/2 cup granulated sugar
  • 3/4 cup packed light brown sugar
  • 1 1/2 teaspoons baking soda
  • 1/2 teaspoon salt
  • 1 cup milk, at room temperature
  • 1 1/4 cups malted milk powder
  • 1 cup vegetable oil
  • 3 large eggs, at room temperature
  • 1 cup sour cream, at room temperature
  • 1 teaspoon vanilla extract

Preheat oven to 350 degrees F.  Line cupcake pans with paper liners.

In a medium bowl, whisk the flour, cocoa powder, both sugars, the baking soda and salt together.  Whisk the milk and malt powder in a measuring cup.

In the bowl of a stand mixer fitted with the paddle attachment, beat the oil, flour mixture and milk mixture until smooth.  Add the eggs, one at a time, beating well after each addition, and stopping to scrape the sides of the bowl once or twice.  Beat in the sour cream and vanilla, mixing just until combined.

Divide the batter among the prepared pans, filling each well about half full.  Bake for about 20 minutes, or until the tops of the cupcakes spring back when lightly pressed and a toothpick inserted in the center comes out clean.  Transfer the pans to wire racks and let the cupcakes cool for about 5 minutes before removing them from the pans.  Cool completely before frosting.

Makes 28 cupcakes.

NOTE: I made 1/3 batch of this cupcake recipe and yielded 10 ice cream cone cupcakes. To make the ice cream cone cupcakes, fill cones 2/3 full and bake til a toothpick inserted in the center comes out clean, about 15-18 minutes. 


The winner of the Pillsbury Celebrate More Fall Celebration Kit and $100 gift card is....


Commenter #4 Lisa Ghenne from The Cutting Edge of Ordinary. This is what she said she loves about Fall...

"EVERYTHING! I can't wait for autumn to arrive. Sweaters, cozy socks, pumpkins, apples, chilly nights by the fire pit, soups, stews, casseroles! I love it all! Thanks for the chance at this sweet prize! Pun intended!"

Congratulations Lisa! Please email me with your address to claim your prize!


Thursday, July 11, 2013

My Birthday Cakes and No-Bake Cake Pops


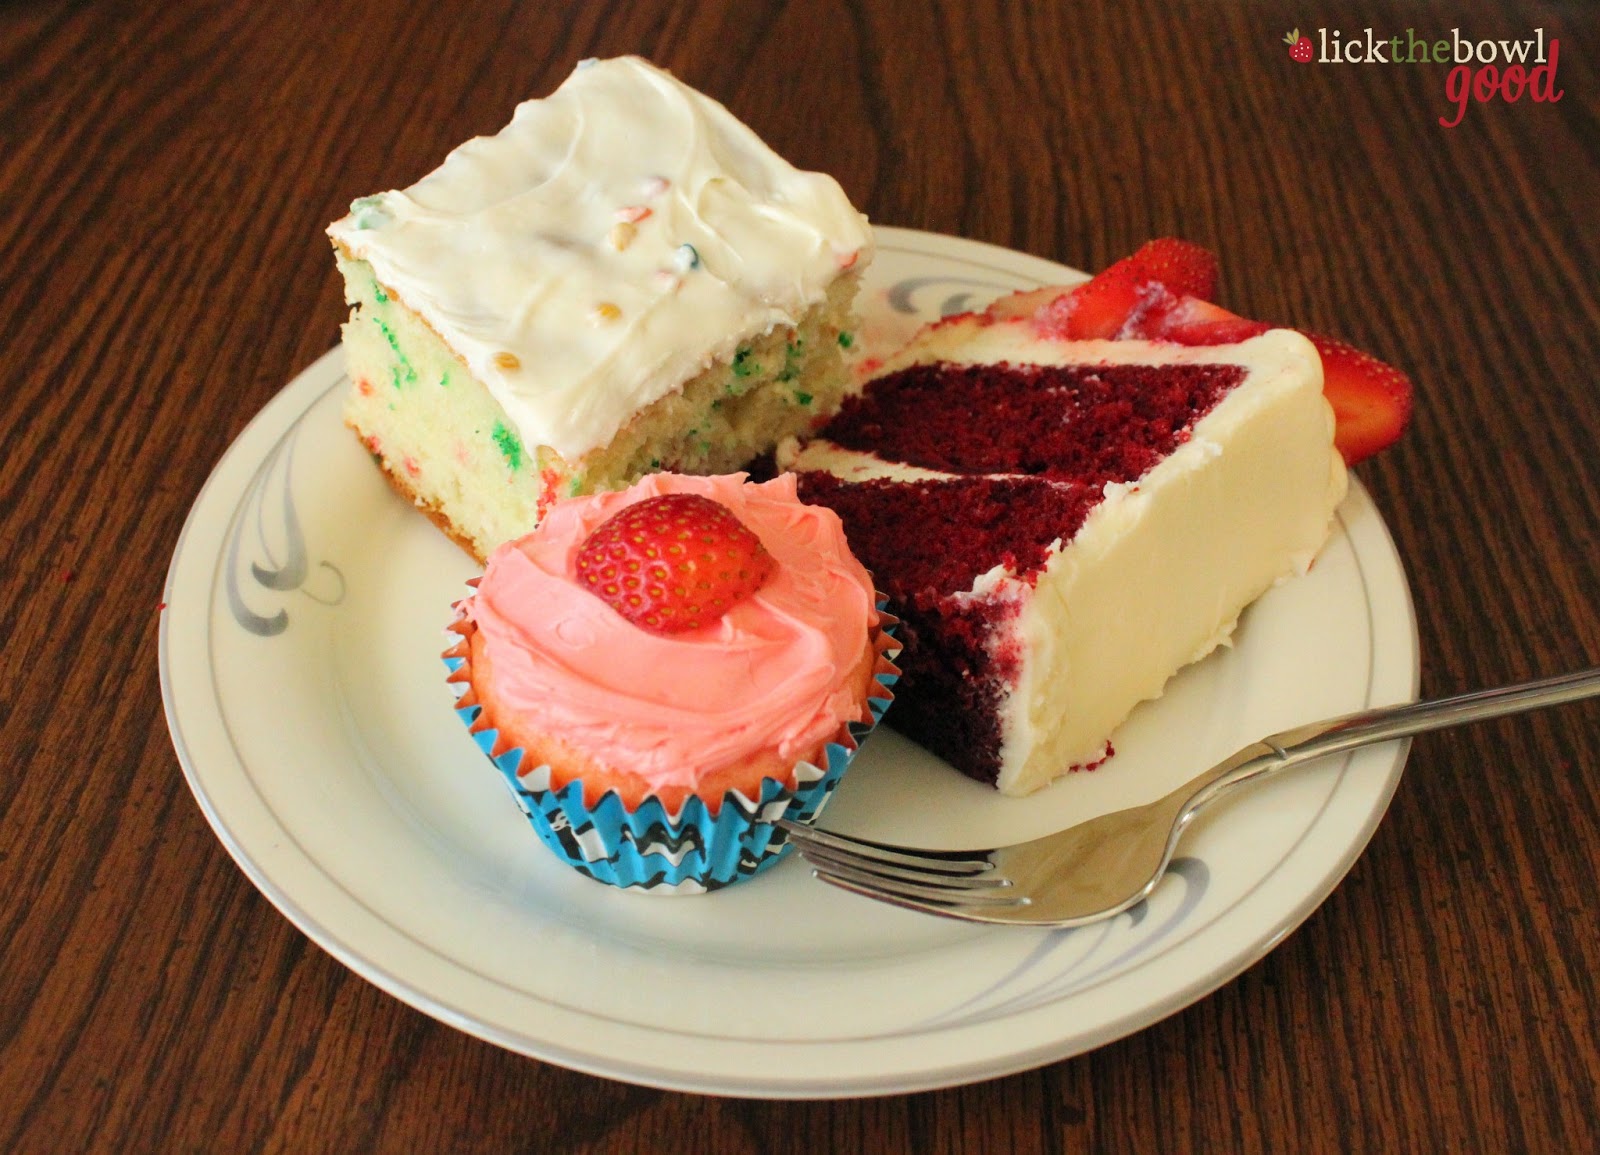
I had a birthday a couple weeks ago. What is it about birthdays after 30, that just aren't so exciting? Maybe when I turn 40, I'll get a party, though I might be mourning my 30's by then. Who knows?! Anyway, my 31st birthday was spent mostly hanging out with Hayden and working on my cookbook. See that strawberry topped cake? That was the birthday cake I made myself. It was also the cake that will adorn the cover of my cookbook. I'm pretty thrilled about that! Then family came over and brought me more cake...and I went into a sugar coma! 

My sister made me pink lemonade cupcakes in adorable penguin cupcake liners. I have a deep love for penguins, so I absolutely loved the look of these, they were delicious too. And my mom made me a Funfetti cake with rainbow chip icing. You can't eat Funfetti cake and not feel like a kid. I loved that they baked for me- it made me feel special. What's funny is that Hayden thinks that when you sing 'happy birthday' that it's for him. He gets a big grin on his face and starts clapping. I'm more than willing to give that to him :-)

I made these no-bake cake truffles a couple months ago when I had leftover Funfetti cake mix from making these rice crispy treats. Mix, roll, and dip. No baking necessary. Since they were so simple to make Hayden and I decided to decorate popsicle sticks to jazz them up. 


Can you guess which stick Hayden decorated?
I had a minor issue with these though. After I dipped them in the coating and they set up overnight, the truffle expanded and the candy coating cracked on some of them. I made a couple batches to test them out, some I refrigerated, some I did not and the results were the same. I think that maybe I rolled the balls too tight, but I'm not sure. I read through the comments on the blog I got the recipe from and others had the same issue. I googled my problem and found that this is a common issue when making cake pops. Anyway, they were fun and simple and tasty. Don't let a little cracked coating deter you from making them. Kids will have fun with these too and will eat them up so fast you'll forget about all the imperfections. 


No-Bake Funfetti Cake Truffles
loosely adapted from Chef In Training

  • 1 cup dry Funfetti cake mix (any flavor will work)
  • 1/4 cup sweetened condensed milk
  • 1/2 teaspoon vanilla extract
  • candy coating or chocolate for dipping
Mix dry cake mix, sweetened condensed milk and vanilla together until combined. 

Roll into 1-inch balls. Coat with candy coating or melted chocolate. Top with sprinkles while the coating is still wet. Allow to set.


Hayden playing with the sprinklers and trying to spray his momma!

Wednesday, April 17, 2013

Pillsbury Funfetti Celebrates 25 Years! (Giveaway Closed)


It's party time- the cake we all know and love is having a birthday!  Pillsbury's Funfetti is turning 25 this year and is celebrating in a bold and colorful way. When I think of birthdays, I immediately think of cake and Pillsbury Funfetti has us covered with their Funfetti Premium Cake and Cupcake Mix and four new frosting colors- Aqua Blue Vanilla with fish shaped candy bits, Hot Pink Vanilla with pink sugar crystals, Vibrant Green Vanilla and Bold Purple Vanilla with colorful candy bits. 


Last year for my birthday my mom made me a Funfetti birthday cake and while I wasn't so thrilled about turning 30, that cake made me feel like a kid again, with it's brightly speckled sweet interior. In honor of it's 25th birthday, I made something equally fun and delicious and started with everyone's favorite- crispy rice treats amped up with Funfetti cake mix and frosting. These definitely taste just like cake and worthy of a celebration. 


How do you celebrate birthdays? While chatting with my family and fellow baking buddies we've come up with some tips for you on how to maximize your birthday experience. 
  1. Get the kids involved. Let them help in the celebration and planning of the day- from the food, to the decorations to the cake. Not only allow them to make some decisions on their own but let them help you mix the cake mix, hang the streamers and decorate the invitations. Even something as simple as choosing what color candles or balloons to use will make their day. Not only with the celebration be more personal, the kids will be proud of their contributions.
  2. Often times, when there are birthdays, there is pressure to bring a gift. Then you struggle with getting the right gift for the person or how much to spend. Instead, ask your guests not to bring gifts but instead to donate their time, a toy or funds to a charity that means something to your family. If they insist on a gift ask them to provide an experience like a trip to the zoo, or going out for some ice cream rather than a gift wrapped plastic toy. 
  3. Incorporate a craft into the celebration and let that serve as the party favor. Decorate a small wooden frame with non-toxic colorful paints, glue, beads, glitter and jewels. Let the kids craft and socialize. Once the festivities are over, they'll have a handmade keepsake to remember the great day. 

Frosted Funfetti Crispy Rice Treats by Monica h

  • 4 Tablespoons unsalted butter, plus more for dish
  • 10 oz. mini marshmallows
  • 1/2 teaspoon vanilla extract
  • 1/2 cup Pillsbury Funfetti Cake Mix, dry
  • 6 cups crisp rice cereal
  • 1- 15.6 oz. can Pillsbury Funfetti Frosting (any color)
Butter a 9x13-inch dish and set aside. 

In a large pot, melt butter over medium heat. Add marshmallows and vanilla and stir constantly until marshmallows are completely melted. 

Add the dry Pillsbury Funfetti Cake Mix to the marshmallow mixture and stir to combine. Add rice cereal and stir until the mixture comes together and the cereal is well coated. 

Immediately scrape the cereal into the buttered dish and press into an even layer. Allow to cool to room temperature before before frosting. 

Once rice treats are completely cool, frost with Pillsbury Funfetti Frosting and sprinkle the tops with the included sprinkles. 

Cut into squares and serve.


As part of the Funfetti 25th birthday celebration, Pillsbury wants you to join in on all the fun. They are generously offering one lucky reader a Celebration Starter Kit including: Pillsbury Funfetti Premium Cake and Cupcake Mix and 4 boldly hued Funfetti Frostings as well a $50 Visa or American Express Gift Card (total value ($60). 

To enter the giveaway: 

1. Leave a comment on this post telling me about your Funfetti birthday memories. Please be sure to leave an email for me to contact you if you win.

2. For a second entry "Like" Pillsbury Baking on Facebook

3. For a third entry "Like" Lick The Bowl Good on Facebook. Leave a separate comment for each entry. 

A winner will be selected at random and announced by May 1, 2013. 

To learn more about Pillsbury's Funfetti 25th Birthday Celebration please visit Pillsbury on Facebook where they're running a birthday promotion that ends April 25th. Also visit PillsburyBaking.com and Pillsbury on Pinterest

**The J.M. Smucker Company sent me free product samples and other compensation and asked me to promote it's new Funfetti products. 


Tuesday, September 18, 2012

Hayden's 1st Birthday Party!


As I mentioned in the last post, we celebrated Hayden's birthday last Saturday with a party at our home. We had friends and family over for food, cake and fun. I'm not big into character themed birthday parties and cakes and since Hayden doesn't have much of an opinion yet regarding these kinds of things, I did what I wanted- and that was simple and classic party food, made pretty. 

As part of the decoration, Mr. H and I made a photo banner of Hayden, starting with a photo from when he was just hours old all the way up until 12 months. I love it!

I went for a buffet style setup so everyone could take and eat what they wanted, and used the cake as the centerpiece of the table. Here's what I made: 


Last November I made a chocolate layer cake for a family friend (Hi Marnie!) and loved that cake so much. It really was one of the best chocolate cakes I've ever had and what sets it apart from others is that it's made with copious amounts of brown sugar. I knew I wanted that cake for Hayden's birthday so, I increased the recipe 1.5x and baked it in two 12-inch pans. I used a double recipe of my favorite cream cheese buttercream for the frosting because I wanted to be able to tint it a soft robin's egg blue. 

One of my favorite photos from Hayden's party- I love the grin on his face as he feeds Autumn a rice krispie treat!

I fell in love with the Bunting Banner that Christa from Mini Baker made for a wedding shower cake a few weeks ago. I contacted her and we emailed back and forth and she made a custom birthday banner that read "Happy 1st Hayden" complete with hand painted blue stars. It turned out better than I expected and complimented the cake and decor. If you want one of your own, head on over to Mini Baker's Etsy Shop, browse around at her handmade items and place your order! She's got some cute stuff over there. Thanks Christa for working with me on such short notice- it turned out perfectly!


Hayden dug into his cake like a pro. At first it was just fingers in the frosting, then before you knew it he was shoving handfuls of the stuff into his mouth. Then he got to the cake part and started sharing with his Daddy and Autumn and was starting to make a mess on the floor. I don't really know why he started crying, but it was funny. A naked baby covered in cake with teary eyes is enough to make a sucker out of anyone. Silly boy. 

And lastly here's a picture of the three of us, just after singing Happy Birthday. It was a great day and we're so blessed that we made it through Hayden's first year in tact and without any major injuries, growing better with each passing day. Happy Birthday Hayden, We love you!

And thank you to all of you who supported us, cheered  us on and offered words of encouragement  throughout the past year. We appreciate each and every one of you!

Monday, September 10, 2012

Hayden's 1st Birthday Cupcakes

Hayden celebrated his 1st birthday last Saturday, September 1st. We went up to Mount Bonnell for an evening picnic and to watch the sunset over Lake Austin. We didn't have a birthday party for him until a week later, but I did make him a batch of kid friendly cupcakes. You can't have a birthday and not have a cupcake, right? For that matter, you can't have a birthday and not lick the beater either! 

I debated between pumpkin, banana, carrot or apple his cupcakes. Mr. H doesn't love the first two so that left carrot cupcakes or apple cupcakes, except Hayden is kind of funny about textures in his food so I wasn't sure he'd like shredded carrots in his cake. And I was out of apple sauce. Enter his baby food- Plum Organics carrot and apple puree. It's delicious and worked perfectly in this recipe. You could use all carrot or apple if you prefer, but this is what I had on hand and it was a success. You could taste both fruits, but overall it was just like a moist and moderately sweet spice cake topped with a brown sugar and spice cream cheese frosting. It doesn't get much better than that! 


Carrot and Apple Spice Cupcakes from Monica h

Printer Friendly Version
  • 1/4 cup (4 Tbsp) unsalted butter, room temperature
  • 1/2 cup granulated sugar
  • 1/4 cup packed light brown sugar
  • 1 teaspoon ground cinnamon
  • 1/2 teaspoon freshly grated nutmeg
  • 2 large eggs
  • 2 Tbsp. pure maple syrup
  • 1/2 teaspoon vanilla extract
  • 1 cup all-purpose flour
  • 1/2 teaspoon baking soda
  • 1/4 teaspoon salt
  • 3/4 cup carrot and apple puree (Plum Organics Baby Food)
Preheat oven to 350 degrees F. Line a cupcake tin with paper liners and set aside. 

In a large bowl, cream butter and sugars til fluffy and pale in color. Add the cinnamon and nutmeg and mix until the spices are fully incorporated. 

Add the eggs, one at a time, until well blended then add the maple syrup and vanilla and mix. 

Gently add the flour, baking soda and salt. Stir until just combined but avoid overmixing the batter. Scrape down the sides of the bowl with a rubber spatula then add the pureed carrot and apple mixture. Stir until combined. 

Divide batter into 12 cupcake liners, filling each about 3/4 full. 
Bake for 18-20 minutes or until a toothpick inserted into the center comes out clean. Allow cupcakes to cool slightly before removing to a wire rack to cool completely before frosting with Brown-Sugar and Spice Cream Cheese Frosting. 

Brown Sugar and Spice Cream Cheese Frosting
  • 1/4 cup (4 Tbsp) unsalted butter, room temperature
  • 6 oz. cream cheese, room temperature
  • 1/2 cup packed light brown sugar
  • 1/2 teaspoon ground cinnamon
  • 1/4 teaspoon freshly grated nutmeg
In a medium bowl, beat cream cheese and butter until creamy and smooth. Add the brown sugar and spices and beat on medium-high speed until fluffy. Use immediately. 

Makes 12 cupcakes. 

Our attempt at a family photo :-) Happy Birthday Hayden!

Thursday, August 30, 2012

Summery Birthday Cupcakes & A Winner!


My sweet angel boy Sam would have turned 6 years old this past August 15th. It's hard to believe that that much time has passed. Every year we celebrate by baking him up a cake or cupcakes, and going to the cemetery for a balloon release. This year was no different only Hayden was with us and he sent the balloons up to his big brother. He will always be my first born even if he's not here. And I will always celebrate his life as long as I'm his momma. This year it was with strawberry lemonade cupcakes. 


Strawberries and lemons just scream summer to me and these were the perfect refreshing treat. They were sweet and tangy, bright and loaded with lemon zest in the cupcake, in the filling and in the buttercream. I found the recipe at Four Points Foodie and adapted it to my liking. I can't say that I've seen a cupcake filled with fresh diced lemony strawberries before so I was definitely intrigued. These were delicious and perfect for celebrating a sixth birthday. 


There are a few more days of Summer left and if you're looking for a seasonal recipe to whip up for your Labor Day weekend, these might be the cuppies for you! For the winner of the "Whatever Happened To Sunday Dinner?" cookbook head to the bottom of this post. 
Strawberry Lemonade Cupcakes adapted from Four Points Foodie

Printer Friendly Version

For The Cupcakes:
  • 1/4 cup (1/2 stick) unsalted butter, room temperature
  • 1/2 cup sugar
  • 1 egg
  • 1/2 tsp vanilla bean paste
  • 3/4 cup flour
  • 1/4 cup milk
  • 1/8 tsp of salt
  • 1/2 tsp baking powder
  • 1 Tbsp fresh lemon juice
  • Zest of 1 lemon
For The Strawberry Lemon Filling:
  • 1/4 cup diced strawberries
  • 1 1/2 tsp sugar
  • Zest of 1 lemon
For The Lemon Buttercream:
  • 1/4 cup (1/2 stick) unsalted butter
  • 1 tsp lemon zest
  • 1 cup powdered sugar
  • 2 tsp lemon juice
For The Cupcakes: Preheat oven to 350 degrees and line 8 cupcake tins with paper cups.  

In a mixer, cream butter until light and fluffy then add the sugar and mix well. Add the egg and the vanilla  then stir.  Alternately add the flour and the milk, mixing well after each addition. Add the salt and baking powder then scrape down the sides of the bowl. Add the lemon juice and zest then stir well.   

Scoop into cupcake papers filling no more than 3/4 full. Bake for 20-22 minutes or until a toothpick inserted into the centers comes out clean.  Remove from oven and allow to cool completely on a wire rack. 
For The Strawberry Filling: In a small bowl, mix the strawberries, lemon zest and the sugar and let sit for 10 minutes.   

For The Buttercream: In a medium bowl, cream butter until light and fluffy. Add lemon zest then slowly add the powdered sugar til well combined. Mix well then add the lemon juice and beat until fluffy.

To Assemble The Cupcakes: Cut the center of each cupcake out with a sharp paring knife. Spoon strawberry lemon filling into hole then using a large tip, frost over the filling on each cupcake.   

NOTE: Makes 8 cupcakes. Recipe can be doubled. 


The winner of "Whatever Happened To Sunday Dinner?" by Lisa Caponigri chosen by random.org is my friend Heather of Kitchen Concoctions. Yay! 
Related Posts with Thumbnails