Showing posts with label Sky High Cakes. Show all posts

Friday, August 2, 2013

A Special Anniversary- The Cake Slice Turns 5!


My boy turned 23 months today. That's exciting and terrifying all at the same time. One more month to go til his 2nd birthday! But that's not what I'm writing about today. August 1st is the 5th anniversary for The Cake Slice Bakers. I joined the the cake baking group in April of 2009 and have baked dozens of cakes through 5 different cookbooks and with many talented and amazing women. 

My very first cake that I baked with the group was Chai Cake with Honey-Ginger Cream from Sky High Cakes from Alisa Huntsman and Peter Wynne. I'm not a big fan of chai or ginger but I found this group helped me open my eyes and made me try different techniques and flavors that I wouldn't have otherwise tried. And I've made friends with these awesome women- we support and encourage each other, which is far better than cake. 

In celebration of our 5th anniversary, we decided to bake a special cake to help celebrate. I went back to the original and my favorite cake book of all and made a cake I've wanted to try for quite some time- Mocha Cake with Espresso Drizzle from Sky High Cakes. The cake is three delicious layers of dense, fudgey mocha cake, reminiscent of a flourless chocolate torte. In between the layers is a generous amount of a white chocolate, sweetened condensed milk, sticky espresso infused glaze. It was definitely a celebration cake. I'm so glad this baking group is around and I hope to bake along with them for many more years. 

Happy 5th Anniversary Cake Slice Bakers! If you're interested in keeping up with us, follow The Cake Slice Bakers on Facebook for baking tips, recipes and cake!


Mocha Cake with Espresso Drizzle 


Mocha Cake: 
  • 1 cup freshly brewed espresso or double-strength coffee
  • 2/3 cup unsweetened cocoa powder
  • 4 eggs
  • 2/3 cup buttermilk
  • 1 1/2 teaspoons vanilla extract
  • 2 2/3 cups cake flour
  • 2 2/3 cups sugar
  • 3/4 teaspoon baking powder
  • 1/2 teaspoon salt
  • 2 sticks (8 ounces) unsalted butter, at room temperature

Espresso Drizzle: (see note below)
  • 12 ounces good-quality white chocolate
  • 3/4 cup sweetened condensed milk
  • 6 tablespoons freshly brewed espresso or double-strength coffee

Preheat the oven to 350 degrees F. Butter the bottoms and sides of three 8-inch round cake pans or coat with vegetable cooking spray. Line the bottom of each pan with a round of parchment or waxed paper and grease the paper.

To make the cake: In a medium bowl, combine the hot espresso and cocoa powder, stirring to dissolve the cocoa. Let this mocha mixture stand until cooled to body temperature. Meanwhile, in another bowl, beat the eggs lightly.Whisk in the buttermilk and vanilla until well mixed.

Place the flour, sugar, baking powder, and salt in a large mixing bowl. With the mixer on low, evenly blend the dry ingredients. Add the butter and the mocha mixture, beating until well blended. Raise the mixer speed to medium and beat until light and fluffy, then add the buttermilk-egg mixture in 3 additions, scraping well and blending only to incorporate. Divide the batter among the 3 prepared pans.

Bake the cake layers for 35 to 38 minutes, or until a cake tester or wooden toothpick inserted in the center comes out almost clean but still moist. Let cool in the pans for about 10 minutes, then invert onto wire racks. Carefully peel off the paper liners and let the layers cool completely.

To make the espresso drizzle: (This makes a lot of glaze and could easily be halved- I had quite a bit leftover). Melt the white chocolate in a double boiler or in a medium heatproof bowl over a pan of very hot water.

Whisk in the sweetened condensed milk and espresso and continue whisking until smooth. Use while warm.

NOTE: The white chocolate didn't really want to melt and seemed rather stiff though it was still warm. Once I added the condensed milk and espresso it all came together. I had a few lumps but strained them out before pouring the glaze over the cake. I had a lot of glaze leftover. Next time, I would just make half a recipe.

To assemble the cake: Place one layer, flat side up, on a cake stand or serving plate. Pour 1/2 cup of the Espresso Drizzle onto the center of the layer and spread all the way to the edge, allowing it to drip slightly over the sides. Repeat with the second layer. Set the third layer in place, then pour the remaining drizzle on top and spread to the edges, making sure the glaze drips down the sides, covering all the edges.


Sunday, December 11, 2011

M-I-C-K-E-Y

For the past 3 years, I have made the birthday cake for the boys I was a nanny for. I made a sea themed cake, a Wonder Pets cake, a Dinosaur cake and this year the theme was Pirate Mickey! In the past, I've spent countless hours thinking of the cake, drawing it out, then finally baking and decorating. Time was never as issue for me until this year. My mom came over to help out with Hayden, but a child needs his momma and I had to take frequent breaks to coo with him. Speaking of Hayden, my friend got mad at me for not sharing a picture of him a couple posts back, so here he is. This is one of my favorites.

The boys wanted a pirate ship cake complete with a flag, treasure chest, dolphin and sea turtle cupcakes. They wanted Donald Duck, Minnie and Pluto there too. Well I just couldn't commit to doing that this year so I did a dessert table instead. Yes, that's still a lot of work but it was broken up over the course of two days and I wasn't spending the bulk of my day decorating with mouse ears. I made a 9-inch Mickey Mouse cake as well as Oreo cupcakes, sugar cookie bars, a Giant m&m cookie and rice krispy treats. Today I will share the recipes for the cake and the cupcakes.

The main birthday cake was vanilla buttermilk cake with strawberry jam between the layers and iced in cream cheese frosting. The Micky decoration is made up of fondant. This is the same recipe I've made every year and the kids' mother just loves it and requests it every time. I've shared this recipe before but there's now a printable link below. The cupcakes start off with Hershey's "Perfectly Chocolate" cake recipe. I intended to put chopped up Oreos in the batter but forgot about it until I had already stuck them in the oven. Perhaps you can give that a try. The frosting was a basic buttercream with finely chopped Oreos in it. I used a mixture of shortening and butter for the frosting for flavor and stability. It was light and creamy, wasn't too sweet and really did taste like an Oreo. I'll be making these again!

Hershey's "Perfectly Chocolate" Chocolate Cupcakes

Printer Friendly Version

  • 2 cups sugar
  • 1 3/4 cups all purpose flour
  • 3/4 cup Hershey's Cocoa
  • 1 1/2 teaspoons baking powder
  • 1 1/2 teaspoons baking soda
  • 1 teaspoon salt
  • 2 eggs
  • 1 cup milk
  • 1/2 cup vegetable oil
  • 2 teaspoons vanilla extract
  • 1 cup boiling water

Heat oven to 350°F. Line muffin cups (2-1/2 inches in diameter) with paper bake cups and set aside.

Stir together sugar, flour, cocoa, baking powder, baking soda and salt in large bowl. Add eggs, milk, oil and vanilla; beat on medium speed for 2 minutes. Stir in boiling water (batter will be thin).

Fill cups 2/3 full with batter. Bake 22 to 25 minutes. Cool completely before frosting.

Makes about 24-30 cupcakes.

Oreo Buttercream from Monica H

  • 1/2 cup unsalted butter, room temperature
  • 1/2 cup shortening or butter
  • 1 teaspoon vanilla extract
  • 2 Tablespoons milk
  • 3-4 cups powdered sugar
  • 14 Oreos, finely crushed in food processor

In a large bowl, cream butter, shortening, vanilla, and milk.

Add powdered sugar until desired sweetness is achieved, anywhere between 3 and 4 cups. Mix in crushed Oreos until well combined.

If your frosting is too thick, add a tad more milk to thin. If it's too thin to pipe with, add more sugar until it's the texture you want.

This is enough buttercream to frost a layer cake or about 30 cupcakes.

Vanilla Buttermilk Cake from Sky High: Irresistible Triple-Layer Cakes

Printer Friendly Version

Makes an 8-inch triple-layer cake

  • 4 whole eggs
  • 2 egg yolks
  • 2 teaspoons vanilla extract
  • 1 1/4 cups buttermilk
  • 3 cups cake flour
  • 2 cups sugar
  • 4 1/2 teaspoons baking powder
  • 1/2 teaspoon salt
  • 2 sticks unsalted butter, at room temperature

Preheat the oven to 350 degrees. Butter the bottoms and sides of three 8-inch round cake pans or spray to coat with nonstick cooking spray. Line the bottom of each pan with a round of parchment or waxed paper and grease the paper.

Put the eggs and yolks in a medium mixing bowl, add the vanilla and ¼ cup of the buttermilk. Whisk to blend well.

Combine the flour, sugar, baking powder and salt in a large mixer bowl; whisk to blend. Add the butter and the remaining 1 cup buttermilk to these dry ingredients, and with the mixer on low, blend together. Raise the mixer speed to medium and beat until light and fluffy, about 2 minutes.

Add the egg mixture in 3 additions, scraping down the sides of the bowl and mixing only until thoroughly incorporated. Divide the batter among the three prepared pan.

Bake the cake layers for 28 to 32 minutes, or until a cake tester inserted in the center comes out clean and the cake begins to pull away from the sides of the pan. Let the layers cool in the pans for 10 minutes; then carefully turn out onto wire racks, peel off the paper liners and let cool completely.

NOTE: This can be made in 3 9-inch pans, but the baking times will vary slightly, so keep an eye on them.

Thursday, May 20, 2010

Cupcakes and Cookbooks

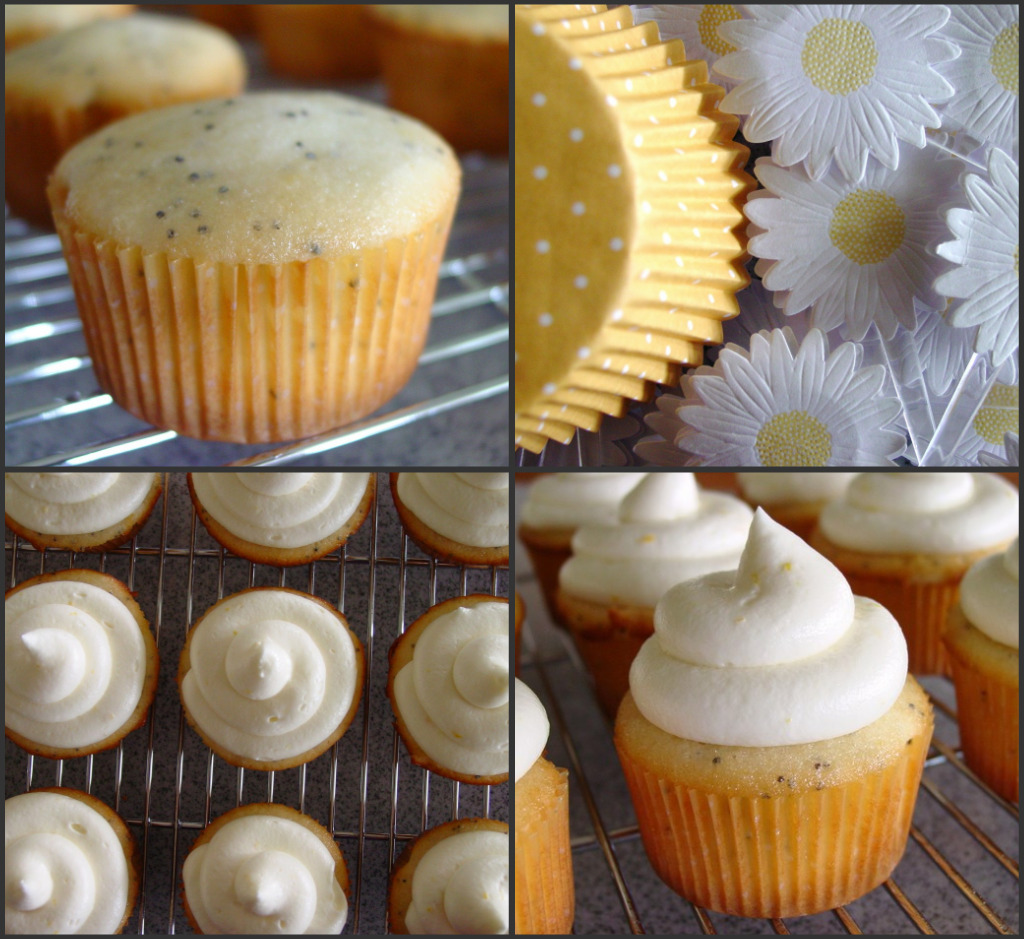
It's Cake Slice time again, and May's cake choice was Lemon Poppyseed Cake with Almond Frosting from Sky High Cakes by Alisa Huntsman and Peter Wynne. I was so glad to get the chance to bake from this book again since it is one of my favorites. Only instead of making a triple layer cake I decided to make these into cupcakes.

I did make a few adaptations but they were minor and didn't really change the recipe. Firstly I halved this recipe and ended up with 15 cupcakes. I did this because I thought it would be better for portion control. Secondly, I only used half the amount of poppyseeds the recipe called for because I used them all in/on my Everything No-Knead Bread. And lastly, instead of adding almond extract to the cream cheese frosting, I added lemon zest because there are nut allergies in my family.

These cupcakes were different than any other lemon poppyseed cake I've had. Mostly because it was a white cake used for the base. There are no egg yolks in this recipe so the texture is very light and fluffy, but still firm. They're tender but not terribly moist. Luckily they're brushed with a lemon syrup that sweetens and moistens them up.

I think an almond flavoring in the frosting would have been delicious but the lemon was refreshing and bright and complimented the cupcakes perfectly. It also piped really well, thanks to the boatload of powdered sugar :-) I baked them in these Spring-y liners and picks from the Martha collection that I found last year. I had been waiting for the perfect occasion to use them and this Mother's Day was it. I then garnished them with more sugared lemon zest. I hope you like 'em!

Lemon Poppyseed Cake from Sky High

Cake:
  • 3 cups cake flour
  • 1 3/4 cups sugar
  • 4½ tsp baking powder
  • ½ tsp salt
  • 3 tbsp poppy seeds
  • 2 sticks (8 ounces) unsalted butter
  • Zest of 1 large lemon
  • 1¼ cups buttermilk
  • 5 egg whites

Lemon Syrup:

  • 1/3 cup water
  • 1/4 cup sugar
  • Juice of 1 large lemon

Frosting:

  • 8 ounces cream cheese
  • 2 sticks (8 ounces) unsalted butter
  • 5 cups confectioners sugar
  • 1 tbsp almond extract or finely grated zest of 1 lemon

Cake: Preheat the oven to 350F. Grease three 8 inch cake pans and line the bases with parchment paper. Combine the flour, 1¾ cups sugar, baking powder, poppy seeds and salt in a mixing bowl. Mix gently to combine.

Add the butter, lemon zest and 1 cup of buttermilk to the flour. Beat on low until completely mixed. Raise the speed to medium and beat for 1-2 minutes until lighter in color.

In a medium bowl, combine the egg whites with the remaining ¼ cup buttermilk, whisk to blend thoroughly. Add the egg white mixture to the batter in 2-3 additions, scraping down the sides of the bowl and beating only enough to incorporate the mix. Divide the batter between the three pans.

Bake for 25 to 30 minutes until the cakes are golden brown, spring back when touched lightly in the centre, and a cake tester comes out clean. Leave to cool in the pans for 10 minutes before turning out.

While the cake layers are cooling, make a lemon syrup.

Syrup: In a small pan combine the remaining ¼ cup sugar, water and lemon juice. Bring to the boil, stirring to dissolve the sugar.

Generously brush the cakes with the lemon syrup while they are still warm. Then allow the cakes to cool completely.

Frosting: In a large mixing bowl beat the cream cheese and butter with an electric mixer until light and fluffy. Gradually add the confectioners sugar, 1 cup at a time, beating well between each addition. Add the almond extract or lemon zest and then continue to beat well for 3-4 minutes until light and fluffy.

To complete the cake, place one layer, top side down, on a cake plate and spread about a fifth of the frosting over the cake to cover evenly. Repeat with the second layer and place the third layer on top. Frost the top and sides of the cake with the remaining frosting.

Makes 1 x 8inch triple layer cake or 30 cupcakes.

NOTE: I added lemon zest to the cream cheese frosting instead of the almond extract.

I halved the recipe and made 15 cupcakes.

Be sure to stop by the other Cake Slice Bakers to see their cakes!
___________________________________________________

WAIT! I have a giveaway for you!

You have a chance to win ANY cookbook your little heart desires. Yes, it's true! This giveaway is sponsored by Snubbr and all you have to do is leave me a comment on this post telling me what cookbook you'd like to win and why. Be sure to answer both questions! That's it, just make sure it's a cookbook still in print so they can send it to you :-)

A winner will be chosen in one week by the folks at Snubbr. Be sure I have a way of contacting you if you win.

At the request of Snubbr, this giveaway is only open to US residents.

Best of luck to you all!

Thursday, April 15, 2010

Isn't She Lovely?

Ah, isn't this a beauty? Every year for my sisters' birthday I make her a special strawberry cake. I usually make her a strawberry layer cake topped off with a strawberry flower using this recipe. But this year I wanted to make something a little different, just as pretty and much simpler.

To hull the strawberries, I used a new gadget from Chef'n called the Stem Gem. You push in the green stem, which pushes the prongs out. Then you insert it into the stem of the strawberry and let go of the button. The gadget holds the stem tight, then you twist it and pull it out. It was pretty effective at removing the hull and nothing more.

You see, in a matter of 10 days there are 3 birthdays in my family and I usually make all the cakes. I'm happy to do it, but I get tired of making batches of frosting. So this year, my father in law got a banana pudding cake, my sister received this strawberry shortcake and my mother in law got a pretty glazed Bundt. That recipe will come a little later, but for now here's a little strawberry goodness.

This recipe comes from Sky High: Irresistable Triple Layer Cakes from Alisa Huntsman and Peter Wynne. I've many many cakes from this book and they've all been delicious. I remembered The Food Librarian made this cake so I visited her blog to read her notes on it. The original recipe called for Rose Water and vanilla to macerate the berries in. I just wanted to use sugar and Mary agreed that was a good idea. I also wanted to bake the cake in 2 larger pans rather than 3 6-inch pans and it just so happens that Mary made it again and did the same thing recently. Good minds think alike, I guess :-)

This cake was light and fresh. It was creamy and dreamy. The berries were bursting with sweetness and as Mary says, "it's like eating a cloud of summer". My sister and the rest of my family really liked this cake. My mom liked it so much she had 2 big honkin' pieces. (Sorry mom, I ratted you out!) Mr. H was hesitant because it didn't have chocolate, but later that night he said he thought it was good. The only thing that would make it better was if it were chocolate cake instead of vanilla and chocolate mousse instead of whipped cream! Guess you can't please them all.

Strawberry Shortcake adapted from Sky High Cakes

Cake:

  • 5 tablespoons unsalted butter, room temperature
  • ¾ cup vanilla sugar
  • 1 teaspoon vanilla extract
  • 2 eggs
  • 1 ½ cups cake flour
  • 2 ½ teaspoons baking powder
  • ¼ teaspoon salt
  • 2/3 cup (160ml) buttermilk

Fresh strawberry filling:

  • 2 pints strawberries, small if possible
  • ½ cup vanilla sugar

Whipped cream:

  • 1 ½ cups heavy cream
  • 2 tablespoons sugar

Garnish:

  • a few whole strawberries, sliced in half if desired

Preheat the oven to 350ºF. Grease the bottoms and sides of 2 8-inch round cake pans. Line the bottom of each with a round of parchment or baking paper and grease the paper.

For the cake:

In a large mixing bowl, cream the butter, sugar and vanilla with an electric mixer until light and fluffy. Add the eggs, one at a time, scraping down the sides of the bowl and beating well after each addition. Sift together the flour, baking powder and salt. Add these dry ingredients to the batter, alternating with the buttermilk, in 2 or 3 additions. Beat well. Divide the batter among the prepared pans.

Bake the cake layers for 18-23 minutes or until a cake tester or wooden toothpick inserted in the center comes out clean. Allow to cool in the pans for 10 minutes then invert onto wire racks, carefully peel off the paper and allow to cool completely.

For the filling:

Wash and hull the berries and cut them into thin slices. Place in a bowl and add the sugar. Stir to coat them well, cover the bowl, and let the berries macerate at room temperature until they exude their juices, about 1 hour.

For the cream:

In a large chilled bowl, with chilled beaters, whip the cream with the sugar until stiff – there will be about 3 cups.

Assembling the cake:

Place one cake layer, flat side up, on a cake stand or serving plate. Top with half of the fresh strawberry filling, spooning it over the entire layer and making sure any juices go onto the cake layer and not the plate, if possible. Top this layer with half of the whipped cream, spreading it evenly over the berries. Repeat with the second cake layer, using up the remaining berries and whipped cream. Garnish with whole berries if desired.

For best flavor, cover the dessert with a cake dome or loose plastic wrap and refrigerate for about 2 hours before slicing. Serve with the remaining strawberry filling on the side.

Serves 8-10
Who knew donkeys liked strawberries?

Tuesday, November 3, 2009

Birthday Cake

Today is my 2nd Blogoversary and I thought a cake was in order. This is no ordinary cake though. This cake was made in memory of my son Sam's 3rd birthday in addition to Tin Roof Ice Cream I made in August.

I chose a stunning checkerboard cake from Sky High Cakes. You need a special cake pan to make this cake. I got mine off of Craigslist and it's made by Pampered Chef, but you can get your from Amazon. Anyway, the set includes 3 9-inch nonstick pans and a plastic insert that looks like a bulls eye. This allows you to color the different layers so that when you stack and cut into the cake it looks like a checkerboard pattern.

I decorated the pure white cake by adding another layer of thickened chocolate ganache. I also made a couple butterflies and a dragonfly to place on the cake. Dragonflies and butterflies have always reminded me of my boys because when we went to the cemetery to pick the perfect spot to lay him to rest, there were TONS of dragonflies and butterflies fluttering around. Now when I think of one, I think of the other. You can learn how to make them by picking up a copy of Hello Cupcake!

I only had one issue with this cake and it was completely my fault- I forgot to grease the pans! And I didn't realize it until after I filled them- doh! Believe me, many prayers were said throughout the process and thankfully they came out just fine. This cake has to be my all time favorite as far as looks go. I just thought it was so pretty and simple, yet the interior was a whole other dramatic surprise. It was a lot of work, but my son is so worth it. I hope I made him proud.

Black & White Checkerboard Cake

from Sky High

Makes 1 8 or 9-inch 3 layer cake

  • 3 cups cake flour
  • 2 cups sugar
  • 4 1/2 tsp. baking powder
  • 1/2 tsp. salt
  • 2 sticks (8 oz.) unsalted butter, room temp.
  • 1 1/4 cups buttermilk
  • 4 whole eggs
  • 2 egg yolks
  • 2 tsp. vanilla extract
  • 2 oz. unsweetened chocolate, melted and cooled
  • 2 oz. white chocolate, melted and cooled
  • Semisweet Ganache (recipe follows)
  • White Chocolate Buttercream (recipe follows)

Preheat the oven to 350 degrees F. Butter 3 checkerboard cake pans, 8 or 9 inches in diameter. Line the bottoms with parchment or waxed paper and butter the paper.

Place the flour, sugar, baking powder, and salt in a large mixer bowl. With the mixer on low speed, blend for 30 seconds. Add the butter and 1 cup of the buttermilk and beat just until combined and evenly moistened. Raise the speed to medium and beat until light and fluffy, 2 to 3 minutes.

In a medium bowl, whisk together the whole eggs, egg yolks, remaining 1/4 cup buttermilk, and vanilla. Add to the batter in 2 or 3 additions, scraping down the sides of the bowl and beating only until incorporated after each addition; do not overmix.

To make the dark chocolate batter, whisk 1 cup of the vanilla batter into the melted unsweetened chocolate, then gently whisk in another 3 cups batter.

For the white batter, whisk 1 cup of the vanilla batter into the melted white chocolate and whisk back into the remaining vanilla batter in the bowl as gently as possible. Using the dividers provided in the set and 2 14-inch pastry bags fitted with plain 3/8-inch tips (I used Ziploc bags for this), fill the pans about half full. The cakes will rise to the top when done. You'll need 2 layers with dark chocolate rings each and 1 layer with 2 vanilla rings.

Bake for about 25 minutes, or until a cake tester or wooden toothpick inserted in the center comes out clean. Allow the layers to cool in the pans for 10 minutes before turning out onto wire racks. Peel off the paper and let cool completely.

Semisweet Ganache

Makes 1 cup

  • 6 oz. semisweet chocolate, coarsely chopped
  • 1/2 cup heavy cream

Place the chocolate in a heatproof bowl. Heat the cream to a simmer, pour over the chocolate, and let stand for 5 minutes. Whisk until smooth.

White Chocolate Buttercream

Makes about 5 cups

  • 3 egg whites
  • 4 oz. good quality white chocolate
  • 1 cup sugar
  • 1/4 cup water
  • 3 sticks (12 oz.) unsalted butter, room temp.

Put the egg whites in the bowl of an electric mixer and set the mixer up for use. Melt the white chocolate about halfway in a double boiler over simmering water. Remove from the heat, stir until smooth, and set aside to cool.

Combine the sugar and water in a small heavy saucepan. Set over medium heat and stir to dissolve the sugar. Bring to a boil and cook, without stirring, until the syrup reaches the soft-ball stage; 238 degrees F on a candy thermometer.

Immediately start beating the egg whites on medium-low speed. Slowly add the syrup in a thin stream, taking care not to hit the beaters. Continue to whip until the mixture is body temperature and a stiff meringue has formed.

Reduce the speed to low and add the butter 2-3 tablespoons at a time. When all of the butter is incorporated, beat on medium speed until the frosting appears to curdle. Continue to whip, and it will suddenly come together. At this point, add the melted white chocolate and mix well.

To Assemble the Cake:

Place one of the layers with 2 chocolate rings on a cake stand or large serving plate. Spoon half of the semisweet ganache onto the cake and spread it evenly over the layer, leaving a generous 1/4-inch margin around the edges. Place the only layer with 2 vanilla rings onto the cake (this is the middle layer). Spread the remaining ganache over this layer, again leaving a 1/4-inch margin. Top with the final cake layer, aligning the sides carefully so that the pattern will be successful. To make frosting easier, you may want to refrigerate the cake briefly to allow the ganache to set up first.

Frost the sides and top with the white chocolate buttercream, carefully smoothing out the frosting.

NOTE: I added another layer of thickened ganache to the top of the cake. This is not part of the recipe.

___________________________________________________

And because gifts are nice to receive on birthdays, I'm going to be giving away 2 of the items below to get your holiday baking off to a good start.

2 winners will receive a Holiday Baking Pack from McCormick. The pack includes a full size bottle of vanilla extract, ground cinnamon, and 2 smaller containers of ground nutmeg and ginger, as well as a recipe booklet. And because they seem to be difficult to find on some areas I'm also including a bag of Hershey's Cinnamon Chips.

You have until Tuesday, November 10th to leave me a comment on this post telling me about your most memorable birthday. I want details people! Tell me about the cake, the atmosphere, how old you were, what made it so special.

One comment per person please. Giveaway open to the USA and Canada. Extraneous comments will be deleted. Winners will be chosen by Random Number Generator and anncounced next Wednesday. Good luck.

Sunday, September 20, 2009

Triple Chocolate Cake and A Winner!

This cake was chose by the Cake Slice Bakers for this months cake. It also happens to be the last cake we are baking as a group from Sky High Cakes. It has been a pleasure baking this from this amazing book, but I look forward to different styles and flavors of cake from our new baking book, Southern Cakes by Nancie McDermott. Tune in next month for that wonderful cake!

Since we are switching to a new baking book, as are also accepting new members to bake along with us. We only bake one cake a month that we all vote on, then blog about it on the 20th. If you're interested in becoming a member (and I hope you are!) you can email Katie at: (appleandspice [AT] hotmail.co.uk) with ‘Cake Slice Member’ as the subject.

On to this fabulous confection-- Triple Chocolate Fudge Cake! Sounds great doesn't it? It consisted of a chocolate mayonnaise cake made with strong coffee and a bit of cinnamon. The mayonnaise serves in place of oil or butter as there are still eggs in this cake. It's filled with a white chocolate mousse and covered in sour cream fudge! So this cake uses cocoa powder, white chocolate, and dark chocolate. Yum!

I made 2 versions of this cake-- a 6-inch triple layer cake and a 9-inch double layer cake from one recipe. The 6-inch cake was a paid order for my boss' husband's birthday. He is a major chocoholic and loved this. The larger cake stayed home with Mr. H and I, but we graciously shared with our neighbors, family and friends. A little went a long way.

I only had one minor problem with this cake and it was the frosting. It wasn't really a problem it just wasn't the consistency I wanted. It makes a loose but fudgy frosting that's supposed to be the consistency of mayonnaise. It was just difficult to spread over the cake so I added about a cup of sifted powdered sugar and a little vanilla to thicken and smooth it out. It became very thick almost immediately so I then added a little milk and called it perfect.

It spread beautifully and I was even able to pipe a simple border on the cakes. A few of you have asked me how I get my cakes so smooth. I use an off-set spatula and a rotating cake stand. I haven't always done it this way though. I just bought the revolving cake stand a couple months ago, but it has made my life so much easier and my cakes so much smoother. I'm in love with it. See look how smooth. Does anyone else get turned on by super smooth frosting? Anyone?

Triple Chocolate Fudge Cake from Sky High Cakes
Chocolate Mayonnaise Cake
  • 2 ¼ cups all purpose flour
  • 1 cup unsweetened cocoa powder
  • 2 ¼ tsp baking soda
  • 1 ¼ tsp baking powder
  • 1 tsp salt
  • ½ tsp ground cinnamon
  • 2 ½ ounces unsweetened chocolate, chopped
  • 1 cup milk
  • 1 ¼ cups hot, strongly brewed coffee
  • 2 eggs
  • 1 cup mayonnaise (not low fat or fat free)
  • 1 ½ tsp vanilla extract
  • 2 ¼ cups sugar

Preheat the oven to 350 degrees F. Butter the bottoms and sides of three 9 inch round cake pans. Line the base of each pan with parchment.

Sift together the flour, cocoa powder, baking soda, baking powder, cinnamon and salt. Set aside.

Put the chocolate in a large heatproof bowl. Bring the milk to a simmer. Pour the hot coffee and milk over the chocolate. Let stand for a minute, then whisk until smooth. Let the mocha liquid cool slightly.

In a mixer bowl, beat together the eggs, mayonnaise and vanilla until well blended. Gradually beat in the sugar. Add the dry ingredients and mocha liquid alternately in 2 or 3 additions, beating until smooth and well blended. Divide the batter among the 3 prepared pans.

Bake for 25 to 28 minutes, or until a cake tester inserted in the centre comes out almost clean. Let the cakes cool in their pans for 10-15 minutes before un-molding onto a wire rack and carefully peeling off the paper. Leave to cool completely.

NOTE: Do not use salad dressing, Miracle Whip or Lite Mayo. I used Hellman's or Best Foods Real Mayonnaise.

White Chocolate Mousse

  • 4 ounces white chocolate, chopped
  • 1 cup heavy cream
  • 1 egg white
  • 1 tbsp sugar

Melt the white chocolate with ¼ cup cream in a double boiler. Whisk until smooth. Remove from the heat and let the white chocolate cream cool to room temperature.

When it has cooled, beat the remaining ¾ cup cream until soft peaks form. In a clean bowl whip the egg white with the sugar until fairly stiff peaks form.

Fold the beaten egg white into the white chocolate cream, then fold in the whipped cream until blended. Be sure not to over mix.

Sour Cream Chocolate Icing

  • 12 ounces bittersweet or semi sweet chocolate, chopped
  • 1 stick (4 ounces) unsalted butter
  • 2 tbsp light corn syrup
  • ¼ cup half-and-half at room temperature
  • ½ cup sour cream, at room temperature

Melt the chocolate with the butter and corn syrup in a double boiler over barely simmering water. Remove from the heat and whisk until smooth.

Whisk in the half-and-half and sour cream. Use while still soft.

NOTE: This was too soft for me so I added about a cup of sifted powdered sugar, a 1/2 tsp. of vanilla and whisked it together. It was a little thick so I added milk to thin.

Assembly: Place one layer, flat side up, on a cake stand or serving plate. Cover the top evenly with half the white chocolate mousse, leaving a ¼ inch margin around the edge. Repeat with the second layer and the remaining mousse. Set the third layer on top and pour half the sour cream chocolate icing over the filled cake. Spread all over the sides and top. Don’t worry if some of the cake shows through. This first frosting is to seal in the crumbs, and is known as a crumb coat. Refrigerate the cake for 30 minutes.

After this time cover the cake with the rest of the icing, smoothing it down the sides. It should be the consistency of mayonnaise. Use a palette knife or the back of a spoon to swirl the frosting around the cake.

* * * * * * * * * *
Thank you all so much for leaving me comments about your pets, your friends, your hairy children. I loved reading each and every one of them. They made me laugh, they made me smile, they made me sad. But mostly I just appreciated the love you have for them. They are just so special, aren't they?

On to the winner of my giveaway.... lucky number 44!

#44 is fellow Texan, Adele from Simply Delicious! Congratulations Adele. Contact me with your address so I can send your gift out.

And be sure to check out all the other fabulous chocolate cakes from the Cake Slice Bakers!

Related Posts with Thumbnails