Showing posts with label Oreos. Show all posts

Tuesday, October 28, 2014

Chocolate Fudge Oreo Bundt for National Chocolate Day!


I had a major craving for chocolate cake one night. It was almost time to start dinner, so I didn't really have time to search for a recipe or bring butter to room temperature so I pulled out one of my favorite baking books- Bundt Classics. I immediately found a recipe that looked good to me and I had all the ingredients on hand. Of course, I added my own touches to it and it took this cake to a whole new level of chocolate deliciousness!


This recipe starts with a chocolate cake mix but you'd never know it. I took the help of the mix and got this cake in the oven in less than 15 minutes. It baked while I made supper then we had it for dessert. Win! I have to be honest, when I was making this, I had no intention of adding Oreos to the batter. I was getting the ingredients from the pantry and Hayden grabbed the Oreos- positioned right at his eye level. He said we needed to add Oreos, so I did! I keep that little genius child around for a reason ;-).


This cake was over the top, a chocolate lovers dream! I mean really, there's the chocolate cake, chocolate pudding, chocolate syrup, chocolate chips and chocolate cookies. Then I had the audacity to top it off with silky ganache and even more chocolate chips. This was fudgy and decadent and cured my cravings. Coincidentally, it's National Chocolate Day, so make this Bundt! 


Chocolate Fudge Oreo Bundt adapted from Bundt Classics

Printer Friendly Version

Cake:
  • 1 (18.25 oz) box chocolate cake mix
  • 1 (3.4 oz) box instant chocolate pudding
  • 1 cup sour cream
  • 1/2 cup warm water
  • 1/3 cup vegetable oil
  • 1/4 cup Hershey's chocolate syrup
  • 1 teaspoon vanilla extract
  • 4 large eggs
  • 1 cup mini chocolate chips
  • 10 Oreos, coarsely broken

Ganache
  • 1/2 cup heavy cream
  • 1/2 cup chocolate chips

Decoration: 
  • Mini chocolate chips or Oreos, optional

To Make The Cake: Preheat oven to 325 degrees F. Generously grease a 12 cup Bundt pan with non-stick baking spray (with flour). Set aside. 

In a large mixing bowl, combine all the cake ingredients except the chocolate chips and Oreos. Blend with a hand mixer over medium speed until well blended. Scrape the sides of the bowl down and stir in the chocolate chips and crushed Oreos. 

Pour the batter into the prepared Bundt pan. Bake for 55-65 minutes or until a toothpick inserted into the center comes out clean. Cool cake in pan for 20 minutes. Unmold cake onto a cooling rack or a serving platter and allow to cool completely. 

To Make The Ganache: In a small mixing bowl, heat cream in the microwave until hot and steamy, about 60 seconds. Add the chocolate chips to the hot cream and let them sit for 5 minutes. With a spatula, gently stir the chocolate chips and cream together until the mixture comes together and becomes shiny and silky. Do not use a whisk or stir too vigorously, this will cause air bubbles in the ganache. If tiny lumps of chocolate remain, let the mixture sit a little longer, then stir again until smooth. 

The longer the mixture sits, the thicker it becomes. Allow ganache to thicken a bit before pouring onto cooled cake. You want it pourable but not so thin that it runs off the side of your cake. 

Immediately top with additional mini chocolate chips or Oreo cookies, if desired. Allow ganache to set before serving. Store leftover cake in an airtight container at room temperature.


Friday, October 12, 2012

Because Sometimes You Just Need Pie


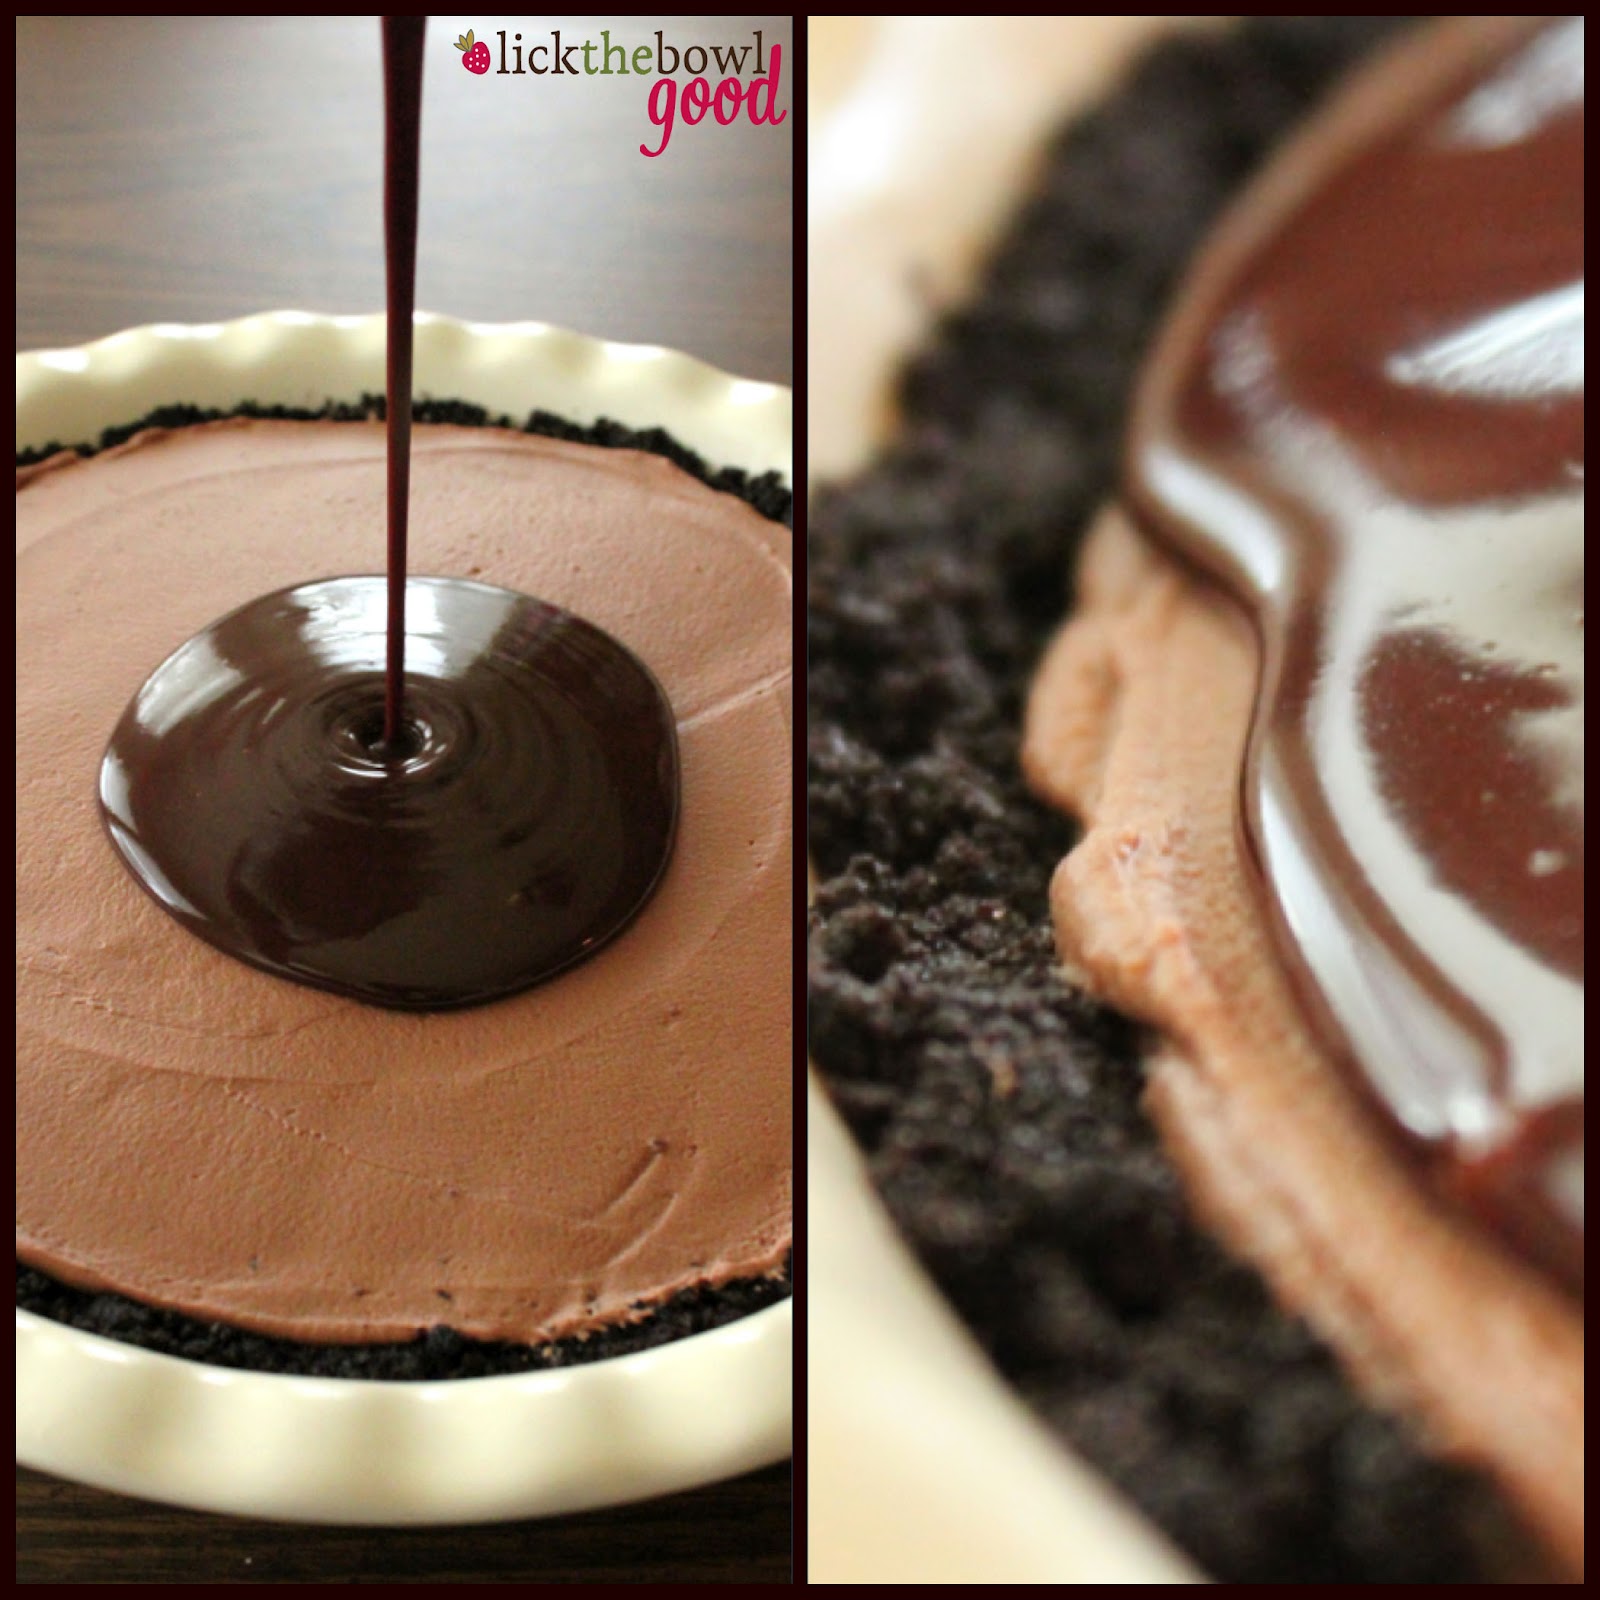
Pie is just one of those comforting desserts that warms your heart and soothes your soul. It doesn't matter if it's warm from the oven crumb topped apple pie or pucker up cool and tangy key lime pie eaten al fresco in the middle of Summer. Pie is just a comfort food, for me at least. So last month when we (The Cake Slice Bakers) were faced with the challenge to make a peanut butter and chocolate mousse "cake" I knew I'd be turning it into a pie. I use the term "cake" loosely, because there's not one part of this recipe that goes into the oven. You start with a cookie crust, layer in some fluffy peanut butter and chocolate mousse and glaze it with a healthy dose of deep, dark and rich ganache. Sounds good, right?
Peanut butter and chocolate go hand in hand. Most people love that combination, I've just never been a huge fan of it. I know you're all looking at me like I'm crazy, but it's true. I love peanut butter and I love chocolate, separately, on their own, not together. My brother LOVES it though so I made this pie for him. Lately we've all been dealing with some financial stuff. It seems everywhere I turn someone is. This economy is just rough and you do what you have to do to get by. If you're not struggling in some way, kudos to you! For my brother, he had to sell his beloved truck. He is a car "collector"- his favorites being old Cadillacs. He needed some cash flow and this truck needed to find a new home. He was kind down in the dumps about it so this pie was made for him. It was a "I'm sorry this economy sucks and you had to sell your truck, but I still love you" kind of pie. And sometimes we all need that. 

In fact right now, I could use about a dozen of these kinds of pies. If you're in the same situation, consider this pie for you! There are several steps to make this pie and several dishes to wash! There's a bowl for the crust, one for the whipped cream, another two for the mousse layers and another for the glaze, plus a food processor a saucepan and any measuring tools and spatulas. But is it worth it? heck yes! It seems rather lengthy and involved but each step is fairly simple and straightforward. It just takes time and patience but in the end you'll be rewarded with a creamy and decadent pie sure to warm your heart even if you never turn the oven on. 


Chocolate Peanut Butter Mousse Pie adapted from The Cake Book by Tish Boyle

Printer Friendly Version 

For The Chocolate Wafer Crust: 
  • 1 1/2 cups chocolate cookie crumbs (I used Oreos, with the filling scraped out)
  • 5 Tbsp. unsalted butter, melted
For The Peanut Butter Mousse: 
  • 2.5 oz. cream cheese, softened
  • 1 Tbsp. unsalted butter, softened
  • 2/3 cup powdered sugar
  • 1/3 cup creamy peanut butter
  • 1/8 tsp. salt
  • 1 1/4 cups heavy cream
For The Chocolate Mousse: 
  • 2.5 oz. bittersweet chocolate, coarsely chopped
  • 2 oz. milk chocolate, coarsely chopped
  • 3 Tbsp whole milk 
  • 3 Tbsp granulated sugar
  • 1/2 tsp. vanilla extract
For The Chocolate Glaze: 
  • 3 oz. semisweet chocolate, finely chopped
  • 1/3 cup heavy cream
  • 1/2 tsp. vanilla extract
To Make The Chocolate Crust: In a medium bowl, stir together the cookie crumbs and the melted butter. Stir until well combined. Pat the mixture into the bottom and up the sides of a 9-inch deep dish pie plate. Refrigerate the crust while you make the peanut butter mousse. 

To Make The Peanut Butter Mousse: In a large bowl using an electric mixer, beat the cream cheese and butter at medium speed until creamy, about 1 minute. Add the powdered sugar and mix until well blended. Add the peanut butter and salt and mix until well blended, scraping down the sides of the bowl as necessary. Set bowl aside while whipping the cream. 

In a large clean bowl, beat the heavy cream with an electric mixer at high speed until soft peaks form. Gently fold 1/2 cup of the whipped cream into the peanut butter mixture until almost blended. Fold in another 3/4 cup of the whipped cream until completely blended and no white streaks appear. 

Scrape the peanut butter mousse into the prepared pie pan and spread it into an even layer. Refrigerate while you make the chocolate mousse. Cover the remaining whipped cream and refrigerate ready to use. 

To Make The Chocolate Mousse: Place both chocolates in the bowl of a food processor and process until finely ground. Leave the chocolate in the food processor. 

In a small saucepan, combine the milk and sugar and bring to a boil over medium heat, stirring frequently until the sugar dissolves. With the food processor running, pour the hot milk through the feed tube, and process until the chocolate is completely melted. Scrape down the sides of the bowl, add the vanilla extract, and process until well blended. Scrape the mixture into a medium bowl. 

Using a rubber spatula, gently fold 1/4 of the reserved whipped cream into the mousse. Fold in the remaining cream until completely blended. Scrape the mousse onto the peanut butter mousse layer and smooth the top using an offset spatula. Refrigerate the pie while making the chocolate glaze. 

To Make The Chocolate Glaze: Place finely chopped chocolate into a medium bowl. 

In a small saucepan, bring the cream to a boil.  Pour cream over the chocolate and let sit for a few minutes. Add the vanilla, then gently stir until the chocolate is completely melted and the glaze is smooth. Do not over mix or you'll incorporate air bubbles. Let the mixture cool at room temperature for 10 minutes before using. 


Pour the cooled glaze over the chocolate mousse layer. Using a small metal spatula, spread the glaze evenly over the top of the pie. Sprinkle the top with peanuts if desired, for garnish, before the glaze sets. 

Chill the pie for at least 2-3 hours before serving. Loosely cover pie and store any leftovers for up to 3 days in the refrigerator. 


Friday, August 3, 2012

Creamy Oreo Birthday Pie and A Winner!

Happy 17th Birthday Aaron!


We are on our way out of town for a long weekend to visit family. My aunt had a baby a couple weeks ago and we can't wait any longer to meet him! As thrilled as we are about being there, we are not so enthusiastic about the 9-hour road trip that follows. We usually just travel across town with Hayden and last October we even went to the pumpkin patch, about an hour away, but that's it. I'm trying to stay composed but internally I'm freaking out! 9 looooooong hours...

I know people travel all the time with kids and I'm sure things will be just fine, I'm just concerned about keeping him entertained for that long. And napping, and feeding. haha! My mom, brothers and cousin are coming with us so we will have help, I'm just praying there are no meltdowns. And I don't mean by Hayden :-) How does one travel without packing up the entire house? I don't think I realized how much "Stuff" that little guy has. 


This Oreo pie has nothing to do with our trip, but it was delicious. I made it for my brother's 17th birthday back in May and forgot to blog it. It was tangy and creamy and sweet, and loaded with chopped up Oreos. After refrigerating the pie, the cookies soften and become one with the cream cheese filling. My brother and Mr. H both loved this birthday pie and one of the best parts about it is that you don't have to turn the oven to make it. This pie is super rich so a small slice goes a long way. A glass of icy milk helps wash it all down. Enjoy and wish us luck this weekend! I'll let you all know how it goes when we get back.

Creamy Oreo Pie adapted from Kraft

Printer Friendly Version 
  • 36 Oreo Cookies, divided 
  • 1/4 cup butter, melted
  • 1 pkg. (8 oz.) cream cheese, softened
  • 1/3 cup sugar
  • 2 cups whipped cream
  • Additional Oreos and whipped cream for garnish, optional
Crush 26 of the cookies into crumbs. Mix with butter until well combined then press firmly into the bottom  and up the side of a 9-inch pie plate. Refrigerate while preparing the filling. 

Chop 10 of the remaining cookies and set aside. Beat cream cheese and sugar in a medium bowl with an electric mixer on medium speed until light and fluffy. Add the chopped cookies and whipped cream, stirring gently until well blended. Spoon into prepared crust. 

Garnish with mounds of whipped cream and additional Oreos. Refrigerate at least 2 hours or until firm, before serving. 


And the winner of the $25 Walmart gift card is commenter #65  Sharon B who said...

My perfect steak dinner is one with my husband. We work in different cities right now and only see each other on the weekends. Some of the best times we have these day are over dinner!"


Congratulations Sharon B! Please email me with your mailing address and I'll send your gift card right out to you. 

Friday, May 25, 2012

Milk's New Favorite Cookie!


I'm not usually one to follow food trends. I like to bake and eat what I want, when I want, and not just because "everyone else is doing it". Take these Oreo stuffed chocolate cookies for example. I remember seeing them A LOT last year but they didn't really appeal to me. But a few weeks ago, things changed when I was wanting to bake something using Oreos and Mr. H was wanting plain chocolate chip cookies. Insert this insane cookie and both our cravings were met.


Hayden at 6 months- He's changed so much already!
I googled and saw several different recipes for the Oreo stuffed chocolate chip cookie and almost all of them linked back or credited Jenny of Picky Palate with this creation, so that's the recipe I went with. When I say these cookies are insane, I mean it. Let me prove it to you. Firstly, they are ginormous. Everyone kept saying they were "huge" and "really large" but what exactly does that mean? How "huge" can a cookie be?   Autumn let me borrow her tennis ball so I demonstrate the size of these cookies. Crazy, right? 


Jenny used Double Stuf Oreos, but I like the Reduced Fat Version because they have slightly less filling and aren't as greasy feeling on the tongue, but that's just personal preference. It's obviously not about calorie control when you're stuffing cookies into cookies. Mr. H likes the chocolate stuffed ones so I used those as well. You can use whatever type of Oreo you want here, even the store brand...I won't tell. 


Another reason these cookies are insane, is because each cookie is the equivalent of three cookies on one. You take a scoop of cookie dough, put it on top of the Oreo, you take another and put it on the bottom and you make an Oreo sandwich. Then you carefully squish it all together, wrapping the dough around the Oreo. You want to be careful not to break the Oreo when you do this. The Oreos with more filling tend to slide around a bit and are more prone to breaking. You can also refrigerate or freeze the Oreos to prevent breakage if you want, but it's not ultimately necessary. They will still taste the same. I think you could easily bake these in a muffin tin instead of a cookie sheet if you wanted and achieve a similar result if you're opposed to cookie making (ahem, Ingrid)

These cookies are ridiculously rich and pair well with a tall glass of icy milk. And one of them goes a long way. We cut ours in half and ate them that way, since they were easier for dunking and so we could choose which filling we wanted. These are fun and different and would make any Oreo cookie lover very happy. 

Oreo Stuffed Chocolate Chip Cookies from Picky Palate

Printer Friendly Version 

  • 1 cup butter, softened
  • 3/4 cup light brown sugar, packed
  • 1 cup granulated sugar
  • 2 large eggs
  • 1 Tablespoon pure vanilla
  • 3 1/2 cups all purpose flour
  • 1 teaspoon salt
  • 1 teaspoon baking soda
  • 10 oz bag chocolate chips
  • 1 package Oreo Cookies (not all will be used)
Preheat oven to 350 degrees F.  
In a stand or electric mixer cream butter and sugars until well combined.  Add in eggs and vanilla until well combined.
In a separate bowl mix the flour, salt and baking soda.  Slowly add to wet ingredients along with chocolate chips until just combined.  
Using a cookie scoop take one scoop of cookie dough and place on top of an Oreo Cookie.  Take another scoop of dough and place on bottom of Oreo Cookie.  
Seal edges together by pressing and cupping in hand until Oreo Cookie is enclosed with dough.  
Place onto a parchment or silpat lined baking sheet and bake cookies 9-13 minutes or until cookies are baked to your liking.  Let cool for 5 minutes before transferring to cooling rack. 
Makes approximately 20-24 very large cookies


Sunday, December 11, 2011

M-I-C-K-E-Y

For the past 3 years, I have made the birthday cake for the boys I was a nanny for. I made a sea themed cake, a Wonder Pets cake, a Dinosaur cake and this year the theme was Pirate Mickey! In the past, I've spent countless hours thinking of the cake, drawing it out, then finally baking and decorating. Time was never as issue for me until this year. My mom came over to help out with Hayden, but a child needs his momma and I had to take frequent breaks to coo with him. Speaking of Hayden, my friend got mad at me for not sharing a picture of him a couple posts back, so here he is. This is one of my favorites.

The boys wanted a pirate ship cake complete with a flag, treasure chest, dolphin and sea turtle cupcakes. They wanted Donald Duck, Minnie and Pluto there too. Well I just couldn't commit to doing that this year so I did a dessert table instead. Yes, that's still a lot of work but it was broken up over the course of two days and I wasn't spending the bulk of my day decorating with mouse ears. I made a 9-inch Mickey Mouse cake as well as Oreo cupcakes, sugar cookie bars, a Giant m&m cookie and rice krispy treats. Today I will share the recipes for the cake and the cupcakes.

The main birthday cake was vanilla buttermilk cake with strawberry jam between the layers and iced in cream cheese frosting. The Micky decoration is made up of fondant. This is the same recipe I've made every year and the kids' mother just loves it and requests it every time. I've shared this recipe before but there's now a printable link below. The cupcakes start off with Hershey's "Perfectly Chocolate" cake recipe. I intended to put chopped up Oreos in the batter but forgot about it until I had already stuck them in the oven. Perhaps you can give that a try. The frosting was a basic buttercream with finely chopped Oreos in it. I used a mixture of shortening and butter for the frosting for flavor and stability. It was light and creamy, wasn't too sweet and really did taste like an Oreo. I'll be making these again!

Hershey's "Perfectly Chocolate" Chocolate Cupcakes

Printer Friendly Version

  • 2 cups sugar
  • 1 3/4 cups all purpose flour
  • 3/4 cup Hershey's Cocoa
  • 1 1/2 teaspoons baking powder
  • 1 1/2 teaspoons baking soda
  • 1 teaspoon salt
  • 2 eggs
  • 1 cup milk
  • 1/2 cup vegetable oil
  • 2 teaspoons vanilla extract
  • 1 cup boiling water

Heat oven to 350°F. Line muffin cups (2-1/2 inches in diameter) with paper bake cups and set aside.

Stir together sugar, flour, cocoa, baking powder, baking soda and salt in large bowl. Add eggs, milk, oil and vanilla; beat on medium speed for 2 minutes. Stir in boiling water (batter will be thin).

Fill cups 2/3 full with batter. Bake 22 to 25 minutes. Cool completely before frosting.

Makes about 24-30 cupcakes.

Oreo Buttercream from Monica H

  • 1/2 cup unsalted butter, room temperature
  • 1/2 cup shortening or butter
  • 1 teaspoon vanilla extract
  • 2 Tablespoons milk
  • 3-4 cups powdered sugar
  • 14 Oreos, finely crushed in food processor

In a large bowl, cream butter, shortening, vanilla, and milk.

Add powdered sugar until desired sweetness is achieved, anywhere between 3 and 4 cups. Mix in crushed Oreos until well combined.

If your frosting is too thick, add a tad more milk to thin. If it's too thin to pipe with, add more sugar until it's the texture you want.

This is enough buttercream to frost a layer cake or about 30 cupcakes.

Vanilla Buttermilk Cake from Sky High: Irresistible Triple-Layer Cakes

Printer Friendly Version

Makes an 8-inch triple-layer cake

  • 4 whole eggs
  • 2 egg yolks
  • 2 teaspoons vanilla extract
  • 1 1/4 cups buttermilk
  • 3 cups cake flour
  • 2 cups sugar
  • 4 1/2 teaspoons baking powder
  • 1/2 teaspoon salt
  • 2 sticks unsalted butter, at room temperature

Preheat the oven to 350 degrees. Butter the bottoms and sides of three 8-inch round cake pans or spray to coat with nonstick cooking spray. Line the bottom of each pan with a round of parchment or waxed paper and grease the paper.

Put the eggs and yolks in a medium mixing bowl, add the vanilla and ¼ cup of the buttermilk. Whisk to blend well.

Combine the flour, sugar, baking powder and salt in a large mixer bowl; whisk to blend. Add the butter and the remaining 1 cup buttermilk to these dry ingredients, and with the mixer on low, blend together. Raise the mixer speed to medium and beat until light and fluffy, about 2 minutes.

Add the egg mixture in 3 additions, scraping down the sides of the bowl and mixing only until thoroughly incorporated. Divide the batter among the three prepared pan.

Bake the cake layers for 28 to 32 minutes, or until a cake tester inserted in the center comes out clean and the cake begins to pull away from the sides of the pan. Let the layers cool in the pans for 10 minutes; then carefully turn out onto wire racks, peel off the paper liners and let cool completely.

NOTE: This can be made in 3 9-inch pans, but the baking times will vary slightly, so keep an eye on them.

Wednesday, July 22, 2009

Birthdays, Cheesecakes and Loot!

I saw these creamy babies at Bake or Break and I contemplated making them for my birthday because they looked so good. I placed a mental bookmark on them and moved on.

Then on my birthday I was talking to my 11 year old cousin and I decided to make these for him. We have the same birthday and he was asking me about my birthday cake. I told him I made myself a strawberry cheesecake tart and I asked him what kind of cake he got. He said he got a frozen Sara Lee cheesecake and I felt badly for him. He deserved more than that. Every boy on their 11th birthday deserves more than a mediocre frozen grocery store cake. Don't you agree?

So I vowed to make him these cheesecakes to celebrate his birthday as well as the 4th of July. We all met up at my mom's for a bbq, so it was the perfect occasion to make these. Coincidentally my mom's birthday and my other cousins' birthday are on July 5th, so we had a multi-birthday celebration. Only I made my mom a different cake and some fudge! I'll blog about that later.

Anyway, for my birthday the lovely Ingrid from 3 B's sent me Martha Stewart's new Cupcake book! I knew she had because she told me she bought it, but I had no idea she was going to send so many other goodies as well. Look at all this loot! Thank you Ingrid for making my birthday so special :-)

One of the things we decided to do was bake together from this book. She happened to bake these same Oreo cheesecakes so head over there to see hers!

Cookies and Cream Cheesecakes from Cupcakes via BoB
  • 42 Oreos, 30 left whole and 12 coarsely chopped
  • 2 pounds cream cheese, softened
  • 1 cup granulated sugar
  • 1 teaspoon vanilla extract
  • 4 large eggs, lightly beaten
  • 1 cup sour cream
  • pinch of salt

Preheat oven to 275°. Line standard muffin pans with liners. Place 1 whole cookie in the bottom of each liner.

Beat cream cheese at medium speed using an electric mixer. Gradually sugar, beating until combined. Beat in vanilla.

Drizzle in eggs, a bit at a time. Beat in sour cream and salt. Stir in chopped cookies.

Divide batter among pans. Bake for about 22 minutes or until filling is set.

Cool completely on wire racks. Refrigerate 4 hours or overnight. Remove from pans just before serving.

Makes 30 cheesecakes.

NOTE: Fill them up almost to the very top. They may puff in the oven, but they don't rise. I got 32 cheesecakes from this recipe.

* * * * * * * * * * * * * * * * * * * * * * * * * * * * * * * * * * * *

The only problem I had with these cheesecakes is that they puffed in the oven, when I pulled them out and let them cool, they shrunk up a bit. Also when I took them out of the cupcake tin, there was condensation buildup underneath the cheesecakes. Don't know what that was all about, but it didn't affect the flavor or consistency one bit. And one last thing, I refrigerated these over night. The next morning when I went to pipe 'Happy Birthday' on them, they looked wet so I had to blot them. Has anyone else made these yet and had that happen?

These cheesecakes were SO good. They were easy to put together and since the recipe calls for a whole cookie in the bottom of the cupcake liner, there's no need to make a crust. Easy peasy and ultra creamy! My cousin loved them and he kept asking me what was in them as if he was making a mental note so he could go home and make them- so cute! I promised him I'd send his mom the recipe so she could make them again for him and that made him pretty happy.

Related Posts with Thumbnails