Showing posts with label Icing. Show all posts

Monday, October 21, 2013

Our Last Vintage Cake


For the past year, The Cake Slice Bakers and I have been baking from Vintage Cakes by Julie Richardson. I missed a baking a few of the recipes when I was writing the cookbook, but the ones I did bake were quite tasty. This is a beautiful book and full of great recipes. If you're a cake fiend like I am, I would recommend you check this book out. 

Next month, we'll be baking from a new cake book so this month, rather than voting on and baking a specific cake, we had the choice to bake any cake we wanted from this book. I narrowed it down to two cakes but eventually decided on Texas Sheetcake because it's my hubby's favorite. The other cake I wanted to make was the Kentucky Bourbon cake. I still intend to make it, I just got busy and ran out of time. My friend Maranda from Jolts & Jollies made it and shared it on her blog if you're interested in the recipe. It looks delicious! 

It's not very often that Hayden falls asleep with Daddy on the couch- he hasn't done that since he was an infant. How sweet is this though? Those curls, my goodness!

This cake was very simple to put together and feeds a crowd. That's the beauty of sheet cakes. I divided the batter between to pans and took some to my mother-in-law. The cake was very moist although it was a little crumbly, in my opinion. Perhaps I could have baked it a couple minutes less or added a tad more oil or an extra egg next time??? There are so many recipes to try though, so I don't feel the need to remake this one. If you make it, I hope you'll let me know how you like it!


Texas Sheetcake from Vintage Cakes


Cake:
  • 1 cup unsalted butter
  • 1/2 cup lightly packed premium unsweetened natural cocoa
  • 3 tablespoons canola oil
  • 1 cup water
  • 2 cups all-purpose flour
  • 2 cups sugar
  • 1 teaspoon baking soda
  • 1/2 teaspoon fine sea salt
  • 2 eggs
  • 1/2 cup buttermilk
  • 2 teaspoons pure vanilla extract
Frosting:
  • 1/2 cup unsalted butter
  • 1/4 cup  lightly packed premium unsweetened cocoa
  • 1/3 cup whole milk
  • 2 teaspoons pure vanilla extract
  • 3 cups sifted powdered sugar
  • 1/2 cup toasted chopped nuts
Center an oven rack and preheat the oven to 375°F. Grease a 15 by 10 by 2-inch baking pan.

To make the cake, melt the butter in a large saucepan over medium heat. Whisk in the cocoa. Add the oil and water and bring to a rolling boil for 30 seconds. Remove the pan from the heat and set it aside to cool slightly. 

Meanwhile, sift together the flour, sugar, baking soda, and salt in a large bowl, then whisk the ingredients by hand to ensure they are well mixed. Pour the warm cocoa mixture into the sifted ingredients and whisk until just combined. In a small bowl, whisk together the eggs, buttermilk, and vanilla. With a rubber spatula, stir the buttermilk mixture into the batter. Pour the batter into the greased pan and place in the center of the oven. 

Bake until the top is firm and a wooden skewer inserted in the middle of the cake comes out with moist crumbs, 32 to 35 minutes.

While the cake is in the oven, make the frosting: melt the butter in a saucepan over medium heat. Whisk in the cocoa and bring the mixture to a rolling boil; boil for 30 seconds. Remove from heat and whisk in the milk and vanilla. Add the powdered sugar 1 cup at a time while whisking continuously. 

Immediately after the cake comes out of the oven, pour the frosting over the hot cake and sprinkle with the nuts. Try not to jiggle the cake before it sets or you'll leave waves in the frosting. Allow to cool before cutting into squares.

Well wrapped and stored at room temperature, this cake keeps for up to 5 days.

Want a bite?

Wednesday, November 9, 2011

Pumpkins, Pumpkins, Pumpkins

Just a quickie post for today. I am one busy momma and it's already taken me 3 hours to edit and upload photos for this recipe! These days it seems everything takes me twice as long to complete, with the exception of bathing and getting ready- because I've gotten quite speedy at that. I do have some recipes to share with you all, it will just take me a little longer to blog about them. I hope you will all bear with me.

There are a few recipes I make that I wish I could force feed to people. You know the ones that are so good but they were blogged about years ago or didn't have the greatest photos to accompany them, that they got overlooked? Well that is this cake. This is my go-to pumpkin cake. It's homey and will never win a prize for beauty queen, but it's moist and flavorful and gets better day by day. A dusting of powdered sugar would be fine, but it's the icing and chopped nuts that send it over the top. All you need is a big bowl and a whisk and you can whip this baby up in no time. I urge you to give this one a try!

Last Sunday we went to the pumpkin patch. It's something I've looked forward to doing with my son for years. We enjoyed it though Baby H wasn't quite so impressed. We waited til the last minute and most of the pumpkins were already picked over but we found an orange globe that Hayden approved of. Here's my mini pumpkin!

Cinderella Cake Previously seen Here

Printer Friendly Version
  • 2 cups sugar
  • 4 eggs
  • 1 cups vegetable oil
  • 2 cups flour
  • 2 teaspoons baking soda
  • 2 teaspoons cinnamon
  • 1/2 teaspoon salt
  • 1-15 oz. can pumpkin puree
  • 1 teaspoon vanilla

Beat sugar and eggs til well blended and light in color. Add oil, continuing to beat. Combine dry ingredients to egg mixture. Add pumpkin and mix well. Pour into greased 9-inch bundt pan.

Bake at 350 degrees for 55 minutes. Let stand in pan for 10 minutes, then turn out onto baking rack or platter and allow to cool completely. Frost with Coachman's Icing.

Coachman's Icing

  • 4 oz. cream cheese, softened
  • 1/2 cup unsalted butter, softened
  • 2 cups powdered sugar, sifted
  • 1 teaspoon vanilla
  • 1/2 cup nuts, chopped (optional)

In a medium bowl, blend softened cream cheese and butter til smooth and creamy. Add vanilla. Then add powdered sugar until desired consistency is achieved. Frost and top with chopped walnuts or pecans (optional) before icing sets.

Wednesday, May 25, 2011

Very Vanilla Bundt For My Baby Brother

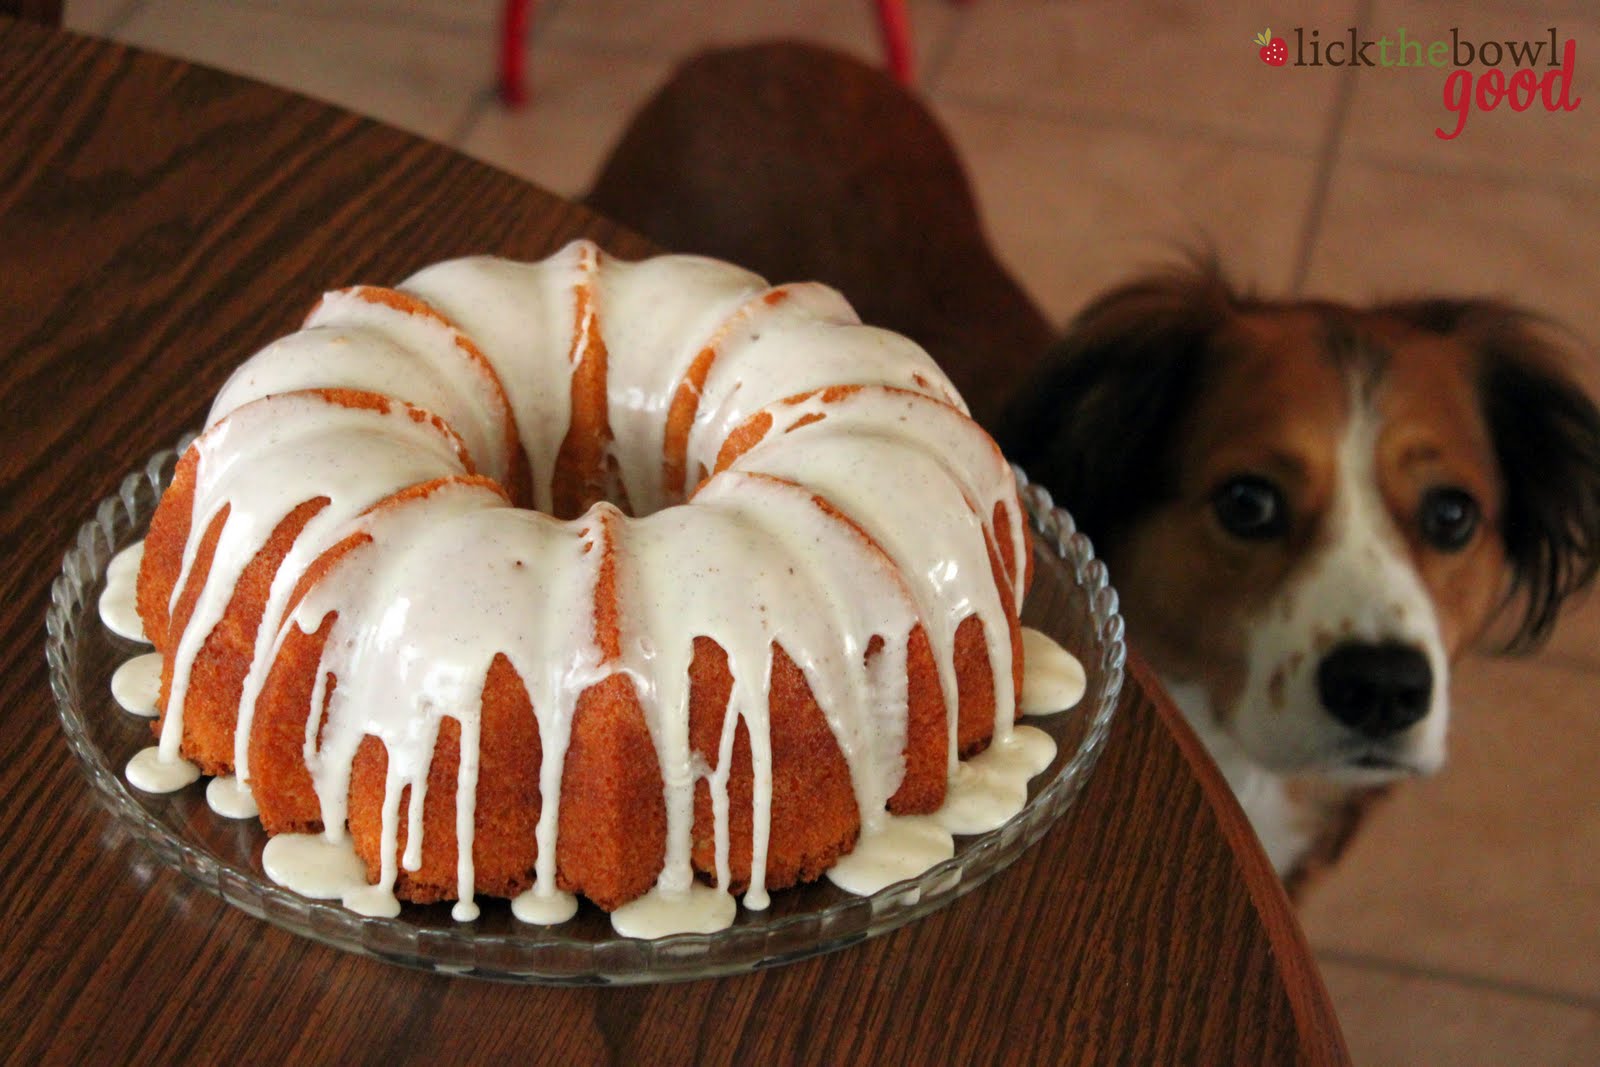
My baby brother's birthday was a couple weeks ago. Only he's not a baby anymore, he's 16 years old! It's amazing how fast they grow up. I was looking at wedding photos the other day while cleaning out the guest room (preparing it for the nursery) and I saw this little boy who was my ring bearer. A sweet boy who was no more than 4 feet tall and now he's my height. His birthday fell on a weekday, but that didn't stop him from getting his birthday wish. He wanted all of his family to get together and have dinner together at The Olive Garden. And so we made it happen. I brought the cake.

I wasn't really planning on baking him a cake, but I had plenty of time that day to make it so I started texting my mom, asking what he'd like. I had several elaborate cakes in my head, some with tunnels of cheesecake running through it, others covered in a silky ganache. My mom said he mentioned something about a pineapple upside down cake a few days prior, I could do that. But then she said she'd just pick up a cake at the grocery store so I didn't have to bake anything. Um, no. Not gonna happen! So I text my brother while at school and asked him what his dream cake would be like. His response was not what I was expecting. It was only one word: vanilla.

It just so happens I made a vanilla bean cake for my old boss' mother about a week prior, only she wanted peaches in it, so I made it into a Peach Upside Down Cake. It looked and smelled great, the batter tasted amazing, but I didn't get a chance to taste the final product. I licked a beater, gave another to Mr. h and vowed to make that cake again. I just didn't think it would be so soon after the other. If I was going to make a vanilla cake, I wanted it to be loaded with vanilla flavor. The cake and glaze contains both vanilla extract as well as vanilla beans, speckled throughout. It is positively vanilla!

Mr. H is a huge chocolate fan and will pass up almost anything vanilla, but even he liked this cake. It was wonderfully aromatic and tasty to boot. It had a light, tender and moist crumb which I was thrilled about, because it seems so many "yellow" or butter cakes turn out dense or dry. I wanted a slightly larger cake so I increased the recipe by one and a half times and baked it in my 15 cup Anniversary Bundt. The birthday boy was pleased with his cake and even more thrilled that his family got together to celebrate his birthday. That just tells you the kind of young man that he is growing into, to wish for something like that. That's why I love him so much. Happy birthday Aaron!

Vanilla Bean Bundt Cake adapted from Bon Appetit

Printer Friendly Version

Cake:

  • 1 teaspoon bourbon
  • 1/2 teaspoon vanilla extract
  • 1 vanilla bean, split lengthwise
  • 1 1/2 cups all purpose flour
  • 2 teaspoons baking powder
  • 1/4 teaspoon salt
  • 1/2 cup plus 6 tablespoons unsalted butter (1 3/4 sticks), room temperature
  • 3/4 cup sugar
  • 1/4 cup (packed) golden brown sugar
  • 2 large eggs
  • 1 large egg yolk
  • 1/2 cup buttermilk

Glaze:

  • 1 cup powdered sugar
  • 2 teaspoons (or more) whole milk
  • 1 teaspoon vanilla extract
  • 1/2 vanilla bean, split lengthwise

For the cake: Position rack in center of oven and preheat to 325°F. Butter and flour a standard Bundt pan, then spray pan with nonstick spray. Pour bourbon and vanilla extract into small bowl. Scrape seeds from vanilla bean into bourbon-vanilla mixture; stir to blend well (reserve scraped vanilla bean for another use). (If you don't have or want to use bourbon, just substitute with vanilla extract).

Whisk flour, baking powder, and salt in medium bowl to blend.

Using electric mixer, beat butter and both sugars in large bowl until light and fluffy. Add eggs and egg yolk 1 at a time, beating until well blended after each addition. Beat in bourbon-vanilla mixture.

Add flour mixture in 2 additions alternately with buttermilk in 1 addition, beating just until blended after each addition. Transfer batter to prepared pan; smooth top evenly (batter will come only halfway up sides of pan).

Bake cake until tester inserted near center comes out clean, about 55 minutes. Cool in pan on rack 15 minutes. Invert cake onto rack and cool completely.

For the glaze: Whisk powdered sugar, 2 teaspoons milk, and vanilla in small bowl to blend, adding more milk by 1/4 teaspoonfuls if glaze is too thick to drizzle. If glaze is too thin, add a little more sugar until it's the consistency desired. Scrape the seeds from the vanilla bean into the glaze and whisk until the seeds are incorporated throughout the glaze.

Place cooled cake on serving dish. Using spoon, drizzle glaze over cake in zigzag pattern. Let cake stand at room temperature until glaze sets, about 15 minutes.

NOTE: Cake can be made up to 1 day ahead. Cover with cake dome and let stand at room temperature.

P.S. My fabulous friend gifted me with a new logo for my blog. I'll tell you all about it in the next post.

I hope everyone has a safe Memorial Day Weekend!

Sunday, July 25, 2010

Thank You & A Guest Post

Hi everyone! I just wanted to thank you for all the kind comments and emails that I received over the last couple days regarding the loss of our special furry friend, Sierra. They mean so much to me and my family.

I also wanted to let you know that I have a guest post up at 3 B's- Baseball, Baking & Books if you'd like to come over and check it out.

Thanks for everything,

Monica H

Thursday, May 27, 2010

For A Soldier And His Mom

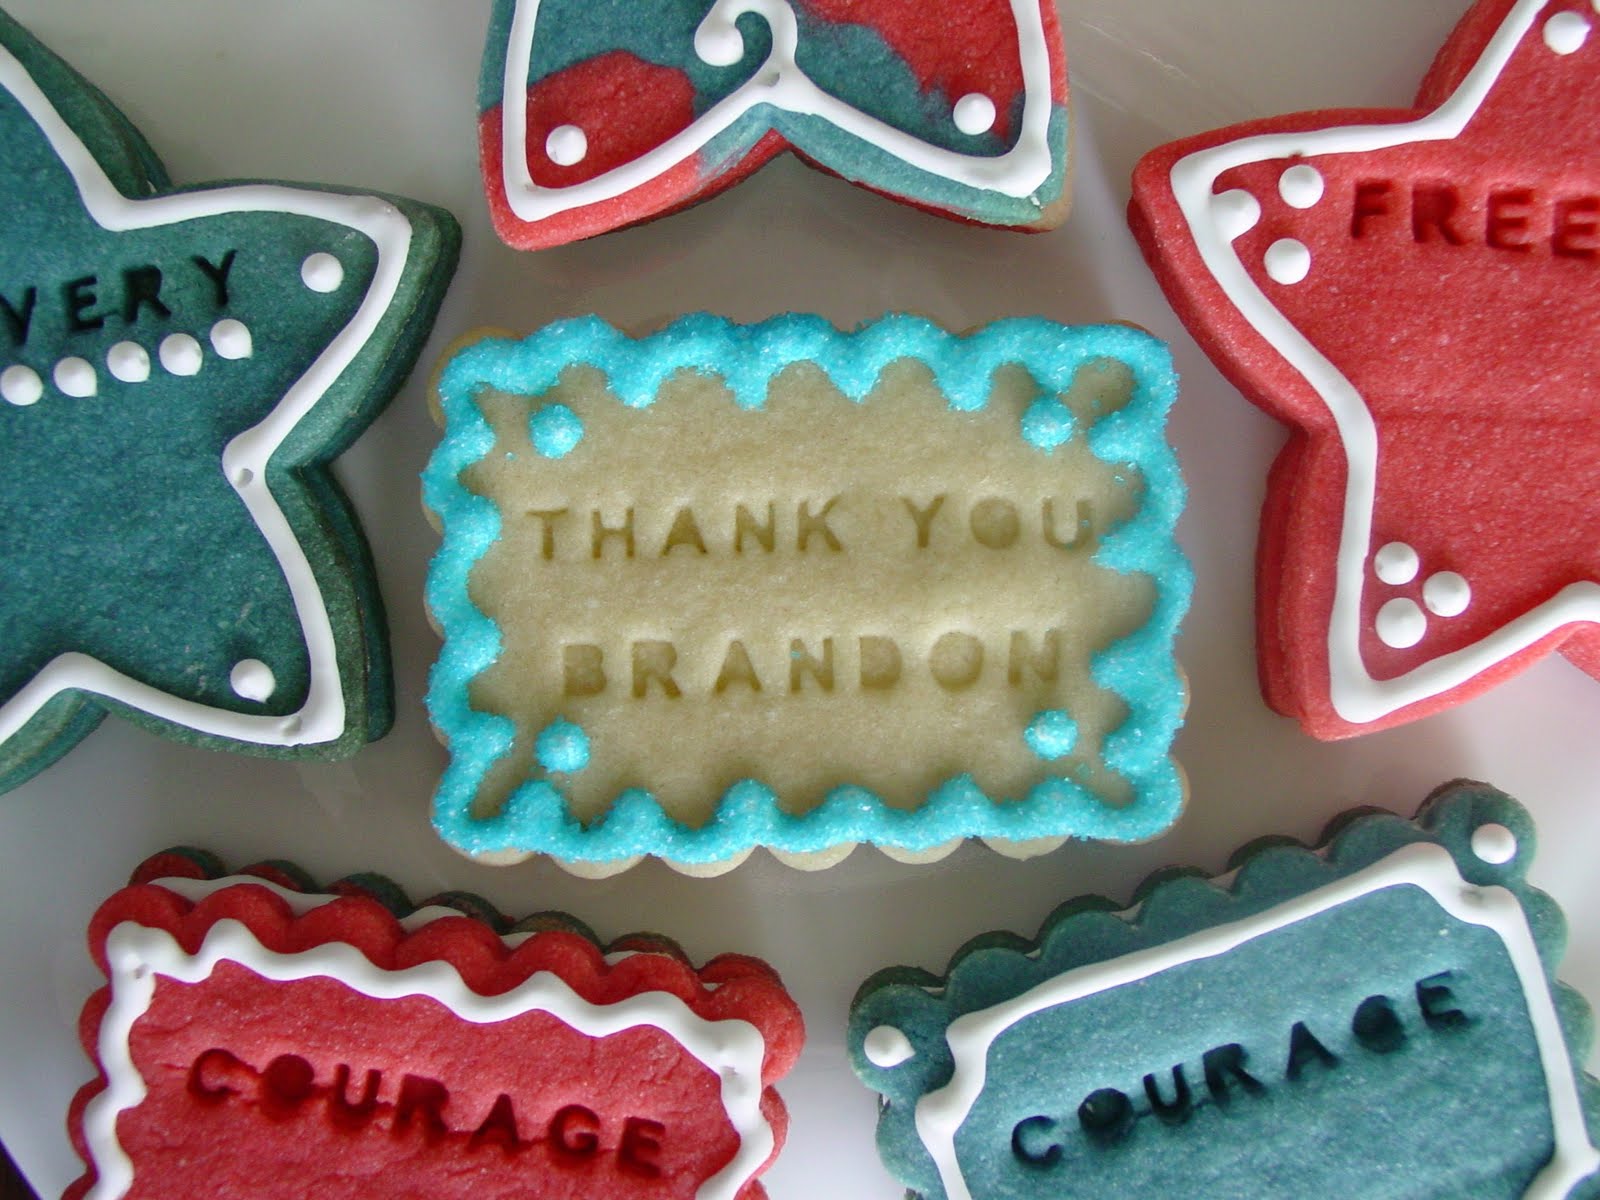
I made these cookies for a special friend and her son- Janet and Brandon. Ever since I got these cool 'message in a cookie' cookie cutters from Williams-Sonoma I knew I wanted to make these for them.

I've been chatting with Janet via email and phone conversations for several months now. While we've never met in person we've become great friends. We talk about our foodie finds and lust over Le Creuset and Williams-Sonoma. We talk about life and family, baking, shopping and blogging. We laugh and sometimes we cry. Sometimes we send eachother little gifts from time to time and that's where these cookies come in.

While Memorial Day is not a "happy" holiday, it is about remembering our fallen soldiers and honoring our veterans. I wanted to do something to acknowledge a brave and courageous young man who is currently fighting for our freedom in Afghanistan. I've sent a couple care packages to Brandon but this time, this one was for Janet. I know these are just sugar cookies but I wanted to let her know that I think of her and her son daily and I appreciate his service and her friendship.

I got these cookie cutters in December but I just now got around to using them, and I broke them in in a perfect way, don't you think? They were really fun and easy to use. You just slide the letters or phrases into a channel on the underside of the cutter, push the cookie cutter into the dough, then you gently press in the plunger to imprint a message on your cookie. Once you lift the cutter, you're left with a perfect personalized cookie. This set also comes with a heart shape cutter which I'll be using in the future for a special little girl ;-)

Sugar Cookies from Williams-Sonoma

  • 2 1/2 cups all-purpose flour
  • 1/2 tsp. salt
  • 12 Tbsp. unsalted butter at room temperature
  • 1 cup sugar
  • Food coloring gel (optional)
  • 1 egg
  • 1 1/2 tsp. vanilla extract

Over a small bowl, sift together the flour and salt. Set aside.

In the bowl of an electric mixer fitted with the flat beater, beat the butter on high speed for 2 minutes. Reduce the speed to medium, slowly add the sugar and a few drops of food coloring gel and beat for 2 minutes, stopping the mixture occasionally to scrape down the sides of the bowl. Add the egg and vanilla and beat for another minute.

Stop the mixer and add half of the flour mixture. Beat on low speed until most of the flour has been absorbed. Add the remaining flour and continue beating until all of the flour has been absorbed and the dough starts to pull away from the sides of the bowl, 2 to 3 minutes.

Turn the dough out onto a work surface and divide into 2 equal balls, Shape each into a disk and wrap separately in plastic wrap. Refrigerate for at least 2 hours, up to 2 days.

Dough can be made ahead of time up to this point.

Remove the dough from the refrigerator and let stand for 5 minutes. On a lightly floured surface, roll out the dough to a thickness of 1/4 inch.

Preheat an oven to 350 degrees F Line several baking sheets with parchment paper.

Dip cookie cutters into flour just before using and cut out shapes. Place on the baking sheet. Gather up the scraps, reroll them and cut out additional cookies. Refrigerate the cookies until firm 20 to 30 minutes. You want the cookies to be really cold and hard otherwise when you bake them, they'll spread and lose their shape.

Bake the cookies until golden brown around the edges, 12 to 15 minutes.

Transfer the parchment sheets with cookies onto wire racks and let cool for 5 minutes, then transfer the cookies directly onto the racks and let cool completely.

Decorate with royal icing. Store the cookies in an airtight container at room temperature for up to 3 days.

Makes 12 to 15 cookies (I got 20 cookies).

Royal Icing Using Egg Whites from Joy of Baking
  • 1 large egg whites
  • 1 teaspoons fresh lemon juice
  • 1 1/2 cups powdered sugar, sifted

In the bowl of your electric mixer (or with a hand mixer), beat the egg whites with the lemon juice until foamy. Add the sifted powdered sugar and beat on low speed until combined and smooth.

The icing needs to be used immediately or transferred to an airtight container as royal icing hardens when exposed to air. Cover with plastic wrap when not in use.

Thank you Brandon! Be safe and come home soon!

Tuesday, December 29, 2009

Cut It Out!

Christmas cookies are a must for the holidays. I make them every year but I usually make my Great Aunt Mary's Sugar Cookie recipe. This year I attempted a royal iced cookie from Cookie Craft that Lorelei from Mermaids Sweets shared with me. This is the second time I've made this recipe and it is really good. I don't think it will replace the other cookie recipe simply because they're so different but it's the perfect cookie for special occasions. Thanks Lorelei for sharing with me!

The first time I made these I made onesie cookies for a baby shower. They were decorated in pink and green and turned out so cute. I'll share those with you another time. It was my first time making them and while the cookies turned out perfectly, my icing job was a little rough. This time around things went a little smoother.

I like this recipe because you roll the cookies between sheets of waxed or parchment paper, which means you don't have to roll them on a counter with excess flour. Which means your cookies won't get tough or dry as you reroll them. Also as long as you work with the dough when it's been chilled properly, it's a breeze to work with. Keeping them cold also ensures that the cookies will keep their shape when you bake them.

These cookies are crisp and sturdy. They're buttery and fragrant. I use a combination of Mexican vanilla and lemon extract in the cookies but you could also use almond extract or even add a little nutmeg or cinnamon to the cookies as well. Lorelei was kind enough to send me the recipe in a word document so I could just print it out. If you'd like the printable recipe for the cookies and icing, just let me know and I'll send it your way.

Rolled Sugar Cookies from Cookie Craft

  • 3 cups all-purpose flour
  • ½ teaspoon salt
  • 1 cup (2 sticks) unsalted butter, softened
  • 1 cup sugar
  • 1 large egg
  • 2 teaspoons vanilla or 1 teaspoon vanilla plus zest of 1 lemon*

Whisk together the flour and salt in a medium bowl and set aside.

Using your mixer, cream together the butter and sugar until the mixture is light and fluffy. (use paddle attachment). Add the egg and the vanilla (and lemon zest if using) or your extract of choice and mix until well-blended.

With the mixer on low, gradually add the flour mixture to the butter mixture until the two are thoroughly blended.

Turn the dough onto the work surface and divide it into two or three equal portions. Form each one into a rough disk. Place a cookie sheet sized piece of wax paper or parchment paper on your rolling surface.

Place a sheet of wax paper over the cookie dough and use your hand or rolling pin to slightly flatten and evenly distribute the dough across the paper. Roll the pin over the paper covered dough. If the top paper wrinkles, lift and smooth it. You’re finished rolling when the dough surface is uniform and completely flat and it is easy to roll the pin over the dough. Roll dough to a 1/4-inch thickness.

Slide the rolled-out piece of dough (paper and all) onto a cookie sheet and refrigerate it until its firm – this should be 20-30 minutes. Repeat the rolling process with the remaining dough portions.

When the dough is firm, it will pretty much be stiff as a board, remove it from the refrigerator to your flat work surface. Working with one piece of dough at a time, leaving the others in the fridge to chill until you are ready to use them, cut the dough into the desired shape with cutters. Preheat the oven to 350 degrees.

After you’ve rolled and cut the dough and the cookie shapes are on the parchment-lined cookies sheets, bake them in the middle rack of your oven for 12-16 minutes or until the cookies start to turn slightly golden around the edges (smaller cookies will be done more quickly). If you decide to bake two sheets of cookies at a time, space your two oven racks evenly in the oven and rotate the cookie sheets halfway through baking (that is, switch the position of the top sheet and bottom sheet and turn both so that the front of each sheet is at the back to promote even baking).

Cool the cookies completely on a rack before icing or decorating.

Yield:

  • 2 ½ inch cookies – about 30
  • 3 ½ inch cookies – about 16
  • 4 ½ inch cookies – about 12

NOTE: For the sugar cookies, I use 1 tsp. Mexican vanilla and 1 tsp. lemon extract

Royal Icing using Meringue Powder

For Piping:

Makes 2 cups

  • 2 cups Confectioner’s Sugar
  • 4 teaspoons Meringue Powder
  • 3 tablespoons Warm Water
  • 1 tablespoon (lemon juice) or 1 tsp extract

Makes 4 cups

  • 4 cups Confectioner's Sugar
  • 3 tablespoons Meringue Powder
  • 6 tablespoons Warm Water
  • 2 tablespoons (lemon juice) or 2 tsp extract

For Flooding:

Makes 2 cups

  • 2 cups Confectioner's Sugar
  • 4 teaspoons Meringue Powder
  • 6 tablespoons Warm Water
  • 1 tablespoon (lemon juice) or 1 tsp extract

Makes 4 cups

  • 4 cups Confectioner's Sugar
  • 3 tablespoons Meringue Powder
  • 12 tablespoons Warm Water
  • 2 tablespoons (lemon juice) or 1-2 tsp extract

Combine all ingredients in the bowl of your electric mixer. Beat on high for 5 minutes if you’re using an electric stand mixer or for 10 minutes if you’re using an electric hand mixer. If your mixer has multiple attachments, use the paddle.

When you reach the desired consistency, its important that you immediately cover the mixture or store in airtight containers.

Piping Consistency

When first mixed, piping icing will start out with the consistency of white glue. When you’ve finished beating the icing, it will be glossy with the consistency similar to that of toothpaste. The icing should squeeze easily out of a #2 tip but should stay in place and hold its shape on the cookie when it lands.

If the icing is too stiff, it’ll be hard to squeeze from the pastry bag and may lift up off the cookie when you finish the outline or detail, and will also tend to “flake off” the cookie readily when dry.

Flood Consistency

When first mixed, flood icing will appear very soupy. Never fear! In 5 minutes your icing will be shiny and an opaque white color with the consistency of heavy cream.

Flood icing is sometimes known as flow icing for a reason, when you squirt it onto a cookie, it immediately flows toward the piped borders.

The icing should be so thin that it puns like water or that its cookie coverage is transparent, and it shouldn’t be so thick that it stays in place when you squirt onto the cookie.

Allow to dry overnight or until no longer tacky.

NOTE: I tripled the cookie recipe and used the amounts for 4 cups of icing. That was way too much icing, so I suggest making the lesser amount of you're only making one batch of cookies.

I used non pareils, dragees, cinnamon imperials and coarse sanding sugar for decoration. Place decorations on while icing is still wet.

What kind of cookies did you make this year? Any favorites?

Saturday, December 12, 2009

Goody Goody Gum Drops

I was hoping to post a new recipe today but it's been a hectic week and today is my in-laws 38th wedding anniversary. We invited them over to our home for dinner and cake so I've been busy. The cake is done, the rolls are rising, the dishes are washed and I'm tired!

Here are some pictures of what I did last night. I've always wanted to make and decorate a gingerbread house, but I don't really care for gingerbread so I've never done it. Every year I tell myself I'm going to do it and then I talk myself out of it. But I was visiting one of my favorite bloggers, Janet from Captain's Daughter To Army Mom, and she bought a Wilton premade kit that you just assemble and decorate. Her cottage was so cute so I got one!

The kit I bought from WalMart ($10) came with a pre-assembled house, royal icing mix, and candy. I bought the starlite mints and the cinnamon imperials separately and used dessicated coconut for snow. I think it turned out pretty cute.

It was pretty simple, albeit a little sticky. I think my icing was a little stiff, but before I noticed I had already put it in the bag. It worked out fine though. My favorite part are the Christmas tree in the window and the door mat. I also really like the way the "snow" looks. It was fun and I think I'd make another one next year. Or I could buy a bunch more this year and make a candy village!

If you're out doing some shopping this weekend you might want to check out the two books I wrote reviews on-- Confections Of A Closet Master Baker and Planet Cake.

Have a good weekend everyone!

Wednesday, November 11, 2009

PUMPing It Up!

This is the 5th cupcake I've made along with Ingrid from 3 B's out of Martha's Cupcakes. First we made Cookies and Cream Mini Cheesecakes, then Black Forest Cupcakes, Orange Glazed Strawberry Jam Tea Cakes, Tres Leches Cupcakes and now Pumpkin Brown Butter Cupcakes!

These were my choice because I wanted something simple that didn't require making a frosting and I wanted something quick and seasonal. These filled the bill and I think Ingrid liked them too. At the last minute I decided not to make the brown butter glaze for these because I needed them to travel well and I didn't want the glaze melting in the heat of the car. It was 80 degrees here on Saturday.

So I made a couple changes, I omitted the sage, added pumpkin pie spice because I didn't have cloves, and added cinnamon chips and a sprinkling of cinnamon sugar to the top. These were so good. The recipe made 15 cupcakes and I gave a dozen of them away to a couple friends of mine that I met up with this past weekend. So Aaron, Mr. H and I each got one. They were rich and sweet, spicy and so moist. The pumpkin and the brown butter flavors were definitely apparent and the cinnamon chips added a nice sweetness and texture to the cupcakes.

I definitely plan on making these again using the original recipe with the brown butter glaze. I have posted both recipes below so you can make whichever version you prefer! You should definitely give these a try. Head on over to Ingrid's to check out her brown butter glazed version.

Pumpkin Brown Butter & Cinnamon Chip Cupcakes
  • 3/4 cup unsalted butter
  • 1 2/3 cups all-purpose flour
  • 2 teaspoons baking powder
  • 1 teaspoon salt
  • 1/2 teaspoon ground cinnamon
  • 1/4 teaspoon freshly grated nutmeg
  • 1/8 teaspoon pumpkin pie spice
  • 1 cup homemade pumpkin puree
  • 1 cup packed light brown sugar
  • 1/2 cup granulated sugar
  • 2 large eggs
  • 1 cup cinnamon chips, plus more for sprinkling on top
  • 2 tablespoons cinnamon sugar

Preheat oven to 325 degrees F. Place muffin liners in tin and set aside.

In a saucepan, melt the butter over medium-low heat and continue to cook, swirling occasionally, until butter turns golden brown. Skim foam from top, and remove from heat. Pour into a bowl to stop the cooking, leaving any burned bits behind; let cool.

Whisk together flour, baking powder, salt, cinnamon, nutmeg and cloves. In another bowl, whisk together the pumpkin puree, both sugars, eggs, and brown butter mixture. Add the flour mixture, and whisk until just combined. Fold in cinnamon chips until evenly distributed. Top each cupcake with a few more cinnamon chips and sprinkle with cinnamon sugar (about 1/8 teaspoon per cupcake).

Divide the batter evenly among lined cups, filling each one 3/4 full. Bake, rotating tins halfway through, until a cake tester comes out clean, about 20 minutes. Transfer tins to wire racks to cool completely before removing cupcakes.

To finish, dip top of each cupcake in icing (recipe follows), then turn over quickly and let set. Cupcakes are best eaten the day they are glazed; keep at room temperature until ready to serve.

Makes 15 cupcakes

Pumpkin Brown Butter Cupcakes from Martha's Cupcakes
  • 3/4 cup unsalted butter
  • 1 2/3 cups all-purpose flour
  • 1/4 cup fresh sage leaves, cut into a chiffonade (optional)
  • 2 teaspoons baking powder
  • 1 teaspoon salt
  • 1/2 teaspoon ground cinnamon
  • 1/4 teaspoon freshly grated nutmeg
  • 1/8 teaspoon ground cloves
  • 1 cup canned pure pumpkin puree
  • 1 cup packed light brown sugar
  • 1/2 cup granulated sugar
  • 2 large eggs

Preheat oven to 325 degrees F. Place muffin liners in tin or butter and flour and set aside.

In a saucepan, melt the butter over medium-low heat.Add the sage if desired, and continue to cook, swirling occasionally, until butter turns golden brown. Skim foam from top, and remove from heat. Pour into a bowl to stop the cooking, leaving any burned bits behind; let cool.

Whisk together flour, baking powder, salt, cinnamon, nutmeg and cloves. In another bowl, whisk together the pumpkin puree, both sugars, eggs, and brown butter mixture. Add the flour mixture, and whisk until just combined.

Divide the batter evenly among lined cups, filling each one 3/4 full. Bake, rotating tins halfway through, until a cake tester comes out clean, about 20 minutes. Transfer tins to wire racks to cool completely before removing cupcakes.

To finish, dip top of each cupcake in icing (recipe follows), then turn over quickly and let set. Cupcakes are best eaten the day they are glazed; keep at room temperature until ready to serve.

Makes 15 cupcakes

NOTE: Cupcakes can be stored overnight at room temperature, or frozen (unglazed) for up to 2 months, in airtight containers.

Brown Butter Icing

  • 1/2 cup unsalted butter
  • 2 cups sifted powdered sugar
  • 2 teaspoons pure vanilla extract
  • 2 tablespoons milk, plus more if needed

Melt butter in a small saucepan over medium heat, swirling pan occasionally, until nut-brown in color, about 10 minutes. Remove from heat, and pour butter into bow, leaving any burned sediment behind.

Add powdered sugar, vanilla, and 2 tablespoons milk to brown butter, stir til smooth. If necessary, add more milk (up to 2 more tablespoons) a little at a time, just until icing is spreadable. Use immediately.

Congratulations to #26- Christy from Christy's Kitchen Creations and #53- Tamilyn from Butter My Kitchen. They are the lucky winners of my giveaway! You'll both be receiving the McCormick Holiday Baking Pack and a bag of Hershey's Cinnamon Chips. Send me your address and I'll get them out to you as soon as I can.

What will you bake up with these goodies? Maybe these cupcakes? Inquiring minds want to know! Congrats ladies!

Related Posts with Thumbnails