Showing posts with label Ganache. Show all posts

Sunday, October 27, 2013

My First Catered Party and A Spooktacular Halloween Cake


Last week I catered my first party for 40 people. My friend Holly asked if I would make a cake and heavy hors d'oeuvres for her 40th birthday extravaganza. I immediately said "yes!" then began brainstorming recipes and  ideas. Holly said she wanted a Halloween themed chocolate cake and sliders. I pretty much had carte blanche with the menu and decorating and I had so much fun. Here's what I made. 


I made 1). Ham wrapped Asparagus Spears with Boursin Cheese 2). Cream Cheese with Red Pepper Jelly and Spicy Saltine Crackers 3). Sausage, Garlic and Mushroom Pizza Puffs with Herb Red Sauce 4). Pork Tenderloin Medallions on Hawaiian Rolls served with Pesto Mayo.


I also made 7 Layer Dip with a Sour Cream Spiderweb served with corn chips and Sweet and Spicy Smoky Meatballs (that I forgot to take a picture of). And birthday cake!


My friend Holly doesn't actually turn 40 until December but she wanted to celebrate early with a "Happy Hollyween" party. I wanted to play up the "over the hill" theme so I did a graveyard scene and dug an early grave for her. I used Pepperidge Farm Milano cookies and a black edible marker for the tombstones. I used Peeps Marshmallow ghosts, Brach's pumpkins and edible chocolate rocks for decorating. I used melted dark chocolate and Wilton leaf sprinkles to make the tree. I used this Chocolate Cake Recipe, this Vanilla Buttercream Recipe and Chocolate Ganache to make the 2 layer 12-inch cake. It was a success! 


Spicy Saltine Crackers
(recipe given to me by my aunt Melinda)

Printer Friendly Version

  • 1 1/4 cup canola oil
  • 1 Tablespoon caraway seeds
  • 1 Tablespoon cayenne pepper
  • 1 Tablespoon dill weed
  • 3 Tablespoons dry ranch dressing mix
  • 1 box (4 sleeves) Unsalted tops Saltine crackers
In a measuring cup, combine the oil and seasonings. Mix well.

Place the crackers into a 2 gallon Ziploc bag. Pour the seasoned oil over the crackers and shake vigorously until well coated. Let crackers soak up the seasonings for at least one hour or overnight. Leave them in the sealed bag until ready to serve.

Hope you all have a Happy Halloween!

Sunday, July 28, 2013

Boston Banana Cream Pie-lets


I just got back from taking a road trip across the great state of Texas with my mom, aunt, sister and Hayden. My cousin's 1st birthday was last weekend and my aunt asked if I would do the honor of baking his cake. If you're following me on Facebook or Instagram you've already seen The Cat In The Hat cake I made but I will share photos and the recipe I used very soon. I had so much fun making it for him. Now I'm trying to dream up ideas for Hayden's 2nd birthday cake in 5 short weeks. 

I hoped to share this recipe with you before I left but leave it to me to wait til the last minute to try and get things done. I was working with fondant and trying to pack until the wee hours of the morning before we left. I just ran out of time. Luckily The Cake Slice Bakers are forgiving and haven't kicked me out of the group yet even though I'm a week late with my version of Boston Cream Pie-lets. 
This cake uses no butter or oil, instead you whip up heavy cream and use that as the fat in this cake. There are several steps to this recipe but they're all simple. I added sliced bananas to this recipe since it reminded me of banana cream pie. This recipe is a little different though in that you assemble the mini "pies" in custard cups instead of  having a larger round cake that needs slicing. There's lots of extra vanilla bean pudding in there too, which is never a bad thing. If you're interested in this recipe or the others The Cake Slice Bakers have made this year, check out Vintage Cakes by Julie Richardson. 


Boston Banana Cream Pie-lets 
adapted from Vintage Cakes by Julie Richardson


Makes 8-10 servings

Cake:
  • 2 cups sifted cake flour
  • 2 teaspoons baking powder
  • 1 teaspoon salt
  • 1 ½ cups cold heavy cream
  • 1 ¼ cup sugar
  • 3  large eggs
  • 2 teaspoons vanilla extract

Pudding:
  • 1 vanilla bean
  • 4 cups whole milk
  • 1 cup sugar
  • 8 egg yolks
  • ½ teaspoon salt
  • ¼ cup cornstarch
  • 4 tablespoons unsalted butter, cubed

Ganache:
  • 1 cup heavy cream
  • 8 ounces semisweet or dark chocolate chips
  • 3-4 large bananas, sliced 1/4 inch thick


Center an oven rack and preheat to 350 degrees F. Line a 9x13-inch cake pan with foil. Do not grease the foil.

To Make The Cake: Sift together the cake flour, baking powder, and salt in a bowl, then whisk the ingredients by hand to ensure they are well mixed. 

Using the stand mixer fitted with the whisk attachment, whip the cream on high until soft, droopy peaks form. On medium-low speed, add the sugar in a steady stream and then return he mixer to high speed to continue to whip the cream until stiff peaks form. Return the mixer to low speed then add the eggs one at a time, followed by the vanilla. Stir in he flour mixture in three parts, adding the next addition, as soon as the flour has been incorporated. Turn off the mixer before all the flour has been mixed into the batter and finish mixing by hand with a rubber spatula. Pour the batter into the prepared baking dish and place it into the center of the oven until the cake springs back in the middle when slightly pressed, 28 -32 minutes. Cool the cake in it's pan on a wire rack until it reaches room temperature. 

While the cake is in the oven, make the pudding. 

To Make The Pudding: With a small paring knife, split the vanilla bean in half, lengthwise. Scrape out the seeds from the pod and put them along with the pod into the saucepan. Add the milk and 1/3 cup of sugar and place the pan over medium-low heat until the milk is hot but not boiling. While the milk is heating, in a small bowl, thoroughly whisk together the yolks along with the remaining 2/3 cup sugar and the salt, then blend in the cornstarch. Slowly whisk a third of the hot milk into the yolk mixture. Pour this mixture back into the saucepan with the remaining hot milk.Cook gently over medium-low heat, whisking steadily until the pudding just begins to thicken and has been bubbling for roughly one minute (you will need to stop whisking for a moment to see if it is bubbling). Strain he mixture through a fine mesh sieve into a clean bowl. Whisk in the butter until it is melted. 

To Make The Ganache: In a small sauce pan, bring cream to a simmer. Place the chopped chocolate or chips into a large, heat proof bowl. Add the hot cream to the bowl. Swirl the bowl to ensure even coverage of cream on the chocolate. Cover the bowl with a lid or plastic wrap for 5 minutes. Remove lid and whisk the chocolate from the middle and outwards. Start with small circles in the middle and move outwards until all the chocolate has melted. 

To Assemble The Pie-lets: Set aside 8-10 pudding cups (tea cups, juice glasses or small bowls will work just fine). Using a 2 1/2-inch round biscuit cutter, cut out 8 miniature cakes from the pan. Carefully remove the miniature cakes from the pan and using a serrated knife, cut them in half horizontally to create two equal layers per cake. Use the extra cake to snack on or make an extra pudding cup. 

Spoon 3 tablespoons of warm pudding into the bottom of each dish. Place 1 slice of cake over the pudding. Place banana slices over cake and cover with another 3 tablespoons of more pudding. Top with the second piece of cake. (Layers: pudding, cake, bananas, pudding, cake). Evenly divide the ganache over each slice of cake. Cover with plastic wrap and refrigerate until well chilled for at least 4 hours. 

Friday, October 12, 2012

Because Sometimes You Just Need Pie


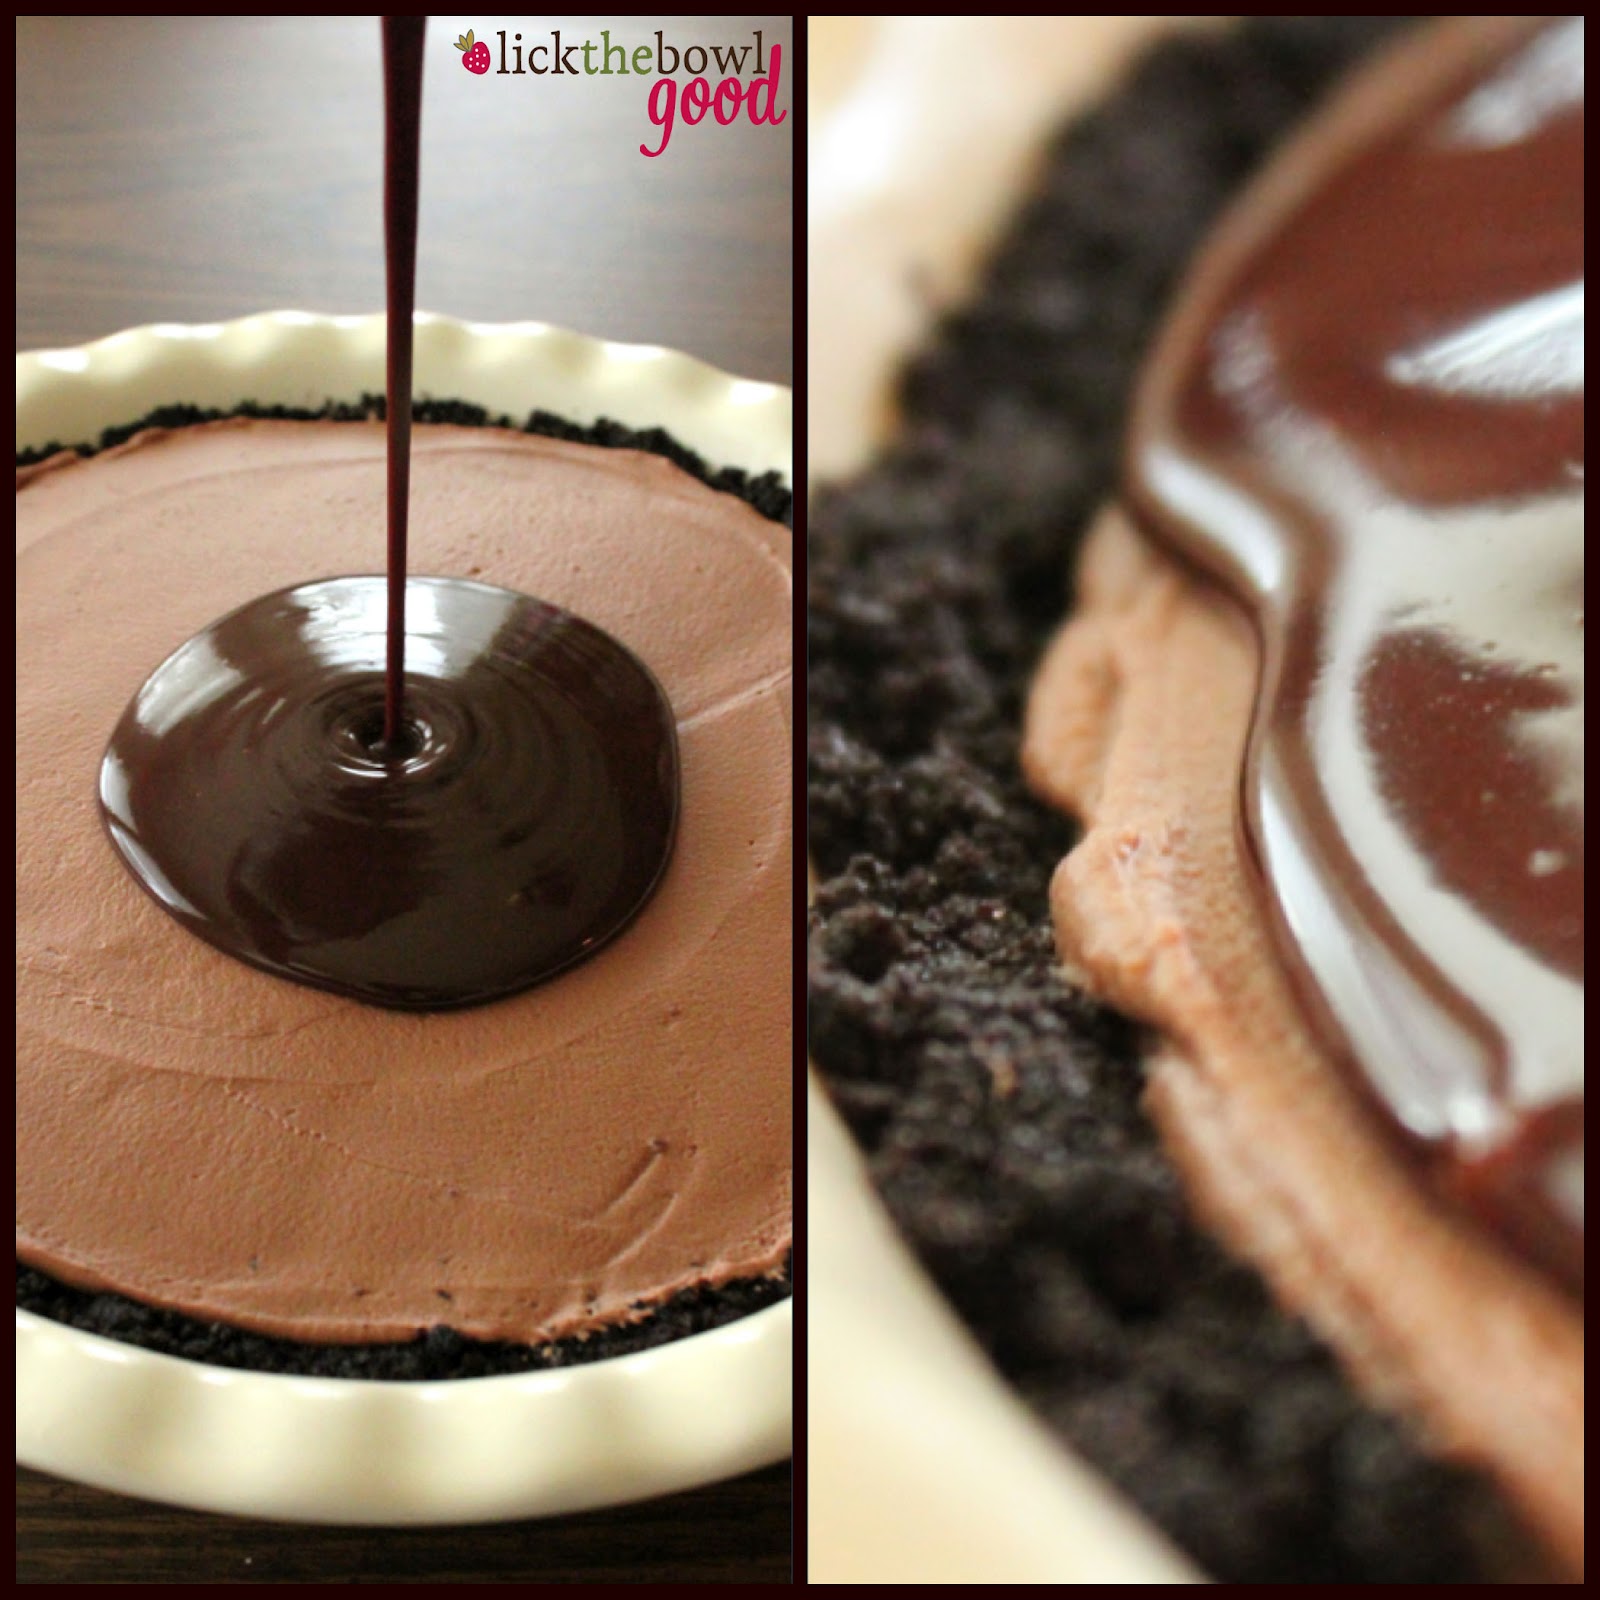
Pie is just one of those comforting desserts that warms your heart and soothes your soul. It doesn't matter if it's warm from the oven crumb topped apple pie or pucker up cool and tangy key lime pie eaten al fresco in the middle of Summer. Pie is just a comfort food, for me at least. So last month when we (The Cake Slice Bakers) were faced with the challenge to make a peanut butter and chocolate mousse "cake" I knew I'd be turning it into a pie. I use the term "cake" loosely, because there's not one part of this recipe that goes into the oven. You start with a cookie crust, layer in some fluffy peanut butter and chocolate mousse and glaze it with a healthy dose of deep, dark and rich ganache. Sounds good, right?
Peanut butter and chocolate go hand in hand. Most people love that combination, I've just never been a huge fan of it. I know you're all looking at me like I'm crazy, but it's true. I love peanut butter and I love chocolate, separately, on their own, not together. My brother LOVES it though so I made this pie for him. Lately we've all been dealing with some financial stuff. It seems everywhere I turn someone is. This economy is just rough and you do what you have to do to get by. If you're not struggling in some way, kudos to you! For my brother, he had to sell his beloved truck. He is a car "collector"- his favorites being old Cadillacs. He needed some cash flow and this truck needed to find a new home. He was kind down in the dumps about it so this pie was made for him. It was a "I'm sorry this economy sucks and you had to sell your truck, but I still love you" kind of pie. And sometimes we all need that. 

In fact right now, I could use about a dozen of these kinds of pies. If you're in the same situation, consider this pie for you! There are several steps to make this pie and several dishes to wash! There's a bowl for the crust, one for the whipped cream, another two for the mousse layers and another for the glaze, plus a food processor a saucepan and any measuring tools and spatulas. But is it worth it? heck yes! It seems rather lengthy and involved but each step is fairly simple and straightforward. It just takes time and patience but in the end you'll be rewarded with a creamy and decadent pie sure to warm your heart even if you never turn the oven on. 


Chocolate Peanut Butter Mousse Pie adapted from The Cake Book by Tish Boyle

Printer Friendly Version 

For The Chocolate Wafer Crust: 
  • 1 1/2 cups chocolate cookie crumbs (I used Oreos, with the filling scraped out)
  • 5 Tbsp. unsalted butter, melted
For The Peanut Butter Mousse: 
  • 2.5 oz. cream cheese, softened
  • 1 Tbsp. unsalted butter, softened
  • 2/3 cup powdered sugar
  • 1/3 cup creamy peanut butter
  • 1/8 tsp. salt
  • 1 1/4 cups heavy cream
For The Chocolate Mousse: 
  • 2.5 oz. bittersweet chocolate, coarsely chopped
  • 2 oz. milk chocolate, coarsely chopped
  • 3 Tbsp whole milk 
  • 3 Tbsp granulated sugar
  • 1/2 tsp. vanilla extract
For The Chocolate Glaze: 
  • 3 oz. semisweet chocolate, finely chopped
  • 1/3 cup heavy cream
  • 1/2 tsp. vanilla extract
To Make The Chocolate Crust: In a medium bowl, stir together the cookie crumbs and the melted butter. Stir until well combined. Pat the mixture into the bottom and up the sides of a 9-inch deep dish pie plate. Refrigerate the crust while you make the peanut butter mousse. 

To Make The Peanut Butter Mousse: In a large bowl using an electric mixer, beat the cream cheese and butter at medium speed until creamy, about 1 minute. Add the powdered sugar and mix until well blended. Add the peanut butter and salt and mix until well blended, scraping down the sides of the bowl as necessary. Set bowl aside while whipping the cream. 

In a large clean bowl, beat the heavy cream with an electric mixer at high speed until soft peaks form. Gently fold 1/2 cup of the whipped cream into the peanut butter mixture until almost blended. Fold in another 3/4 cup of the whipped cream until completely blended and no white streaks appear. 

Scrape the peanut butter mousse into the prepared pie pan and spread it into an even layer. Refrigerate while you make the chocolate mousse. Cover the remaining whipped cream and refrigerate ready to use. 

To Make The Chocolate Mousse: Place both chocolates in the bowl of a food processor and process until finely ground. Leave the chocolate in the food processor. 

In a small saucepan, combine the milk and sugar and bring to a boil over medium heat, stirring frequently until the sugar dissolves. With the food processor running, pour the hot milk through the feed tube, and process until the chocolate is completely melted. Scrape down the sides of the bowl, add the vanilla extract, and process until well blended. Scrape the mixture into a medium bowl. 

Using a rubber spatula, gently fold 1/4 of the reserved whipped cream into the mousse. Fold in the remaining cream until completely blended. Scrape the mousse onto the peanut butter mousse layer and smooth the top using an offset spatula. Refrigerate the pie while making the chocolate glaze. 

To Make The Chocolate Glaze: Place finely chopped chocolate into a medium bowl. 

In a small saucepan, bring the cream to a boil.  Pour cream over the chocolate and let sit for a few minutes. Add the vanilla, then gently stir until the chocolate is completely melted and the glaze is smooth. Do not over mix or you'll incorporate air bubbles. Let the mixture cool at room temperature for 10 minutes before using. 


Pour the cooled glaze over the chocolate mousse layer. Using a small metal spatula, spread the glaze evenly over the top of the pie. Sprinkle the top with peanuts if desired, for garnish, before the glaze sets. 

Chill the pie for at least 2-3 hours before serving. Loosely cover pie and store any leftovers for up to 3 days in the refrigerator. 


Monday, February 20, 2012

Pie Or Cake?

I've been on a pie kick lately and I'm not sure why. Maybe because they're so versatile and can be sweet or savory, and can be served at any meal. Or maybe it's because they can be the meal and the dessert? I'm not sure, but I've been going through my cookbooks and bookmarking pies left and right. I hope you don't get tired of them because it seems that 2012 is the year of the pie. Move over layer cake! Did I just say that?

This month The Cake Slice Bakers chose to make Boston Cream Pie. I realize it's not actually a pie, but a cake, but who cares when you have vanilla cake sandwiched with thick pastry cream and topped with velvety chocolate ganache? I almost made this for my Pie Party, but I ran out of time so I made it for our Super Bowl get together. Classy right? Picture it- Spicy Buffalo Wings, Chips and Queso, Baked Corndogs, Veggies with Dip, Sausage and Pepperoni Pizza Puffs and Boston Cream Pie on a Pedestal. haha! It's a little contradictory but it's never a bad time to eat cake. Or pie. Which is it?

This cake is not hard to make, but you have to plan ahead when making it. It's a little laborious and time consuming, but it's rather simple as long as you read and follow the directions. Just be sure to make the custard ahead of time and have it well chilled so when you're ready to assemble this cake you're not having to wait on the filling. Now I'd love to say that this cake was a dream come true but to be honest I thought the actually sponge cake was a little dry. The filling and the topping were great though and I'd make those components again but I'd try a different recipe for the cake. I thought it dried out because I made it the night before but some of the other Cake Slice Bakers had the same issue. Keep that in mind if you give this recipe a try. If nothing else you'll end up with a very pretty dessert. And who doesn't love pretty?

Boston Cream Pie adapted from The Cake Book

Printer Friendly Version
  • 1 recipe Vanilla Custard Filling (make and chill prior to baking the cake)
  • 1 recipe Hot Milk Sponge Cake
  • 1 recipe Chocolate Glaze

For The Vanilla Custard Filling:

  • 3 large egg yolks
  • 1/4 cup granulated sugar
  • 2 Tablespoons cornstarch
  • 1 cup whole milk
  • 1 Tablespoon unsalted butter
  • 1 teaspoon vanilla extract
  • 1/4 cup heavy cream

In a medium bowl, whisk together the yolks, sugar and the cornstarch, set aside.

In a medium saucepan, bring the milk to a gentle boil. Remove the pan from the heat and whisk about 1/3 cup of the hot milk into the yolk mixture. Return the entire mixture to the saucepan, place over medium-high heat, and bring to a boil, whisking constantly, for 1 minute. Remove the pan from the heat, scrape the bottom of the pan with a spatula, and whisk until smooth. Whisk in the butter until melted.

Immediately strain the custard through a fine-mesh sieve into a medium bowl. Whisk in the vanilla extract. Cover the surface of the custard with plastic wrap, and let cool to room temperature, then refrigerate for two hours, or until well chilled.

Just before assembling the cake, transfer the custard filling to the bowl of an electric mixer. Add 1/4 cup heavy cream and using the whisk attachment, beat the mixture at high speed until it is light and forms soft peaks, about 1 minute.

For The Hot Milk Sponge Cake:
  • 1 1/2 cups sifted cake flour
  • 1 1/4 teaspoons baking powder
  • 1/4 teaspoon salt
  • 1/2 cup whole milk
  • 4 Tablespoons unsalted butter, cut into tablespoons
  • 3 large eggs, at room temperature
  • 3/4 cup granulated sugar
  • 1 teaspoon vanilla extract

Position a rack in the center on the oven and preheat the oven to 350 degrees F. Grease the bottom and sides of a 9-inch cake pan. Dust pan with flour.

Sift together the cake flour, baking powder, and salt two times. Set aside.

In a small saucepan, combine the milk and butter and heat over medium heat just until the butter is melted. Remove the pan from the heat and set aside.

In a bowl of an electric mixer, using the whisk attachment, beat the eggs at high speed until blended, about 1 minute. Gradually add the sugar and vanilla extract and beat until pale and tripled in volume, about 6 minutes.

Sift one-third of the flour mixture over the egg mixture and gently fold it in with a rubber spatula. Repeat with the remaining flour mixture in two more additions.

Reheat the milk mixture to just under a boil. Add it all at once to the egg mixture and gently fold it in. Scrape the batter into the prepared pan.

Bake the cake for 20-25 minutes, until it springs back when lightly touched and a cake tester inserted into the center comes out clean. Cool the cake in the pan on a wire rack for 10 minutes.

Run a paring knife around the edge of the pan and invert the cake onto the wire rack. Reinvert the cake, so that it is right side up.

For The Chocolate Glaze:

  • 3 ounces semi-sweet or bittersweet chocolate, finely chopped
  • 1/2 cup heavy cream
  • 1/2 teaspoon vanilla extract

In a small saucepan, bring the cream to a boil. Remove from the heat and add the chocolate to the pan. Stir until the chocolate is completely melted and the glaze is smooth. Stir in the vanilla extract. Transfer the glaze to a small bowl. Cover the surface of the glaze with a piece of plastic wrap and let cool for about 10 minutes before using.

Assemble The Cake: Using a long serrated knife, cut the cake horizontally in half to make 2 layers.

Save the smooth bottom layer for the top of the cake, and place the remaining cake layer cut side up on a serving plate. Scrape the filling onto the layer and, using a small offset metal spatula, spread it into an even layer. Top with the other cake layer, cut side down.

Glaze The Cake: Pour the warm glaze over the top of the cake, allowing some of it to drizzle down the sides. Serve the cake immediately, or refrigerate.

Store in the refrigerator in a covered container for up to a day. Bring to room temperature before serving.

I've been getting emails and comments asking where Hayden is. You guys are funny! Here he is with his daddy looking at himself in the mirror. He looks at himself, smirks at the good looking boy staring back at him then starts giggling. When he's feeling grumpy, this cheers him up everytime. Maybe he's laughing at his momma, because I like to sing to Michael Jackson's "Man In The Mirror" to him when he does this, except I sing "I'm looking at the boy in the mirror". :-) I wish you all could just hear his laugh. It's the best sound in the world.

Thursday, February 2, 2012

Pie Party Recipes: Chocolate Macaroon Pie

Toasted buttery coconut and chocolate ganache together in one pie. This is the second of the recipes I'm sharing that I made from my Pie Party. This recipe comes from Martha Stewart in her new Pies & Tarts book. There are several pies from that book that had me drooling, but I loved the short ingredient list and simplicity of this one. Martha called it "Crisp Coconut and Chocolate Pie", but to me it was more like a macaroon so I changed the name of the recipe. Also to say "chocolate pie" is a little misleading because it's filled with chocolate ganache, which is nothing more than heavy cream and chocolate, but tastes like a rich, deep, silky, chocolate truffle.

This pie is made up of only 4 ingredients- coconut, butter, chocolate and cream. I was a little confused by how much coconut to use though because Martha says to use 11 ounces, or about 6 cups. But the Baker's coconut package states that 14 ounces is just over 5 cups. I ended using the full 14 ounce bag, which was a bit too much. So I recommend using and weighing out 11 ounces if possible. This pie was simple and delicious, but a little sliver went a long way. To me the combination tasted like a Mounds candy bar (you know, the one you eat when you don't feel like a nut). If you like coconut and chocolate together, then this pie is a winner. It's also gluten free so if you know someone who is sensitive to gluten, this pie is perfect.

Chocolate Macaroon Pie adapted from Pies & Tarts

Printer Friendly Version

For the Crust:

  • 4 tablespoons unsalted butter, softened
  • 11 ounces sweetened shredded coconut

For the Filling:

  • 1 1/4 cups heavy cream
  • 8 ounces semi-sweet chocolate, finely chopped

Make the crust: Preheat oven to 350°F.

In a food processor, process butter and one-third of coconut until mixture forms a ball, 1 to 2 minutes. Transfer to a medium bowl. Sprinkle remaining two-thirds coconut over mixture, and combine with your fingers.

Place a 9-inch pie plate on a parchment-lined rimmed baking sheet. Press coconut mixture into bottom and up sides of pan to form crust, leaving top edges loose and fluffy. Place a foil ring over edge to prevent burning.

Bake until center begins to brown, 10 to 15 minutes, remove foil, and bake until edges are browned, 4 to 6 minutes more. Transfer crust to a wire rack to cool completely.

Make the filling: Bring cream just to a boil in a small saucepan; pour over chocolate in a medium heatproof bowl. Let sit 10 minutes, then stir until chocolate is completely melted and mixture is just combined. Pour into coconut crust.

Refrigerate until filling is set, 1 hour or up to 1 day.

Tuesday, November 3, 2009

Birthday Cake

Today is my 2nd Blogoversary and I thought a cake was in order. This is no ordinary cake though. This cake was made in memory of my son Sam's 3rd birthday in addition to Tin Roof Ice Cream I made in August.

I chose a stunning checkerboard cake from Sky High Cakes. You need a special cake pan to make this cake. I got mine off of Craigslist and it's made by Pampered Chef, but you can get your from Amazon. Anyway, the set includes 3 9-inch nonstick pans and a plastic insert that looks like a bulls eye. This allows you to color the different layers so that when you stack and cut into the cake it looks like a checkerboard pattern.

I decorated the pure white cake by adding another layer of thickened chocolate ganache. I also made a couple butterflies and a dragonfly to place on the cake. Dragonflies and butterflies have always reminded me of my boys because when we went to the cemetery to pick the perfect spot to lay him to rest, there were TONS of dragonflies and butterflies fluttering around. Now when I think of one, I think of the other. You can learn how to make them by picking up a copy of Hello Cupcake!

I only had one issue with this cake and it was completely my fault- I forgot to grease the pans! And I didn't realize it until after I filled them- doh! Believe me, many prayers were said throughout the process and thankfully they came out just fine. This cake has to be my all time favorite as far as looks go. I just thought it was so pretty and simple, yet the interior was a whole other dramatic surprise. It was a lot of work, but my son is so worth it. I hope I made him proud.

Black & White Checkerboard Cake

from Sky High

Makes 1 8 or 9-inch 3 layer cake

  • 3 cups cake flour
  • 2 cups sugar
  • 4 1/2 tsp. baking powder
  • 1/2 tsp. salt
  • 2 sticks (8 oz.) unsalted butter, room temp.
  • 1 1/4 cups buttermilk
  • 4 whole eggs
  • 2 egg yolks
  • 2 tsp. vanilla extract
  • 2 oz. unsweetened chocolate, melted and cooled
  • 2 oz. white chocolate, melted and cooled
  • Semisweet Ganache (recipe follows)
  • White Chocolate Buttercream (recipe follows)

Preheat the oven to 350 degrees F. Butter 3 checkerboard cake pans, 8 or 9 inches in diameter. Line the bottoms with parchment or waxed paper and butter the paper.

Place the flour, sugar, baking powder, and salt in a large mixer bowl. With the mixer on low speed, blend for 30 seconds. Add the butter and 1 cup of the buttermilk and beat just until combined and evenly moistened. Raise the speed to medium and beat until light and fluffy, 2 to 3 minutes.

In a medium bowl, whisk together the whole eggs, egg yolks, remaining 1/4 cup buttermilk, and vanilla. Add to the batter in 2 or 3 additions, scraping down the sides of the bowl and beating only until incorporated after each addition; do not overmix.

To make the dark chocolate batter, whisk 1 cup of the vanilla batter into the melted unsweetened chocolate, then gently whisk in another 3 cups batter.

For the white batter, whisk 1 cup of the vanilla batter into the melted white chocolate and whisk back into the remaining vanilla batter in the bowl as gently as possible. Using the dividers provided in the set and 2 14-inch pastry bags fitted with plain 3/8-inch tips (I used Ziploc bags for this), fill the pans about half full. The cakes will rise to the top when done. You'll need 2 layers with dark chocolate rings each and 1 layer with 2 vanilla rings.

Bake for about 25 minutes, or until a cake tester or wooden toothpick inserted in the center comes out clean. Allow the layers to cool in the pans for 10 minutes before turning out onto wire racks. Peel off the paper and let cool completely.

Semisweet Ganache

Makes 1 cup

  • 6 oz. semisweet chocolate, coarsely chopped
  • 1/2 cup heavy cream

Place the chocolate in a heatproof bowl. Heat the cream to a simmer, pour over the chocolate, and let stand for 5 minutes. Whisk until smooth.

White Chocolate Buttercream

Makes about 5 cups

  • 3 egg whites
  • 4 oz. good quality white chocolate
  • 1 cup sugar
  • 1/4 cup water
  • 3 sticks (12 oz.) unsalted butter, room temp.

Put the egg whites in the bowl of an electric mixer and set the mixer up for use. Melt the white chocolate about halfway in a double boiler over simmering water. Remove from the heat, stir until smooth, and set aside to cool.

Combine the sugar and water in a small heavy saucepan. Set over medium heat and stir to dissolve the sugar. Bring to a boil and cook, without stirring, until the syrup reaches the soft-ball stage; 238 degrees F on a candy thermometer.

Immediately start beating the egg whites on medium-low speed. Slowly add the syrup in a thin stream, taking care not to hit the beaters. Continue to whip until the mixture is body temperature and a stiff meringue has formed.

Reduce the speed to low and add the butter 2-3 tablespoons at a time. When all of the butter is incorporated, beat on medium speed until the frosting appears to curdle. Continue to whip, and it will suddenly come together. At this point, add the melted white chocolate and mix well.

To Assemble the Cake:

Place one of the layers with 2 chocolate rings on a cake stand or large serving plate. Spoon half of the semisweet ganache onto the cake and spread it evenly over the layer, leaving a generous 1/4-inch margin around the edges. Place the only layer with 2 vanilla rings onto the cake (this is the middle layer). Spread the remaining ganache over this layer, again leaving a 1/4-inch margin. Top with the final cake layer, aligning the sides carefully so that the pattern will be successful. To make frosting easier, you may want to refrigerate the cake briefly to allow the ganache to set up first.

Frost the sides and top with the white chocolate buttercream, carefully smoothing out the frosting.

NOTE: I added another layer of thickened ganache to the top of the cake. This is not part of the recipe.

___________________________________________________

And because gifts are nice to receive on birthdays, I'm going to be giving away 2 of the items below to get your holiday baking off to a good start.

2 winners will receive a Holiday Baking Pack from McCormick. The pack includes a full size bottle of vanilla extract, ground cinnamon, and 2 smaller containers of ground nutmeg and ginger, as well as a recipe booklet. And because they seem to be difficult to find on some areas I'm also including a bag of Hershey's Cinnamon Chips.

You have until Tuesday, November 10th to leave me a comment on this post telling me about your most memorable birthday. I want details people! Tell me about the cake, the atmosphere, how old you were, what made it so special.

One comment per person please. Giveaway open to the USA and Canada. Extraneous comments will be deleted. Winners will be chosen by Random Number Generator and anncounced next Wednesday. Good luck.

Thursday, August 20, 2009

Autumn To The Rescue...All She Lacks Is A Cape!

This months selection for The Cake Slice Bakers was Pistachio Petit Four Cake. It's a 3 layer pistachio cake with super this layers of apricot jam, marzipan and ganache. It's then coated entirely in a bittersweet chocolate ganache (I used semisweet) and decorated with more marzipan, tinted and shaped into roses.

I made this cake for my step dad's 50th birthday. I assume he liked it, he didn't say much but I know my aunt and uncle loved it. They love anything with marzipan! I even heard from my grandmother who was not at the party how great the cake was from them. So if you love these flavors this cake is for you!

While making this cake the kitchen smelled wonderful! The toasting of the pistachios the baking of the cake, the sweetness of the ganache and the nutty aroma from the marzipan was quite the treat. My husband walked in and said it smelled like a bakery.

I loved the cake batter and all the individual components but for some reason, I didn't love the final product. I think the marzipan overwhelmed and the pistachio flavor of the cake didn't come through as I hoped. I think it would be great as an almond cake because that was the dominant flavor, but I would sub out a different jam if I were to make it again.

Pistachio Petit Four Cake from Sky High Cakes Printable Version
  • 3/4 cup skinned pistachio nuts
  • 1 2/3 cups sugar
  • 2 cups cake flour
  • 1 tbsp baking powder
  • 1/2 tsp salt
  • 2 sticks (8 oz) unsalted butter, at room temp.
  • 1/2 cup milk
  • 2 tsp vanilla extract
  • 5 eggs, lightly beaten
  • 3/4 cup apricot preserves
  • Marzipan (recipe below)
  • Dark chocolate glaze (recipe below)

Preheat the oven to 350 degrees F. Butter three 8 inch round cake pans. Line the bottom of each pan with a round of parchment or waxed paper and butter the paper.

Spread out the pistachios in a baking tray and toast in the oven for 7 to 10 minutes, until lightly coloured. Transfer to a dish and let cool completely. Finely chop the pistachios and set ¼ cup aside for decoration.

Put the remaining ½ cup pistachios in a food processor. Add the sugar and pulse just enough to grind them finely. Pour into a large mixing bowl and add the flour, baking powder and salt. Blend with the mixer on low for 30 seconds.

Add the butter, milk and vanilla and with the mixer on low, beat until completely incorporated. Raise the speed to medium and beat until light and fluffy, 2 to 3 minutes. Add the beaten eggs in 2 or 3 additions, scraping down the sides of the bowl well and mixing only long enough to blend after each addition. Divide the batter among the 3 prepared pans.

Bake for about 25 minutes or until a cake tester or wooden toothpick inserted in the center comes out clean. Allow the layers to cool in the pans for 10 minutes. Turn out onto wire racks, carefully peel off the paper liners and let cool completely.

Marzipan

  • 8 ounces almond paste
  • 1 ½ cups confectioners sugar
  • 1/4 cup light corn syrup

Crumble the almond paste into a large mixing bowl. Use an electric mixer on low speed to soften the almond paste. Add the confectioners sugar and corn syrup and beat until smooth. Wrap well in plastic so it doesn’t dry out and allow to rest at room temperature for 1 to 2 hours before rolling.

NOTE: I made my marzipan but it would be much easier (and less sticky!) if you were to purchase prepared marzipan. It's about the same price.

Dark Ganache Glaze

  • 1 pound extra bittersweet chocolate
  • 1 ¼ cups heavy cream

Chop the chocolate coarsely and put it in a heatproof bowl. Bring the cream to a bare simmer. Pour immediately over the chocolate and let stand for 5 minutes. Whisk until smooth and use the glaze soon after making before it starts to set. Allow to cool and thicken slightly before use.

NOTE: I used semisweet chocolate.

Assembly:

  • Roll out a third of the marzipan on a work surface dusted with a little confectioners sugar to about 1/8th inch thick. Set one of the cake pans upside down on the marzipan and trim around it with a small knife to make an 8 inch round. Repeat twice more with the remaining marzipan. Save your scraps to make roses for decoration if desired.
  • Place one cake layer on a cake board, flat side up. Spread ¼ cup of the apricot preserves evenly over the top, leaving a ¼ inch margin all round to allow for spreading. Place one marzipan round on top of the preserves and spread 1/3 cup ganache glaze over the top of the marzipan so that it is completely covered. Repeat with the second cake layer, adding more preserves, marzipan and glaze.
  • Add the final cake layer and top with preserves and marzipan as before. Place the whole cake on a wire rack set over a baking pan. Pour the remaining dark ganache glaze over the cake, spreading it as evenly as possible over the top and sides of the cake. Allow the ganache to set before transferring to a plate. It should be smooth and glossy.
  • Garnish the top with the reserved chopped pistachios.
  • Optional: Make some marzipan roses with any leftover marzipan scraps if desired.
* * * * * * *

I had one minor disaster while assembling my cake. I pulled it from the oven and it slipped out of my hand and fell on the floor! It was hot so I couldn't grab it, though it was an automatic reflex. Autumn came to check out what was going on (as usual). I managed to lift the cake off the floor and set it on a cooling rack without damaging the cake. I wasn't worried about it getting dirty though because the floor had just been mopped. Autumn took care of the crumbs for me- look at her licking her lips :-P

Happy 50th Birthday Rick!

Be sure to check out all the other Cake Slice Bakers!

Related Posts with Thumbnails