Showing posts with label Jams/Jellies/Preserves. Show all posts

Wednesday, June 8, 2011

Bake To Show Your Appreciation

These bars. Oh, these bars! They are delicious. I first saw these bars in an issue of Everyday Food a few years ago. I just love Everyday Food recipes because they're simple and not fussy, but they're consistently good. When I first made them, I used plum jam and took them to a friends' house for brunch. Then it seems that I lost the recipe. I looked for a long time through my old issues to find it with no such luck. Why it never occurred to me to just google it, is beyond me. Alas, I smartened up and found it on Martha's website. In my experience, not all of her recipes work for me, but this one is a keeper!

This time when I made the recipe, I chose to use Fredericksburg Peach Jam. Plum jam is my absolute favorite, besides homemade strawberry, but I used peach because Mr. H bought a half gallon of it from Costco a few weeks back. Okay, so I exaggerate slightly, but it was a 40 oz. jar...and that's a lot of jam! This batch went to my good friend Lori, who gifted me with my new logo. How do you express gratitude for something without spending a lot of money, yet you want to give something more than just a card? You bake something special and buttery, with quality ingredients and you hand deliver it. It doesn't get much better than that.

These bars really are great. They're crumbly and crunchy, yet sandy and buttery. The sliced almonds add nice crunch and flavor and worked well with the peach jam and they're perfect for dessert or a weekend brunch. I may have had one or three for breakfast too :-) They're just really flavorful. One note of advice though, if your jam is really sweet then cut back on the sugar in the crust by a couple tablespoons. Feel free to substitute any flavor jam or preserve that you like. Make them for yourself or as a gift, just make them!

Almond Jam Bars from Martha Stewart

  • 1/2 cup unsalted butter, room temp, plus more for baking dish
  • 1 1/2 cups all-purpose flour
  • 1/2 teaspoon ground cinnamon
  • 1/4 teaspoon salt
  • 1/4 teaspoon baking powder
  • 1/2 cup packed light-brown sugar
  • 1/4 cup granulated sugar
  • 1 large egg yolk
  • 3/4 cup sliced almonds
  • 1/2 cup fruit jam (cherry, plum, peach etc.)

Preheat oven to 350 degrees. Butter an 8-inch square baking dish.

In a bowl, whisk together flour, cinnamon, salt, and baking powder.

In a mixing bowl, cream butter and sugars on high speed until light and fluffy; beat in egg yolk. Reduce speed to low; gradually mix in flour mixture. Stir in almonds.

In a small bowl, whisk jam to loosen. (Stirring the jam with a fork or a whisk will enable it to spread smoothly over the dough.)

Gently press half of dough into bottom of prepared dish. With the back of a spoon, gently spread jam over dough, leaving a 1/4-inch border so the jam doesn't stick to the sides of the pan. Sprinkle remaining dough over top all the way to the edges; press gently to form top layer.

Bake until top is golden, 25 to 35 minutes; cool completely in dish. Cut into bars with a serrated knife.

This buttery and gooey bite is just for you. Open Wide!

Tuesday, July 20, 2010

A Request A Year In The Making

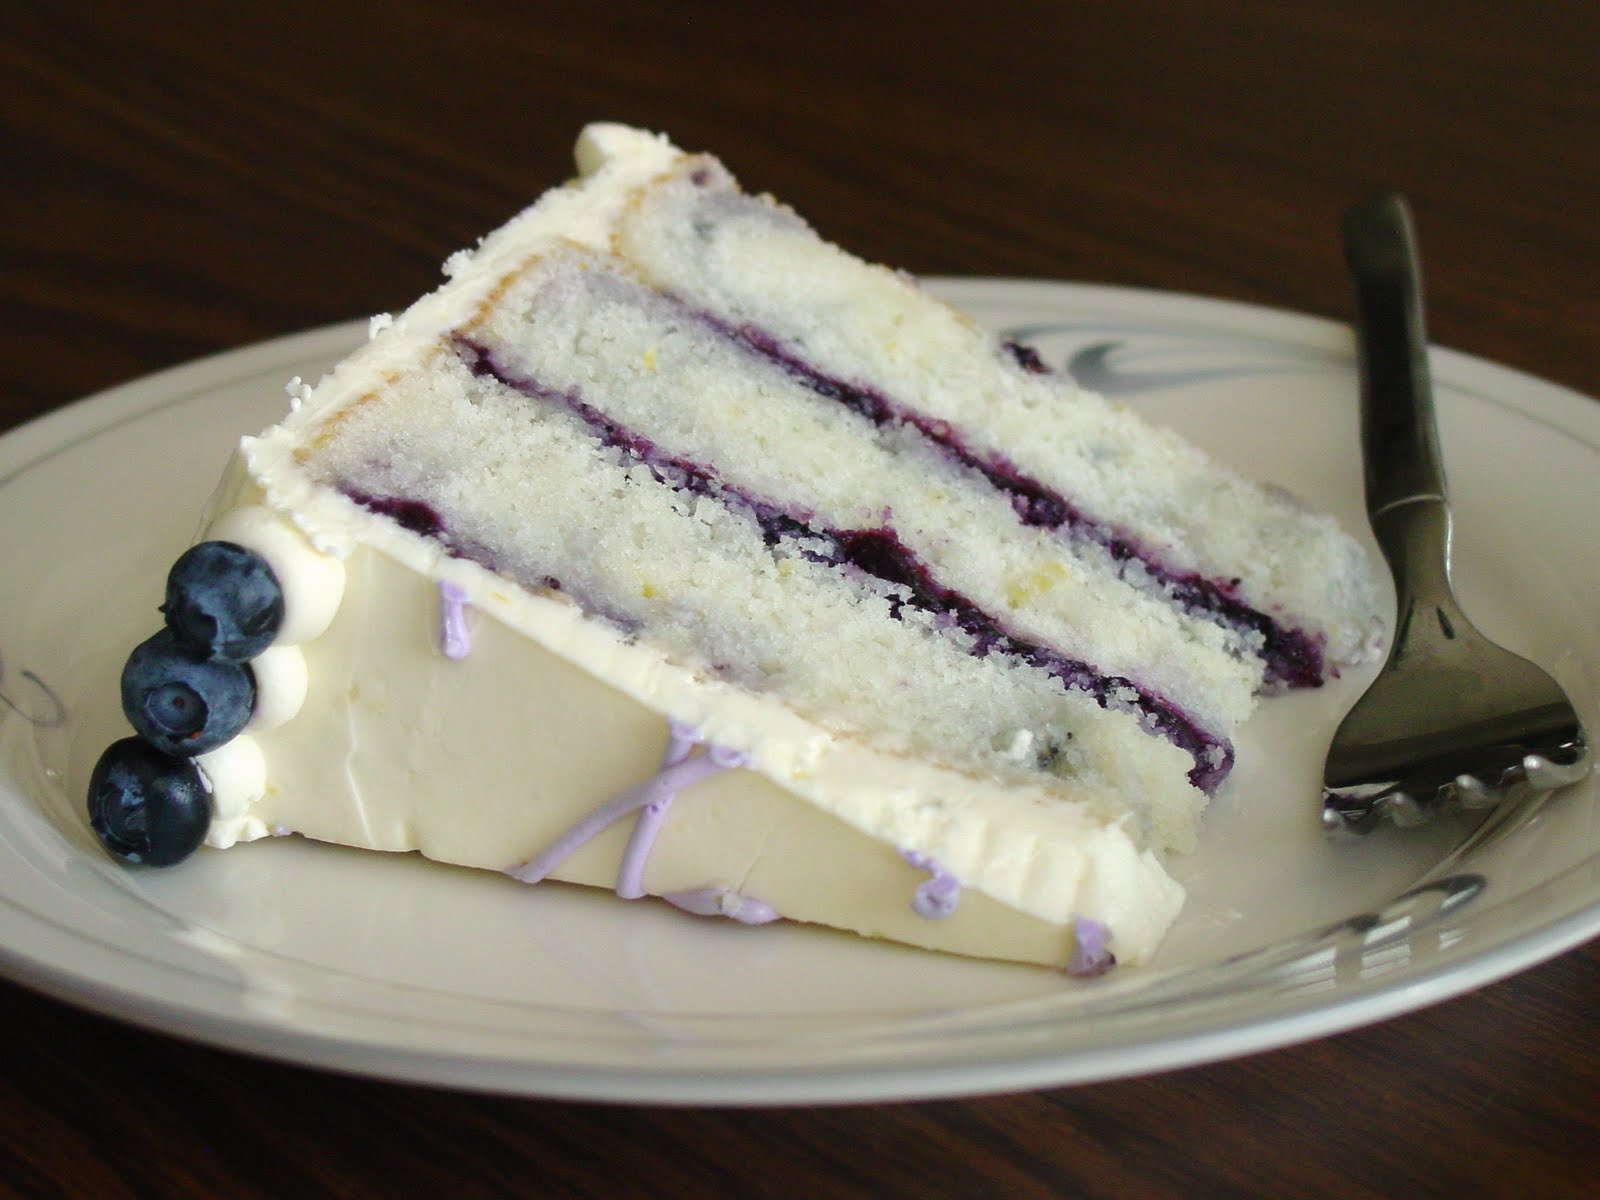
Remember me telling you about my mom's gorgeous birthday cake? Well here it is! I'm not trying to toot my own horn, because I am hard on myself and see all kinds of flaws in the overall cake BUT it is pretty and I love the contrasting colors and flavors. This month the Cake Slice Bakers were to make a Key West Cake with Mango Mousse and Ginger Lime Cream. It sounds delicious but I didn't have time to make this cake as well as all the other birthday treats I had to bake this month. Besides, this is the cake my mother specifically asked for and I was glad to fulfill her request.

If you've been following me long, then you'll know I blogged about this cake exactly one year ago today. If you're new here, then WELCOME to my blog! I had intentions of making my mother cranberry orange scones for her birthday rather than a cake because she loves them and Starbucks changed their recipe and she complains about them every time she gets one. But I asked her what she'd like and without hesitations she said, "I want that lemon blueberry cake you made last year. I've been thinking about it ever since because it was so good." Well alright then, move over scones, hello luscious marble cake. Although I'm pretty sure I'll be making those scones for her sometime soon anyway.

This really is a great cake. I professed my love about it last July 20th (also known as Debby's birthday. Happy Birthday Debby!!!) and this time is no different. I like to eat it at room temperature because the buttercream is soft and creamy and buttery, but my mom likes it cold because the frosting stiffens up. It's great either way. I did decide to take a shortcut and purchase a jar of blueberry jam rather than making the homemade jam. If you have time to make it, then I suggest doing so, if not, spend the extra money for the good stuff. This particular one had lemon juice already in it, but I added a bit more to thin it out and add flavor. The only note I have for you is to puree the jam so you end up with a smoother consistency- I did not do this and my blueberries sunk to the bottom of the cake. Still pretty but not so marbled.

On a different, yet still related note, I get a lot of emails and comments about frosting my cakes and getting them so smooth. So while assembling this cake, I took several pictures of the process and I plan on sharing those with you at a later date- don't worry it will be soon. In the meantime, I hope you'll forgive me for not baking the Key West Cake the other Cake Slice Bakers made. And I hope that you enjoy this cake as much as my mother did.

Lemon Blueberry Marble Cake from Sky High

  • 2 sticks (8 ounces) unsalted butter, at room temperature
  • 2 cups sugar
  • 2 tsp grated lemon zest
  • 1½ tsp lemon extract
  • 7 egg whites
  • 3 cups cake flour
  • 4 tsp baking powder
  • ½ tsp salt
  • 1¼ cups milk

Preheat the oven to 350 degrees F. Butter the bottom and sides of three 8 inch round cake pans. Line the bottom of each pan with a round of parchment or waxed paper and butter the paper.

In a mixer, cream together the butter, sugar, lemon zest and lemon extract until light and fluffy. Gradually add the egg whites 2 or 3 at a time, beating well between additions and stopping occasionally to scrape down the sides of the bowl.

Combine the flour, baking powder and salt, whisk gently to blend. In 2 or 3 alternating additions, beat the dry ingredients and milk into the butter mixture, scraping down the sides of the bowl several times. Beat on medium-high speed for about 1 minute to smooth out any lumps and aerate the batter.

Scoop 1 cup of the batter into a small bowl. Divide the remaining batter equally among the 3 prepared pans, smoothing the tops with a spatula. This gives you a smooth surface to work with. Add 2½ tbsp of the lemon blueberry jam to the reserved batter and blend well. Drizzle heaping teaspoons of this blueberry mixture over the batter in the pans. Use a skewer to swirl the blueberry mixture in short strokes to drag it down through the lemon batter without mixing it in.

Bake for about 25 minutes or until a cake tester or skewer stuck in the center comes out clean and the cake pulls away from the sides of the pan. Let the layers cool for 10 minutes before turning out onto a wire rack, peeling off the paper and leaving to cool completely.

Blueberry Lemon Jam

  • 3 cups blueberries, fresh or frozen
  • ¾ cup sugar
  • 2 tbsp freshly squeezed lemon juice
  • 1½ tsp grated lemon zest
  • 1 tsp grated fresh ginger (optional)

Puree the blueberries with any juices that have exuded in a blender. Pass the puree through a coarse strainer to remove the skins.

In a heavy medium saucepan, combine the blueberry puree with the sugar, lemon juice, zest and ginger (if using). Bring to a gentle boil over a medium heat, stirring often for 20 minutes, or until the preserves have thickened and are reduced to 1 cup.

To check the proper thickness place a small amount of a saucer and put in the freezer until cold. Drag your finger through it. If a clear path is made through the preserve then it is ready. Let the preserves cool before using. (Can be made up to 5 days in advance).

Lemon Buttercream

  • 1 cup sugar
  • ¼ cup water
  • 2 eggs
  • 3 sticks (12 ounces) unsalted butter, at room temperature
  • 2 tbsp freshly squeezed lemon juice
  • 1 tbsp finely grated lemon zest (my addition)

In a small saucepan, combine the sugar and water. Bring to the boil over a medium heat, stirring to dissolve the sugar. Continue to boil without stirring, occasionally washing down the sides of the pan with a wet pastry brush until the syrup reaches the soft-ball stage, 238 (I take it off the heat at 235) degrees F on a candy thermometer. Immediately remove from the heat.

In a large mixer bowl with an electric mixer on medium speed, beat the eggs briefly. Slowly add the hot syrup in a thin stream, pouring it down the sides of the bowl; be careful to avoid hitting the beaters or the syrup may splatter. When all the syrup has been added, raise the speed to medium-high and beat until the mixture is very fluffy and cooled to body temperature. This can take 15-20 minutes.

Reduce the mixer speed to medium-low and gradually add the softened butter 2 to 3 tablespoons at a time, beating well between additions. As you’re adding the last few tablespoons of butter, the frosting will appear to break, then suddenly come together like whipped butter.

Beat in the lemon juice and zest (if using), and the frosting is ready to use.

NOTE: I reserved a small amount of the buttercream and tinted it with Americolor gel colors to pipe the birthday greeting. I piped it with a #3 tip. The border was piped with a #12 tip.

Assembly: To assemble the cake, place a layer, flat side up, on a cake stand. Spread half of the lemon blueberry jam over the top. Place a second layer on top of the first and spread the remaining jam over it. Finally place the third layer on top and frost the top and sides with the lemon buttercream. Decorate with fresh blueberries and serve.

Makes one 8 inch triple layered cake.

To see pictures and learn how to frost a layer cake, click HERE.

Happy 50th Birthday Mom! I love you!

Friday, October 9, 2009

More Cheese Please!

If you know me at all, you know that I love me some cream cheese. Like seriously love it. But I don't like it in savory dishes when it's all hot and creamy. G-ross! However if it's sweetened in any way, shape or form, I am in!

So when I saw these Cheese Danishes on A Feast For The Eyes I knew I had to make them. Stat! I read her post that night and immediately got up to make the filling to chill over night, except I didn't have ricotta cheese so I added a little extra cream cheese. I baked them up the following morning. BTW, if you've never been to her blog, go over there right now. She is amazing and so sweet! I call her my surrogate mom :-)

At the time I only had mini puff pastry shells so that's what I used. I was in desperate need of pastry so I made them work. I let them come to room temperature then I pulled out some of the center so they wouldn't puff up so much. I topped them with the cheese filing, fresh cherries, blueberries and a sprinkling of Sugar In the Raw. They were the perfect two bite pastry. Crisp and flaky, creamy and smooth cheesy centers, fruit and crunchy sugar. What's not to like?

I have made them 3 times since then and have made them with the full sheets of puff pastry and added homemade strawberry jam and mini chocolate chips (as you see in the header). I liked both versions of this danish. It's very simple but impressive to look at and eat, and they're less expensive to make than they are to buy. Great for guests and lazy weekends, but they're best fresh so only bake what you're going to eat. Thanks for the recipe Debby!

Easy Cheese Danishes from Ina Garten via Debby
  • 8 ounces cream cheese, at room temperature
  • ⅓ cup sugar
  • 2 extra-large egg yolks, at room temperature
  • 2 tablespoons ricotta cheese
  • 1 teaspoon pure vanilla extract
  • ¼ teaspoon kosher salt
  • 1 tablespoon grated lemon zest (2 lemons)
  • 2 sheets (1 box) frozen puff pastry, defrosted
  • 1 egg beaten with 1 tablespoon water, for egg wash
  • coarse or raw (turbinado) sugar for sprinkling

Preheat the oven to 400 degrees F. Line a sheet pan with parchment paper.

Place the cream cheese and sugar in the bowl of an electric mixer fitted with a paddle attachment and cream them together on low speed until smooth. With the mixer still on low, add the egg yolks, ricotta, vanilla, salt, and lemon zest and mix until just combined. Don’t whip!

Unfold 1 sheet of puff pastry onto a lightly floured board and roll it slightly with a floured rolling pin until it’s a 10 by 10-inch square. Cut the sheet into quarters with a sharp knife.

Place a heaping tablespoon of cheese filling into the middle of each of the 4 squares. Brush the border of each pastry with egg wash and fold 2 opposite corners to the center, brushing and overlapping the corners of each pastry so they firmly stick together (I didn't fold the danishes with the chocolate chips and jam- I left them square. However if you're going to do it this way, lightly score a border around the pastry so it puffs up but don't cut through and poke holes in the center so it doesn't rise too much! I prebaked these for about 7 minutes before I added the cheese filling. See photo below).

Brush the top of the pastries with egg wash and place them on the prepared sheet pan. Sprinkle with sugar is you desire. Repeat with the second sheet of puff pastry and refrigerate the filled Danish for 15 minutes.

Bake the pastries for about 20 minutes, rotating the pan once during baking, until puffed and brown. Serve warm.

NOTE: I used 1/2 the filling for the smaller bite size danishes (made 24). They baked for about 15 minutes before turning golden.

Also I used 1 lemon instead of two and made the filling the night before so it would set up a bit per Debby's suggestion. I also subbed cream cheese for the ricotta because I didn't have any and they were still delicious.

Hope everyone has a great weekend!

Sunday, September 6, 2009

Accidental Jam and Tea Cakes

I'm calling this accidental jam because I was trying to make something else when it turned into jam. Really good jam! So good that I've made it on purpose 3 times since then. Got half an hour and a couple pounds of strawberries? Then you CAN make jam.

This was supposed to be part of the strawberry cheesecake tart that I made for my birthday. But it looked overcooked and I didn't want to put it on the cheesecake tart and ruin it. So I put it in a jar and threw it in the fridge. The next day I tried it and it was delicious. It definitely tasted like strawberry and it was chunky from the addition of the uncooked fruit. It was thickened from the fruits natural pectin and it only has 1/2 a cup of sugar in it so it's not overly sweet.

It's great on bread, toasted or not, with peanut butter and baked into other goodies like these tea cakes! Ingrid from 3 B's and I baked "together" another cupcake from Martha's Cupcakes. This time it was my choice! I chose Strawberry Jam Tea Cakes with an Orange Glaze.

They were really good but rich. For some reason I was expecting more of a muffin type recipe, but it was more like pound cake baked into muffin tins. You definitely need a cuppa coffee (or tea), even milk to have with these. I was going to halve this recipe but I made the full batch since the recipe says it only makes 16. Except it made 22! and I purposely measured out the amount of batter that went into each tin.

I shared them with a friend who ate 4 of them in a matter of 5 minutes. I took them to her for both of us to share but as soon as I handed her the plate, she pulled back the plastic wrap and stuffed half of one in her mouth! Before I knew it, she had eaten them all and I didn't have the heart to tell her they were for both of us. At least she liked them!

Even though I used strawberry jam these would be equally good with other fruit jams as well. You can also substitute the orange for your favorite citrus. Ingrid made hers with raspberry jam and a lime glaze. Go check out her tea cakes! Ingrid, thanks for baking with me!

Accidental Strawberry Jam
  • 1 1/2 lbs. strawberries, sliced
  • 1/2 cup sugar
  • juice of half a lemon

Slice all but 3-4 strawberries. Place the sliced strawberries in a medium saucepan with the sugar and the lemon juice. Cook over medium high heat, stirring frequently until thick and jam like. Mash the fruit with a spoon to break it up a bit as you go. When it's ready the jam will be move around the pan in one solid-like mass (about 25 minutes).

Finely dice the remaining strawberries. Take off the heat and fold the diced fresh strawberries into the jam. Place in a container and cool to room temperature. Keep refrigerated and consume within 2 weeks.

Strawberry Jam Tea Cakes from Martha's Cupcakes

  • 1 cup unsalted butter, room temp.
  • 3 cups all-purpose flour
  • 1 tsp. baking powder
  • 1/2 tsp. salt
  • 1 1/2 cups sugar
  • 2 tsp. finely grated orange zest
  • 4 large eggs, separated, room temp.
  • 1/2 cup milk
  • 1 cup strawberry jam
  • Citrus Glaze (recipe follows)

Preheat oven to 350 degrees. Spray muffin tins with nonstick spray or brush with butter and dust with flour. Whisk together flour, baking powder and salt.

With an electric mixer, cream butter, sugar and zest until pale and fluffy. Add egg yolks, one at a time, beating until each is incorporated, scraping down the sides of the bowl as needed. Reduce speed to low. Add flour mixture in three batches, alternating with two additions of milk, and beating until just combined after each.

In another bowl, with an electric mixer on medium speed, whisk egg whites to soft peaks; gently fold into the batter. Spoon 2 tablespoons batter into each prepared cup. Make an indentation in the middle of each; fill with 1 tablespoon jam. Top with an additional 2 tablespoons batter, covering jam entirely.

Bake, rotating tins halfway through, until a cake tester inserted in centers of top layers comes out clean, about 30 minutes. Remove from oven. Run a small offset spatula around the edges, and turn the cakes onto wire racks and let cool completely.

To finish, drizzle cakes with glaze, and let set, about 30 minutes. Glazed cupcakes can be stored up to 2 days in a single layer at room temperature in airtight containers.

Orange Glaze

  • 1 1/2 cups powdered sugar, sifted
  • 1/4 tsp. finely grated orange zest
  • 3 Tbsp. fresh orange juice

Whisk together all ingredients until smooth. If necessary, add more sugar to thicken or more juice to thin the glaze. Use immediately.

Ingrid, I look forward to seeing which cupcake you choose next!

Thursday, August 20, 2009

Autumn To The Rescue...All She Lacks Is A Cape!

This months selection for The Cake Slice Bakers was Pistachio Petit Four Cake. It's a 3 layer pistachio cake with super this layers of apricot jam, marzipan and ganache. It's then coated entirely in a bittersweet chocolate ganache (I used semisweet) and decorated with more marzipan, tinted and shaped into roses.

I made this cake for my step dad's 50th birthday. I assume he liked it, he didn't say much but I know my aunt and uncle loved it. They love anything with marzipan! I even heard from my grandmother who was not at the party how great the cake was from them. So if you love these flavors this cake is for you!

While making this cake the kitchen smelled wonderful! The toasting of the pistachios the baking of the cake, the sweetness of the ganache and the nutty aroma from the marzipan was quite the treat. My husband walked in and said it smelled like a bakery.

I loved the cake batter and all the individual components but for some reason, I didn't love the final product. I think the marzipan overwhelmed and the pistachio flavor of the cake didn't come through as I hoped. I think it would be great as an almond cake because that was the dominant flavor, but I would sub out a different jam if I were to make it again.

Pistachio Petit Four Cake from Sky High Cakes Printable Version
  • 3/4 cup skinned pistachio nuts
  • 1 2/3 cups sugar
  • 2 cups cake flour
  • 1 tbsp baking powder
  • 1/2 tsp salt
  • 2 sticks (8 oz) unsalted butter, at room temp.
  • 1/2 cup milk
  • 2 tsp vanilla extract
  • 5 eggs, lightly beaten
  • 3/4 cup apricot preserves
  • Marzipan (recipe below)
  • Dark chocolate glaze (recipe below)

Preheat the oven to 350 degrees F. Butter three 8 inch round cake pans. Line the bottom of each pan with a round of parchment or waxed paper and butter the paper.

Spread out the pistachios in a baking tray and toast in the oven for 7 to 10 minutes, until lightly coloured. Transfer to a dish and let cool completely. Finely chop the pistachios and set ¼ cup aside for decoration.

Put the remaining ½ cup pistachios in a food processor. Add the sugar and pulse just enough to grind them finely. Pour into a large mixing bowl and add the flour, baking powder and salt. Blend with the mixer on low for 30 seconds.

Add the butter, milk and vanilla and with the mixer on low, beat until completely incorporated. Raise the speed to medium and beat until light and fluffy, 2 to 3 minutes. Add the beaten eggs in 2 or 3 additions, scraping down the sides of the bowl well and mixing only long enough to blend after each addition. Divide the batter among the 3 prepared pans.

Bake for about 25 minutes or until a cake tester or wooden toothpick inserted in the center comes out clean. Allow the layers to cool in the pans for 10 minutes. Turn out onto wire racks, carefully peel off the paper liners and let cool completely.

Marzipan

  • 8 ounces almond paste
  • 1 ½ cups confectioners sugar
  • 1/4 cup light corn syrup

Crumble the almond paste into a large mixing bowl. Use an electric mixer on low speed to soften the almond paste. Add the confectioners sugar and corn syrup and beat until smooth. Wrap well in plastic so it doesn’t dry out and allow to rest at room temperature for 1 to 2 hours before rolling.

NOTE: I made my marzipan but it would be much easier (and less sticky!) if you were to purchase prepared marzipan. It's about the same price.

Dark Ganache Glaze

  • 1 pound extra bittersweet chocolate
  • 1 ¼ cups heavy cream

Chop the chocolate coarsely and put it in a heatproof bowl. Bring the cream to a bare simmer. Pour immediately over the chocolate and let stand for 5 minutes. Whisk until smooth and use the glaze soon after making before it starts to set. Allow to cool and thicken slightly before use.

NOTE: I used semisweet chocolate.

Assembly:

  • Roll out a third of the marzipan on a work surface dusted with a little confectioners sugar to about 1/8th inch thick. Set one of the cake pans upside down on the marzipan and trim around it with a small knife to make an 8 inch round. Repeat twice more with the remaining marzipan. Save your scraps to make roses for decoration if desired.
  • Place one cake layer on a cake board, flat side up. Spread ¼ cup of the apricot preserves evenly over the top, leaving a ¼ inch margin all round to allow for spreading. Place one marzipan round on top of the preserves and spread 1/3 cup ganache glaze over the top of the marzipan so that it is completely covered. Repeat with the second cake layer, adding more preserves, marzipan and glaze.
  • Add the final cake layer and top with preserves and marzipan as before. Place the whole cake on a wire rack set over a baking pan. Pour the remaining dark ganache glaze over the cake, spreading it as evenly as possible over the top and sides of the cake. Allow the ganache to set before transferring to a plate. It should be smooth and glossy.
  • Garnish the top with the reserved chopped pistachios.
  • Optional: Make some marzipan roses with any leftover marzipan scraps if desired.
* * * * * * *

I had one minor disaster while assembling my cake. I pulled it from the oven and it slipped out of my hand and fell on the floor! It was hot so I couldn't grab it, though it was an automatic reflex. Autumn came to check out what was going on (as usual). I managed to lift the cake off the floor and set it on a cooling rack without damaging the cake. I wasn't worried about it getting dirty though because the floor had just been mopped. Autumn took care of the crumbs for me- look at her licking her lips :-P

Happy 50th Birthday Rick!

Be sure to check out all the other Cake Slice Bakers!

Monday, August 3, 2009

When Life Hands You Peaches, Don't Ruin 'Em. Huh?

On our way home from Fredericksburg we stopped by a roadside stand and bought some beautiful peaches and zucchini. We bought about a dozen and a half of the fuzzy blush fruit and on the way home I kept wondering what I was going to bake them into. Would it be a peach pie, a cobbler, a crumble, a crisp, ice cream???

Then I asked Mr. H what his thoughts were and he said I wasn't allowed to bake them because I'd "ruin them"! And he was very adamant about that too so I didn't bake them. Although everytime I sliced one up or walked by them and smelled their sweetness, I was tempted.

Then I remembered I had Fredericksburg Peach Preserves (ding! ding! ding!) so I used that along with the zucchini in these muffins and they were wonderful! The original recipe calls for canola oil and orange marmalade, but I used softened butter and peach preserves. They were still moist, tender, fragrant, and sweet, with little bonus pieces of peach from the preserves. They were really delicious and I liked the chew of the dried cherries. I would like to experiment with apricot jam and dried apricots too. Maria and Debby, I'm talking to you :-)

Zucchini Jam Muffins adapted from W.S.
  • 1 1/2 cups all-purpose flour
  • 3/4 cup sugar
  • 2 tsp. baking powder
  • 1/4 tsp. baking soda
  • 1/4 tsp. salt
  • 1/2 tsp. ground cinnamon
  • 2 eggs
  • 1/3 cup canola oil
  • 1/4 cup peach jam or preserves
  • 1 tsp. vanilla extract
  • 1 zucchini (4 oz. total) shredded and drained on paper towels
  • 1 cup dark raisins or dried sweet cherries
  • 1/4 cup pecans or almonds, chopped (optional)

Preheat an oven to 400°F. Grease muffin cups with butter or butter-flavored nonstick cooking spray.

In a bowl, stir together the flour, sugar, baking powder, baking soda, salt and cinnamon.

In another bowl, whisk together the eggs, oil, jam, vanilla and zucchini until blended. Add the flour mixture in three additions and beat just until evenly moistened and smooth. Stir in the raisins or cherries and nuts (if using) just until evenly distributed. The batter will be stiff.

Spoon the batter into the muffin cups, filling each no more than three-fourths full. Bake until the muffins are golden, dry and springy to the touch, and a toothpick inserted into the center comes out clean, 17 to 20 (mine took 18) minutes. Transfer the pan to a wire rack and let cool for 5 minutes. Unmold the muffins. Serve them warm or at room temperature, with butter and more jam.

Makes 10-12 muffins.

NOTE: I froze these after they were cool in a large Ziploc bag. I defrosted/warmed them in the microwave for 45 seconds and we were able to enjoy them throughout the week and they tasted just as fresh, if not better.

The original recipe calls for canola oil, but I used softened butter and it worked out just fine.

Related Posts with Thumbnails