Friday, February 25, 2011

It's About Taste Not Looks

I made this awhile back when I first got my new camera in October. I didn't really know what I was doing with the camera so I just turned it on, adjusted a couple settings and started shooting. For the most part, the pictures turned out okay, but you could tell I was still practicing :-). The white balance on them is a little off and some of them were way blurry, but it was really good and that's what really matters, right? It's about how it tastes, not how it looks.

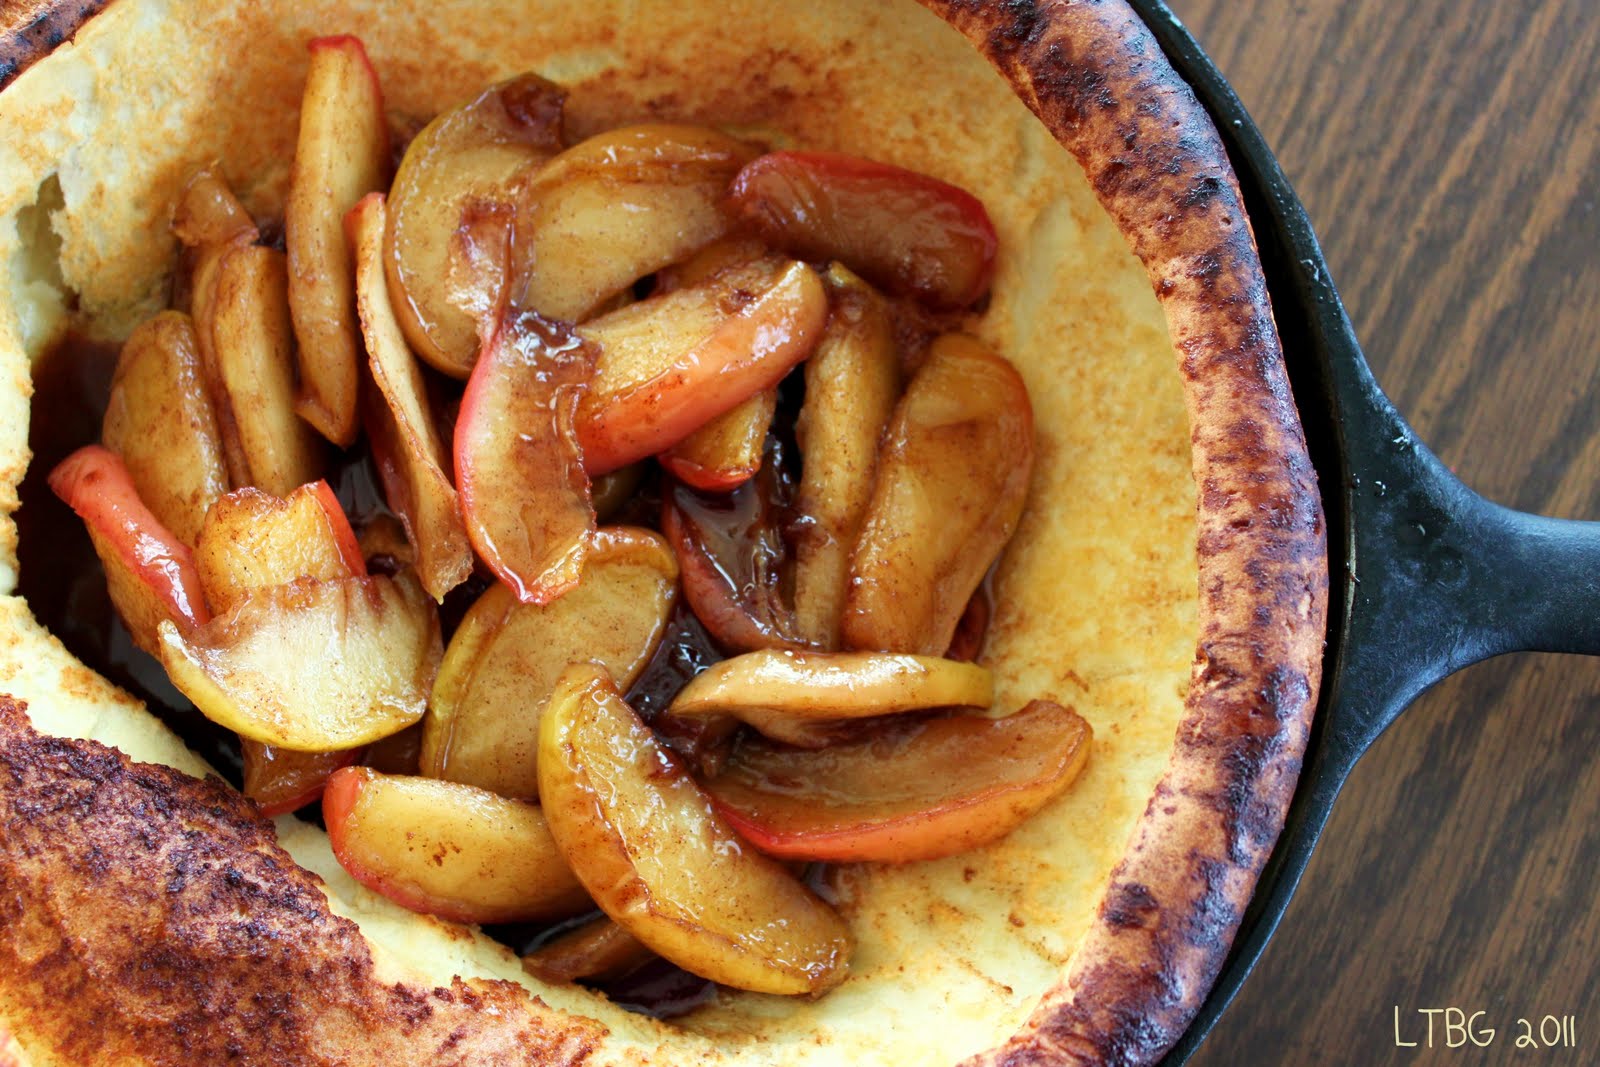
I had my first Dutch Baby Pancake at The Original Pancake House with my mom back in July for her birthday. I liked it, but it was different than anything I've ever had- it's a little custardy, and light, and served with lemon. That seemed strange to me, but it works. I wasn't sure my husband would really be fond of this, but if I served it caramelized, cinnamon-y apples??? Oh yes, he'd be delighted to eat it. And he was!

You can make this puffed apple pancake one of two ways. You can bake the fruit into the batter, or you can serve the fruit in the well of the pancake after it's cooked. I think any cooked stone fruit, apples or pears would be good with this, as well as fresh berries or bananas. We really liked this one and it was fairly simple to make. The only thing I would change next time would be to make more apples for topping. They were delicious! Hope you'll give it a try this weekend.

Puffed Apple Pancake adapted from Dinner With Julie

Printer Friendly Version

  • 2 apples or pears
  • 1-2 Tbsp. canola oil
  • 1-2 Tbsp. butter
  • 1-2 Tbsp. sugar
  • Pinch cinnamon
  • 3 large eggs
  • 3/4 cup all-purpose flour
  • 3/4 cup milk
  • Powdered sugar and lemon slices, for serving

Preheat the oven to 450°F.

Peel (if you want), core and slice the apples. In a large skillet (if you have an ovenproof one, use it), saute the apples in the oil and butter over medium heat for a minute or two. Sprinkle them with the sugar and cinnamon and cook until they start to turn golden and begin to soften. Remove the apples from the heat.

Whisk together the eggs, flour, and milk. Don’t worry about getting all the lumps out. Now you can proceed one of two ways: 1) Pour the batter over the apples in the skillet and put it in the oven. (If you don’t have an ovenproof skillet, pour the sauteed apples into a deep dish pie plate and pour the batter over them.) The apples will bake straight into the pancake, but it won’t rise quite as high with the fruit inside; or 2) Remove the apples and set them aside to serve on top, then pour the batter into the hot pan. This way the pancake will rise even higher and look more dramatic.

Bake for 20-25 minutes, until the pancake is puffed and golden. Cut it into wedges and serve warm with the fruit and a sprinkling of powdered sugar.

Serves 4.

Puffed Berry Pancake: Omit the apples altogether. Drizzle the ovenproof skillet with a little oil, and pop it in the oven for a few minutes to heat up. Pour the batter into the hot skillet and bake as directed. Fill the puffed pancake with fresh berries or other sliced fruit, and serve with syrup or vanilla yogurt for breakfast or for dessert with vanilla ice cream or whipped cream.

Sunday, February 20, 2011

Cake With A Crunch

I know I've been MIA lately, but I'm hoping this cake will more than make up for it. If you like cake, and coffee, and chocolate covered Heath toffee bits, then you'll love this cake. These are all some of my favorite baking flavors so this cake was delicious to me. It doesn't look like much, but it's packed full of flavor with an espresso laced cake, and a buttery toffee crumble on top. It's very simple and ready in less than an hour, from start to finish.

I do have some good news in that I'm finally feeling better. I still have a little congestion and I managed to get my brother and husband sick in the process but we are finally back in the game and doing much better. Although my brother does not admit to being sick. He says sickness is all a state of mind, yet he was asking for cough syrup and his throat was hurting and he was congested like the rest of us. Yeah okay, if you say so. I'm mentioning my brother because his birthday was Thursday when I made this cake. He was staying with us for about a week and left right before I made this so he didn't get to taste it. But I did think of him while I ate it :-). Happy 30th birthday Joe!

This cake had a great contrast of textures. The cake base was moist and tender but the crumbly streusel topping was crunchy and sweet. I really like coffee flavored things, but if you're not a fan, the instant espresso could easily be omitted and you'll be left with a vanilla batter that would still be delicious with the chocolate and toffee. Lauren Chattman (the author of this book) says this cake was developed because of a love for an ice cream with similar flavors. I don't know what ice cream flavor that would be, but I want some! To check out all the other Cake Slice Bakers, click the link.

Coffee Heath Bar Cake from Cake Keeper Cakes

For the Cake:
  • 1½ cups all purpose flour
  • 1 Tbsp instant espresso powder (optional, see note)
  • 1½ tsp baking powder
  • ½ tsp salt
  • ½ cup (1 stick) unsalted butter, softened
  • 1 cup packed light brown sugar
  • 1 egg
  • 1 egg yolk
  • 1½ tsp vanilla extract
  • 1 cup milk

For the Streusel:

  • 4 Heath bars (1.4 oz. each) chopped, or 1 cup prechopped Heath bits
  • 2 tbsp light brown sugar
  • 2 Tbsp all purpose flour
  • 1 Tbsp butter, softened

Preheat the oven to 350F. Grease a 9-inch round springform pan.

For the Streusel: Combine the Heath toffee bits, brown sugar, flour and butter in a medium mixing bowl. Work the mixture with your fingers until it resembles large crumbs. Refrigerate until ready to use.

For the Cake: Combine the flour, espresso powder, baking powder and salt in a medium mixing bowl.

Combine the butter and brown sugar in a large mixing bowl and cream with an electric mixer on medium-high speed until fluffy, about 3 minutes, scraping down the sides of the bowl as necessary.

With the mixer on low speed, add the egg, egg yolk and vanilla.With the mixer on low speed, add a third of the flour mixture and then half the milk, scraping down the bowl after each addition. Repeat, alternating the flour and milk, ending with the flour.

Scrape the batter into the prepared pan and smooth into an even layer with a spatula. Scatter the streusel onto the batter, distributing it evenly over the cake.

Bake the cake until golden and a toothpick inserted in the center comes out clean, 55 to 60 minutes (Mine was done in 50 minutes). Let the cake cool in the pan on a wire rack for 5 minutes. Release the sides of the pan and use a large spatula to slide the cake from the pan bottom to onto a wire rack.

Cool completely, cut into wedges and serve. Store uneaten cake in a cake keeper or wrap in plastic and store at room temperature for up to 3 days.

NOTE: If you don't enjoy the coffee flavoring, it can be omitted from the recipe.

Tuesday, February 15, 2011

Thanks For The Love

Hope everyone had a wonderful Valentine's Day! Mr. H and I went to Chipotle for tacos and burritos. We had a buy one get one free meal coupon then we went to Hobby Lobby for silk flowers. Romantic, huh? ha ha! In all honesty, it was nice not to have to cook, but still be able to spend some one on one time together. Any time spent with my hubby is a good day.

Today I wanted to take a minute to say thank you to some people that have been thinking of me. I was recently given the Stylish Blogger Award. Me, stylish? Who knew? Not me, but I'll take it! A very special thank you and shout out to:

I also wanted to thank Natasha from Saved By The Egg Timer for sending me a very generous gift of fresh Vietnamese coffee and a coffee press. I am a coffee lover and am looking forward to trying it out. So thank you so much for thinking of me.

And to Kate of Calamity Kate's Kitchen. Not only did she pass on that lovely award to me, I also won a giveaway from her blog. I received a package yesterday of specialty cocoa from Penzey's Spices. Ooh, so excited!

You all are awesome and I thank you all for following me, leaving me comment love and for just being there. I appreciate you all more than you know!

I'll be back in a couple days with a new recipe. Stay tuned!

~Monica

Friday, February 11, 2011

Roll It Up!

Oh my goodness, I can't believe it's been 10 days since my last post. It just seems like time has flown by and I don't know where it's gone. I strive to keep this blog up and post a couple new recipes a week, but I just don't have the energy to do so right now. I've been sick for almost 3 weeks now. It started to go away then it came back full force on Tuesday. I went to the doctor when I first got sick and they told me it was viral and it would go away on it's own, well it didn't so I'm dealing with that. Anyway, that's my excuse and I'm sticking to it.

I did manage to whip up this red velvet cake roll last week though. I saw a picture of red velvet cake at California Pizza Kitchen and started to crave it, but wanted to make it in a different way. I searched high and low for a good recipe for at least an hour before realizing that a good blogger friend of mine had it on her blog! Note to self: If you need a recipe, ask your friends first. It was pretty simple but I did make a couple minor changes. I wanted it to be super red without adding additional food coloring, so I just decreased the amount of cocoa in the recipe. Worked like a charm.

I would love to tell you that this cake was so good that I ate half ot it, but the truth is I only had one slice and a bite of another. My taste buds aren't working right and I couldn't really enjoy or taste it very well. It did taste like red velvet cake though, and that's a plus. Texture wise, I thought the cake was better on the second day, since the flavors were allowed to meld together. The cake seemed to relax a bit as well and wasn't as stiff as it was on day 1. I wrapped it well in plastic wrap, which helped it stay moist but it did get a little sticky. A dusting of powdered sugar helps keep all that in check. Just be sure not to wear white while making or eating this :-) And if I don't blog before then, I wish you all a Happy Valentine's Day!

Red Velvet Cake Roll adapted from Imperial Sugar via One Ordinary Day

Printer friendly Version Cake:
  • 4 eggs
  • 3/4 cup granulated sugar
  • 1 Tbsp. oil
  • 2 Tbsp. buttermilk
  • 1 tsp. vinegar
  • 1 tsp. vanilla
  • 1 oz. red food coloring
  • 1/2 tsp. salt
  • 1 tsp. baking powder
  • 2 Tbsp. cocoa powder
  • 3/4 cup cake flour, sifted

Filling:

  • 8 oz. cream cheese, softened
  • 1/4 cup butter, softened
  • 3 cups powdered sugar
  • 1 tsp. vanilla

  • Additional Powdered Sugar, to dust cake

Preheat oven to 350°F. Coat jellyroll pan (cookie sheet with sides) with cooking spray. Line with waxed paper. Coat with cooking spray.

Beat the eggs for five minutes. Slowly add granulated sugar and oil. Beat well. Add buttermilk, vinegar, vanilla and red food coloring.

Sift together dry ingredients. Add slowly to liquid ingredients. Beat two minutes, until well combined.

Pour batter into pan. Bake on middle rack for twelve to fifteen minutes, until the cake springs back when touched in center.

Sprinkle a cloth dishtowel with powdered sugar. Immediately turn cake out onto towel. Peel off waxed paper. Starting at narrow end, roll up cake and towel together. Place seam side down on rack to cool for thirty minutes.

Combine filling ingredients. Beat well. Gently unroll cooled cake. Spread filling over cake. Trim any rough edges. Re-roll the cake without the towel. Place seam side down, on cookie sheet. Dust with powdered sugar. Refrigerate.

When ready to serve, slice cake one inch thick. Serves eight.

Tuesday, February 1, 2011

Lemon-Lime Cream Pie. Oh Yeah.

I have not been baking or cooking much lately. And I'm way behind on blog reading because Bloglines changed and didn't migrate all the blogs over like it should have- so please accept my apologies if I regularly comment but haven't lately. I'm now reading blogs differently but it's not as efficient. On top of that, things in my life have just been crazy but that doesn't mean that I don't have anything to share with you today. I hope you'll continue to support me as I get my act together. In the meantime here's a delicious lemon-lime pie that I made awhile back.

Citrus is in season now and I've been enjoying the most delicious oranges (we've already gone through 4 cases from Costco!) and Texas Ruby Red grapefruit that I've ever had, but still that's no substitute for tart and zesty lemons and limes. Fortunately they are available ripe and juicy year round so make this pie the next chance you get. The original recipe comes from Zoe Bakes and was topped with a brown sugar meringue. It was too beautiful to pass up but unfortunately her directions for baking the meringue failed and I ended up with a weepy mess that never set up. It went down the disposal along with my bitter tears.

But the filling and crust really was good despite the meringue being a flop. So I waited until I was no longer angry over pie and made it again...two weeks later. Though the second time around my pie was going no where near the oven! I filled the graham cracker crust with the thickened puckery filling and let it set and cool. Right before serving I garnished it with swirls of barely sweetened whipped cream and strands of zest. I have no idea why I never took a picture of the entire completed pie. Maybe it was because we cut into it and ate half of it before it ever crossed my mind. Yes, that good.

Lemon-Lime Cream Pie adapted from Zoe Bakes

For The Crust:

  • 11 whole graham crackers
  • 3 tablespoons brown sugar
  • 5 tablespoons unsalted butter
  • pinch salt

For The Filling:

  • 1 cup plus 3 tablespoons sugar
  • 5 tablespoons cornstarch
  • 1/4 teaspoon salt
  • 1 3/4 cups cold water
  • 5 egg yolks
  • 2/3 cup lemon juice (and/or lime juice)
  • 1 tablespoon lime zest
  • 3 tablespoons unsalted butter

For The Topping:

  • 3/4 cup cold heavy cream
  • 2 Tbsp powdered sugar, sifted
  • 1/4 tsp pure vanilla extract

For the Crust: Preheat the oven to 350 degrees.

Place the graham crackers in a food processor and pulse until fine crumbs. Add the brown sugar and butter and pulse until all of the crumbs are coated with the butter and start to stick together.

Place the crumbs in a Pyrex pie plate. Spread them out evenly and press them tightly into the pie plate. Chill the crust for about 15 minutes and then bake for 15-18 minutes. It will not color, but will set the crust.

For the Filling: In a medium saucepan bring to a simmer the sugar, cornstarch, salt and water. Whisk constantly until the mixture starts to simmer and turn translucent. Add the egg yolks one at a time and whisk gently to incorporate well. Repeat with the rest of the egg yolks. Continue to whisk until the mixture is quite thick. If it seems to be getting lumpy, remove from heat and whisk gently until smooth. Slowly add the lemon juice and zest. Whisk gently. Turn off the heat and add the butter. Whisk gently until it is all melted and well incorporated.

Pour the warm filling into the prepared pie shell. Allow to cool on the countertop for an hour undisturbed, before transferring to the refrigerator, uncovered.

For the Topping: In a medium bowl, whip cream on medium high speed til soft peaks form. Slowly add the sugar and vanilla and continue to beat til thick and stiff. Don't overbeat or you'll have butter. Store in the fridge until you're ready for it.

To Assemble: Once pie is completely chilled, top with swirls of lightly sweetened whipped cream around the border or cover the filling entirely with a blanket of whipped cream.

Store in the refrigerator until ready to serve or the filling will be too soft to cut.

Related Posts with Thumbnails