

Sunday, May 30, 2010
Thursday, May 27, 2010
For A Soldier And His Mom

I made these cookies for a special friend and her son- Janet and Brandon. Ever since I got these cool 'message in a cookie' cookie cutters from Williams-Sonoma I knew I wanted to make these for them.

I've been chatting with Janet via email and phone conversations for several months now. While we've never met in person we've become great friends. We talk about our foodie finds and lust over Le Creuset and Williams-Sonoma. We talk about life and family, baking, shopping and blogging. We laugh and sometimes we cry. Sometimes we send eachother little gifts from time to time and that's where these cookies come in.


While Memorial Day is not a "happy" holiday, it is about remembering our fallen soldiers and honoring our veterans. I wanted to do something to acknowledge a brave and courageous young man who is currently fighting for our freedom in Afghanistan. I've sent a couple care packages to Brandon but this time, this one was for Janet. I know these are just sugar cookies but I wanted to let her know that I think of her and her son daily and I appreciate his service and her friendship.


I got these cookie cutters in December but I just now got around to using them, and I broke them in in a perfect way, don't you think? They were really fun and easy to use. You just slide the letters or phrases into a channel on the underside of the cutter, push the cookie cutter into the dough, then you gently press in the plunger to imprint a message on your cookie. Once you lift the cutter, you're left with a perfect personalized cookie. This set also comes with a heart shape cutter which I'll be using in the future for a special little girl ;-)

Sugar Cookies from Williams-Sonoma
- 2 1/2 cups all-purpose flour
- 1/2 tsp. salt
- 12 Tbsp. unsalted butter at room temperature
- 1 cup sugar
- Food coloring gel (optional)
- 1 egg
- 1 1/2 tsp. vanilla extract
Over a small bowl, sift together the flour and salt. Set aside.
In the bowl of an electric mixer fitted with the flat beater, beat the butter on high speed for 2 minutes. Reduce the speed to medium, slowly add the sugar and a few drops of food coloring gel and beat for 2 minutes, stopping the mixture occasionally to scrape down the sides of the bowl. Add the egg and vanilla and beat for another minute.
Stop the mixer and add half of the flour mixture. Beat on low speed until most of the flour has been absorbed. Add the remaining flour and continue beating until all of the flour has been absorbed and the dough starts to pull away from the sides of the bowl, 2 to 3 minutes.
Turn the dough out onto a work surface and divide into 2 equal balls, Shape each into a disk and wrap separately in plastic wrap. Refrigerate for at least 2 hours, up to 2 days.
Dough can be made ahead of time up to this point.
Remove the dough from the refrigerator and let stand for 5 minutes. On a lightly floured surface, roll out the dough to a thickness of 1/4 inch.
Preheat an oven to 350 degrees F Line several baking sheets with parchment paper.
Dip cookie cutters into flour just before using and cut out shapes. Place on the baking sheet. Gather up the scraps, reroll them and cut out additional cookies. Refrigerate the cookies until firm 20 to 30 minutes. You want the cookies to be really cold and hard otherwise when you bake them, they'll spread and lose their shape.
Bake the cookies until golden brown around the edges, 12 to 15 minutes.
Transfer the parchment sheets with cookies onto wire racks and let cool for 5 minutes, then transfer the cookies directly onto the racks and let cool completely.
Decorate with royal icing. Store the cookies in an airtight container at room temperature for up to 3 days.
Makes 12 to 15 cookies (I got 20 cookies).

- 1 large egg whites
- 1 teaspoons fresh lemon juice
- 1 1/2 cups powdered sugar, sifted
In the bowl of your electric mixer (or with a hand mixer), beat the egg whites with the lemon juice until foamy. Add the sifted powdered sugar and beat on low speed until combined and smooth.
The icing needs to be used immediately or transferred to an airtight container as royal icing hardens when exposed to air. Cover with plastic wrap when not in use.

Thank you Brandon! Be safe and come home soon!
Monday, May 24, 2010
Angel Food Cake Made Easy!

Along with lemon poppyseed cupcakes, I made this self frosting angel food cake to take to my mom's house for Mother's Day brunch. I had some egg whites left over from the lemon meringue pie I made so chose this simple cake. And unlike most angel food cakes, it only calls for 6 eggs whites and it's made in a 9-inch Pyrex dish. Genius!

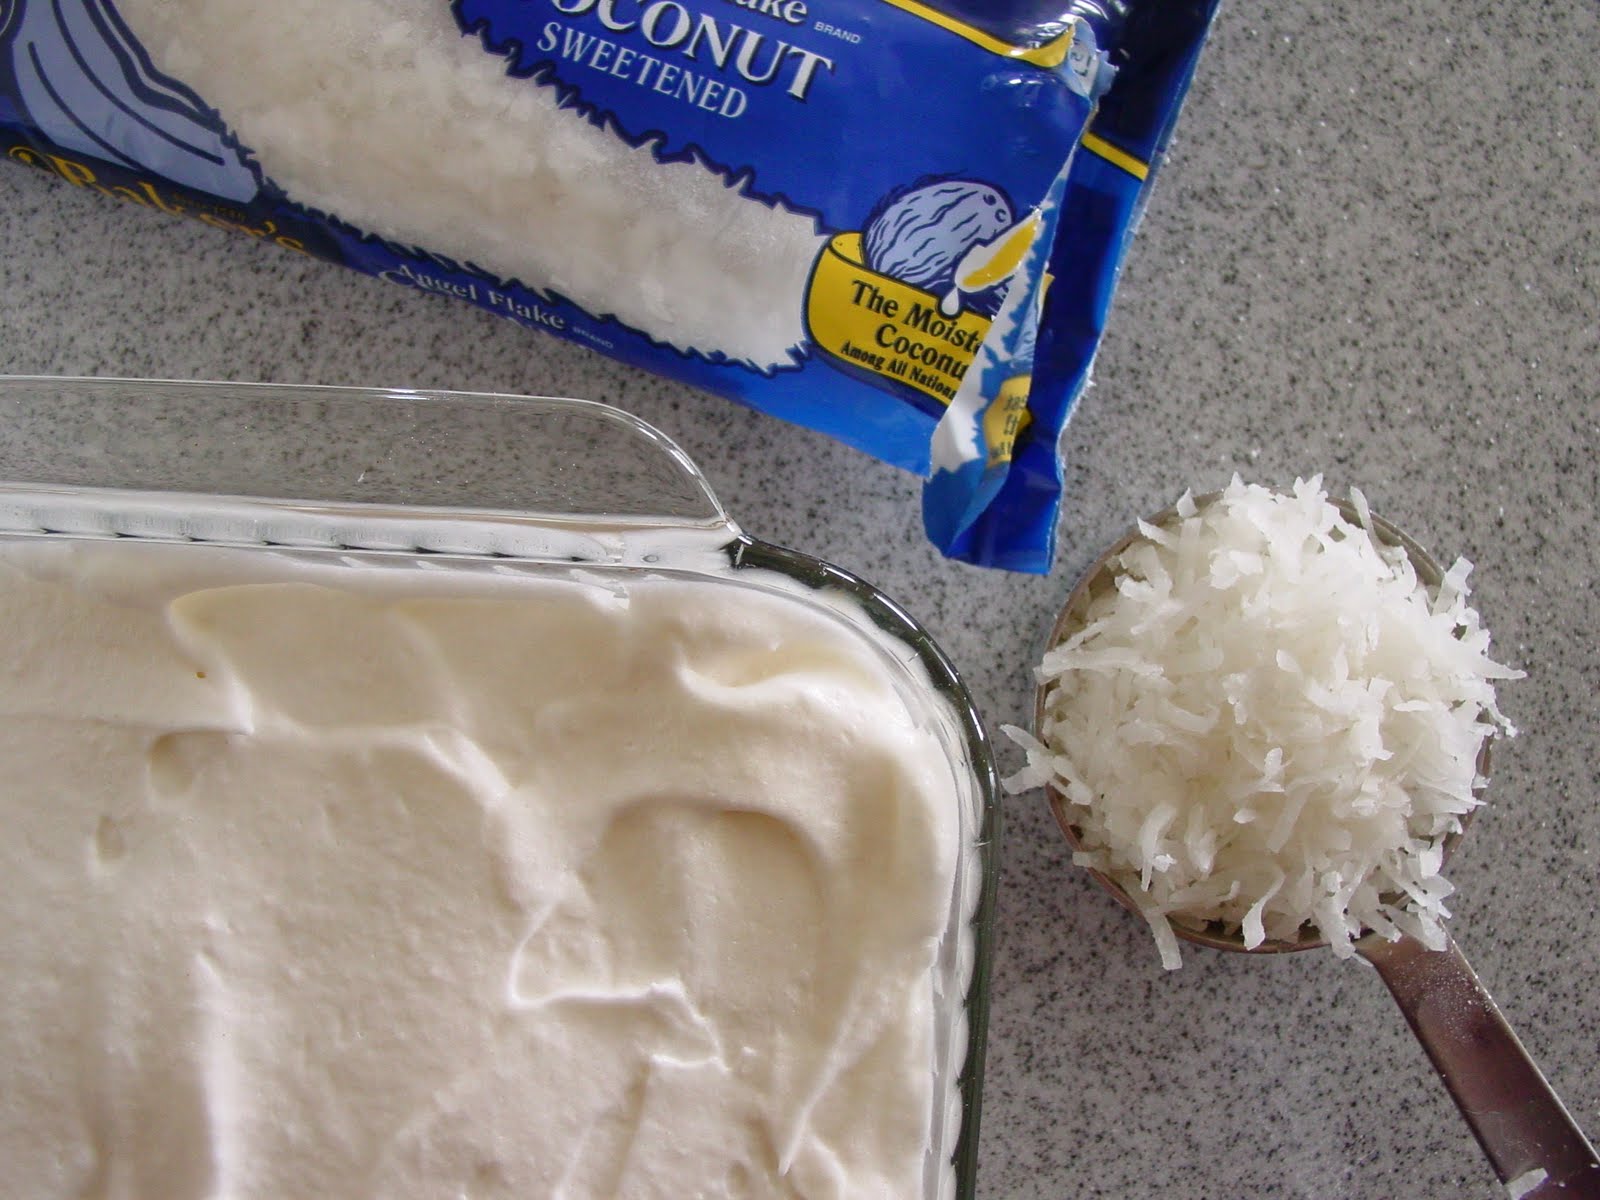
Seriously, how genius is that? Have you ever heard of an angel food cake made in a Pyrex dish? No, me neither and that's why it appealed to me. It took away all the pressure of making a tall daunting impressive angel food cake by making it into a snack cake. It's mildly flavored with vanilla and almond extracts and it's topped with sweetened shredded coconut. As it bakes, the coconut gets imbedded into the cake and becomes slightly crunchy and golden, thus forming the self frosted part of this cake.


This cake was very quick and simple to put together. Like other angel food cakes, this one was light and airy. It was firm and and spongey, with a light sweetness. The coconut on top added a differing texture to the soft interior. Both my mother and monther-in-law love angel food cake, and while it's not my favorite, this was for them. All in all, I'd say that it was a success.
 Self-Frosting Angel Food Snack Cake from The Cutting Edge of Ordinary via Cookie Baker Lynn
- 6 egg whites at room temperature
- 1/2 tsp cream of tartar
- 1/8 tsp salt
- 1/4 cup plus 2 Tbsp sugar
- 1/2 cup sifted cake flour
- 1/2 tsp vanilla extract
- 1/8 tsp almond extract
- 1/2 cup flaked coconut
Preheat oven to 325 degrees F. Position rack in the center of the oven.
Beat egg whites until foamy. Add the cream of tartar and salt. Beat until soft peaks form. Gradually add the sugar, 2 Tbsp at a time, beating until stiff peaks form.
Sprinkle flour over egg white mixture; fold in carefully. Gently fold in almond and vanilla extracts.
Pour batter into an ungreased 9-inch square baking pan. Sprinkle coconut over the top.
Bake for 30 minutes, or until a wooden pick inserted in the center comes out clean. Cool in pan about 40 minutes. Remove cake from pan and cut into squares to serve.

If you haven't already, go enter my cookbook giveaway!
Saturday, May 22, 2010
Strawberry Fields Forever

A few weeks ago Mr. H and I went strawberry pickin'! Every year for the last few years we have gone to Marble Falls to Sweet Berry Farm. In the fall we pick pumpkins and gourds (here and here) and in the springtime we pick red, ripe, juicy strawberries!


Memoria of Mangio da Sola just posted a beautiful blackberry cobbler on her blog. Go check out Memoria's blackberries! She hand picked her berries at the same farm with her mother this past weekend and it reminded me of all the photos I took of the strawberry fields so I wanted to share with you.

Mr. H and I each picked our own strawberries and quickly filled up two crates--in fact they were overflowing with ruby goodness! There's nothing better than plucking a ripe strawberry off the vine that is sun kissed and all warm and juicy inside. It's heavenly! If you've never done that then put it on your bucket list. You'll be glad you did.

At this particular farm they also have a small petting area with goats, donkeys and horses. It's a great place for field trips and photo ops. My favorite time to go is during the fall because it's cooler and they also have scarecrow stuffing, hay rides and mazes. Luckily all year round they have homemade ice cream in berry, strawberry and pumpkin flavors. yum!

If you ever get the opportunity to pick your own berries, I highly recommend you do. Then go bake something spectacular with them like this strawberry shortcake or blackberry cobbler. But be sure to savor a few all by themselves...or maybe with a little whipped cream.

Ah! Luscious strawberries how I heart thee!
Thursday, May 20, 2010
Cupcakes and Cookbooks


It's Cake Slice time again, and May's cake choice was Lemon Poppyseed Cake with Almond Frosting from Sky High Cakes by Alisa Huntsman and Peter Wynne. I was so glad to get the chance to bake from this book again since it is one of my favorites. Only instead of making a triple layer cake I decided to make these into cupcakes.

I did make a few adaptations but they were minor and didn't really change the recipe. Firstly I halved this recipe and ended up with 15 cupcakes. I did this because I thought it would be better for portion control. Secondly, I only used half the amount of poppyseeds the recipe called for because I used them all in/on my Everything No-Knead Bread. And lastly, instead of adding almond extract to the cream cheese frosting, I added lemon zest because there are nut allergies in my family.

These cupcakes were different than any other lemon poppyseed cake I've had. Mostly because it was a white cake used for the base. There are no egg yolks in this recipe so the texture is very light and fluffy, but still firm. They're tender but not terribly moist. Luckily they're brushed with a lemon syrup that sweetens and moistens them up.
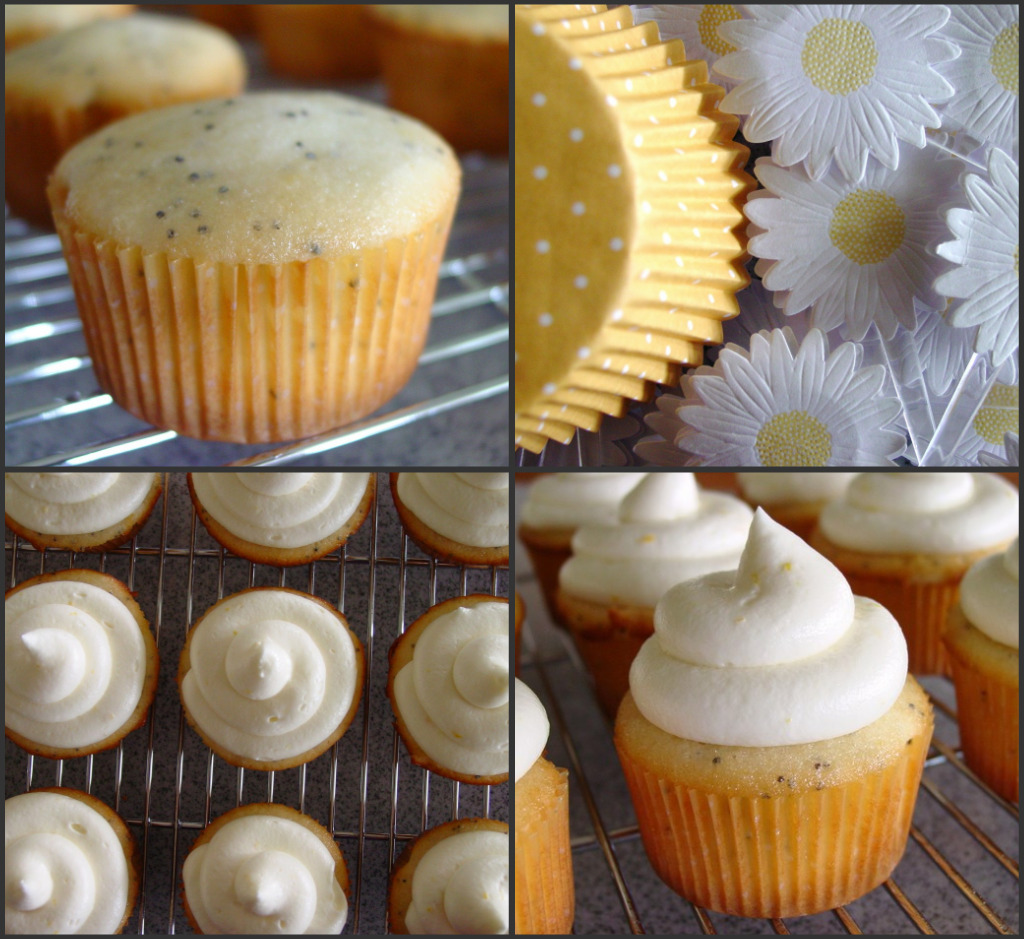
I think an almond flavoring in the frosting would have been delicious but the lemon was refreshing and bright and complimented the cupcakes perfectly. It also piped really well, thanks to the boatload of powdered sugar :-) I baked them in these Spring-y liners and picks from the Martha collection that I found last year. I had been waiting for the perfect occasion to use them and this Mother's Day was it. I then garnished them with more sugared lemon zest. I hope you like 'em!

Lemon Poppyseed Cake from Sky High
Cake:
- 3 cups cake flour
- 1 3/4 cups sugar
- 4½ tsp baking powder
- ½ tsp salt
- 3 tbsp poppy seeds
- 2 sticks (8 ounces) unsalted butter
- Zest of 1 large lemon
- 1¼ cups buttermilk
- 5 egg whites
Lemon Syrup:
- 1/3 cup water
- 1/4 cup sugar
- Juice of 1 large lemon
Frosting:
- 8 ounces cream cheese
- 2 sticks (8 ounces) unsalted butter
- 5 cups confectioners sugar
- 1 tbsp almond extract or finely grated zest of 1 lemon
Cake: Preheat the oven to 350F. Grease three 8 inch cake pans and line the bases with parchment paper. Combine the flour, 1¾ cups sugar, baking powder, poppy seeds and salt in a mixing bowl. Mix gently to combine.
Add the butter, lemon zest and 1 cup of buttermilk to the flour. Beat on low until completely mixed. Raise the speed to medium and beat for 1-2 minutes until lighter in color.
In a medium bowl, combine the egg whites with the remaining ¼ cup buttermilk, whisk to blend thoroughly. Add the egg white mixture to the batter in 2-3 additions, scraping down the sides of the bowl and beating only enough to incorporate the mix. Divide the batter between the three pans.
Bake for 25 to 30 minutes until the cakes are golden brown, spring back when touched lightly in the centre, and a cake tester comes out clean. Leave to cool in the pans for 10 minutes before turning out.
While the cake layers are cooling, make a lemon syrup.
Syrup: In a small pan combine the remaining ¼ cup sugar, water and lemon juice. Bring to the boil, stirring to dissolve the sugar.
Generously brush the cakes with the lemon syrup while they are still warm. Then allow the cakes to cool completely.
Frosting: In a large mixing bowl beat the cream cheese and butter with an electric mixer until light and fluffy. Gradually add the confectioners sugar, 1 cup at a time, beating well between each addition. Add the almond extract or lemon zest and then continue to beat well for 3-4 minutes until light and fluffy.
To complete the cake, place one layer, top side down, on a cake plate and spread about a fifth of the frosting over the cake to cover evenly. Repeat with the second layer and place the third layer on top. Frost the top and sides of the cake with the remaining frosting.
Makes 1 x 8inch triple layer cake or 30 cupcakes.
NOTE: I added lemon zest to the cream cheese frosting instead of the almond extract.
I halved the recipe and made 15 cupcakes.

Be sure to stop by the other Cake Slice Bakers to see their cakes!
___________________________________________________
WAIT! I have a giveaway for you!
You have a chance to win ANY cookbook your little heart desires. Yes, it's true! This giveaway is sponsored by Snubbr and all you have to do is leave me a comment on this post telling me what cookbook you'd like to win and why. Be sure to answer both questions! That's it, just make sure it's a cookbook still in print so they can send it to you :-)
A winner will be chosen in one week by the folks at Snubbr. Be sure I have a way of contacting you if you win.
At the request of Snubbr, this giveaway is only open to US residents.
Best of luck to you all!
Monday, May 17, 2010
A Little Bit Of Everything

Thick Crust. Chewy Interior. I'm talking about No-Knead Bread. I've made this before with rosemary and lemon, but this time I made it with everyone's favorite bagel topping- Everything Spice Blend. It's a combination of garlic, onion, salt, poppy and sesame seeds. This flavors the inside of the bread as well as the top.

This bread was delicious and hearty. It was aromatic and all the different goodies on top give it character. If you've never made no-knead bread, you must. It's very simple and there's minimal effort involved, you just have to plan for it. This recipe takes several hours to complete, but you can throw all the ingredients into a bowl before you go to bed and finish it up the next day. You stir it once, fold it over it's self a few times and let it rest and rise. That's when all those magical bubbles form.


And I baked it in my brand new Le Creuset! I've wanted one for a long time but I refused to pay hundreds of dollars for it. I don't care how good it works, who has that kind of money to blow on a pot? I found this beauty at Tuesday Morning for a third of the price. It's a discontinued color, which I LOVE, and it has a tiny imperfection on the inside so I got an extra discount on it. It's 4.5 qts and retails for about $230, but I got this one for $102. A steal and a gift to myself.


I'd like to dedicate this loaf to my dear friend Janet of From Captain's Daughter To Army Mom. Ever since I told her I made this a couple weeks ago, she's been wanting to see it. Janet, I know you're a big fan of No Knead Bread and you've made it several times, so this is for you! I hope you'll add it to your bread repertoire.

On another note, I finally figured out how to do collages! A few days ago Laura of Hey Mom What's For Dinner? shared with us how to make a header using different pictures. At first I wasn't so interested in creating a new header, then I went to Picnik.com and got hooked! Not only can you make headers, but you can make collages and edit photos. And it's FREE, all you have to do is sign up at Picnik.com. Thanks Laura for showing how easy it is. I made myself a new header and well as for Ingrid- go check it out!

Everything No-Knead Bread adapted from NY Times
- 3 cups all-purpose or bread flour, more for dusting
- ¼ teaspoon instant yeast
- 1¼ teaspoons salt
- 2 Tbsp. Everything Spice, divided (recipe below)
- 1 5/8 cups water
- Flour, cornmeal or wheat bran as needed
1. In a large bowl combine flour, yeast, salt and 1 Tbsp. Everything Spice. Add water and stir until blended; dough will be shaggy and sticky. Cover bowl with plastic wrap. Let dough rest at least 12 hours, preferably about 18, at warm room temperature, about 70 degrees.
2. Dough is ready when its surface is dotted with bubbles. Lightly flour a work surface and place dough on it; sprinkle it with a little more flour and fold it over on itself once or twice. Cover loosely with plastic wrap and let rest about 15 minutes.
3. Using just enough flour to keep dough from sticking to work surface or to your fingers, gently and quickly shape dough into a ball. Generously coat a cotton towel (not terry cloth) with flour, wheat bran or cornmeal; put dough seam side down on towel and dust with more flour, bran or cornmeal. Cover with another cotton towel and let rise for about 2 hours. When it is ready, dough will be more than double in size and will not readily spring back when poked with a finger.
4. At least a half-hour before dough is ready, heat oven to 450 degrees. Put a 5- to 8-quart heavy covered pot (cast iron, enamel, Pyrex or ceramic) in oven as it heats. When dough is ready, carefully remove pot from oven. Slide your hand under towel and turn dough over into pot, seam side up; it may look like a mess, but that is O.K. Shake pan once or twice if dough is unevenly distributed; it will straighten out as it bakes. Spritz or brush the top of the dough with water then sprinkle on remaining 1 Tbsp. Everything Spice. Cover with lid and bake 30 minutes, then remove lid and bake another 15 to 30 minutes, until loaf is beautifully browned. Cool on a rack.
Yield: One 1½-pound loaf.

Everything Spice Blend from Appoggiatura
- 4 tsp poppy seeds
- 4 tsp sesame seeds
- 4 tsp dried garlic flakes
- 4 tsp dried onion flakes
- 4 tsp kosher or sea salt
Mix all ingredients together well in a small bowl. Use to liberally top bagels as soon as they emerge from their water bath. Store any leftovers in an airtight container. Will keep up to two months.

It's quite delicious slathered with butter and griddled, then topped with garlic pesto and a slice of muenster cheese. oh man!
Thursday, May 13, 2010
The Good, The Bad and The Ugly- Archived But Not Forgotten Recipes
I've never posted a recipe and just linked to it without typing out the recipe. But today, I have a smorgasbord of recipes for you.
I have a ton of recipes in my archives that I've never blogged about, for one reason or another. Maybe because my photos are ugly or I didn't take many, or because the recipe was less than stellar. Some I experimented with and don't have recipes for but I decided to go through my photo archives share with you some of my kitchen creations/disasters.
__________________________________________________Red Velvet Cake
from Swan's Down- This cake was beautifully red. It sliced perfectly and the contrast of red and white was appealing to me. But it was nasty so it never got blogged. But ain't it pretty?
Golden Pull Apart Butter Buns
from King Arthur Flour- Mr. H really loved these rolls but I didn't take many pics so I never blogged about them. I thought they were good but these are still my favorite.
Cherry Tomato & Mozzarella Salad- One my favorite and simple salads- Cubed mozz, halved cherry tomatoes, Paul Newman's Balsamic Vinaigrette and fresh basil. yum!

Fudgy Chocolate Brownies
from Martha Stewart- A reader left a comment on my blog awhile back saying these were her favorite brownies. They were tasty but still not my go-to brownie. I'm open to suggestions if you've got any!
Hershey's Milk Chocolate & Toffee Nuggets- This was an experiment and used a recipe that a friend gave me. But they were much more crisp than I wanted. I'll have to play with this one a bit, but basically you can just chop up some Nuggets and toss them in your favorite cookie/blondie batter.

Pineapple Cake with Cream Cheese Frosting
from My Tasty Treasures- I made this before we went to DC and I didn't like the pictures I took because I ran out of light (this was the only good one). It was a very different cake than I expected but I really liked it. It was sticky and gooey and delicious but I thought the frosting was a bit too sweet.
Classic Crumb Cake
from Martha Stewart- This was a waste of 3 1/2 sticks of butter. I'm not sure what I did wrong but it was a little gummy and seemed almost uncooked. I've seen others make the same recipe and theirs turned out fine. Despite the texture, I thought the flavor was a little lackluster.
Spicy Crab Dip- I just made this one up as I went and it was tasty but I didn't jot down a recipe. I just like the blue bowl so I thought I'd share :-)

Rohrnudeln
from A Feast For The Eyes- I'm embarrassed to say that I made these a year ago. I never liked the pictures so I never posted them. They were delicious and reminded me of yeasty sweet kolaches with a jam filling. I filled mine with peach jam and topped them with butter and sugar that baked into a crunchy topping.
Guittard Chocolate Chip Bars- A while back I made Guittard chocolate chip cookies. They were super buttery and good but I wanted a bar cookie so I patted them into a baking dish and topped them with more chips. Perfect with a glass of milk.

Garlic Oven Fries
from A Feast For The Eyes- I won't be mad at you if you think this picture is ugly. ha ha! These fries (and that chili dog) were yummy but again my pictures stunk because I ran out of light. This was the best photo of the baked fries I could find.
Coffee Ice Cream- I adapted Mr. H's favorite vanilla recipe by adding instant espresso to it. In the end it just wasn't as coffee-y as we hoped for. Note to self: Add lots more coffee next time!

Hasselback Potatoes- I can't remember where I found the technique for this recipe, but you basically slice them but still keep them attached, season and butter, then bake til tender. I didn't take photos of the final product and while they were good we still like a loaded baked potato better. I served these with Steak Diane from Vanilla Sugar. so good!

Black & White Angel Food Cake
from Ina Garten- I made this a year ago for my MIL's birthday. She loves angel food cake and I had always wanted to make this recipe but I was a bit disappointed. The ganache thickened up too much and ended up peeling off the cake. The next day I topped it with chocolate sauce and strawberries which made it prettier, but I still don't like angel food cake. I served it with pomegranate pear sorbet which was the best part!
I hope you've enjoyed my little slide show of recipes. Do you have any recipes in your archives that you haven't blogged about for once reason or another? Please share!
Subscribe to:
Comments (Atom)