Showing posts with label Marshmallows. Show all posts

Saturday, October 18, 2014

Salted Brown Butter Biscoff Treats

Any time I see Biscoff or brown butter in a recipe, I perk up and my eyes get a little bigger. I love those two ingredients and they're even better when you you combine them to make these Salted Brown Butter Biscoff Treats. Rice Krispy treats are so easy to make and they're perfect to make any time of year and I've never met any one who didn't like them. I've made Brown Butter and Spice Rice Treats for years but decided to try something a little different this time. 


Biscoff, if you're not familiar with it, is a creamy spread very similar in consistency to peanut butter, but it's completely nut free because it's made from crushed up Biscoff (Lotus Brand) cookies. They are lightly spiced, caramelized cookies that are quite addicting. When you make it into a spread and can then shovel it into your mouth with a spoon, it becomes heavenly! Mixed with the earthy, nutty flavors of browned butter and accented with sea salt, these treats become irresistible. Hubby said these were amazing, and he rarely dishes out that compliment. 

Salted Brown Butter Biscoff Treats adapted from Bakerella

  • 10 ounces mini marshmallows
  • 1 stick unsalted butter
  • 3/4 cup creamy Biscoff spread
  • 6 cup crisp rice cereal
  • 1 cup coarsely broken Biscoff cookies
  • fleur de sel salt

Butter a 9x9-inch pan. Place the marshmallows in a large bowl and set aside. 

In a small saucepan, melt the butter over medium heat. Continue to cook, swirling the pot occasionally until the butter boils and becomes foamy. It will turn golden brown and start to smell nutty. Once the butter stops sizzling and the foam subsides, it is ready. Keep an eye on it because you don't want it to burn. This could take 5 to 8 minutes.

Once the butter has browned, remove from the heat and pour the butter and the browned bits over marshmallows. Stir until the marshmallows are fully coated. Place the bowl into the microwave and heat for one to two minutes, stirring occasionally until the marshmallows are completely melted. Stir in the Biscoff spread until fully incorporated. 

Carefully fold the cereal and the crushed Biscoff cookies into the marshmallow mixture until everything is well coated. Press cereal mixture into the buttered pan and sprinkle the top with sea salt, use as much or as little as you'd like. Allow treats to cool before cutting. 


Saturday, September 7, 2013

The S'mores Cookbook and The Novica Giveaway Winner!


I was recently sent a cookbook for review of The S'more Cookbook by fellow blogger Susan Whetzel of the blog Doughmesstic. I'm always thrilled when I see a blogger come out with a cookbook. I know some people think it's kind of overrated, but I know how hard bloggers work and how much time goes into running a website, cooking, baking, photographing, and recipe developing. If you're a blogger then you know it's hard work! 


I like s'mores. I don't love them because I think they can be a little too sweet at times, but I like them just fine. When I was sent this cookbook, I was intrigued, because I was hoping for s'more flavored/s'more inspired desserts and this book is filled with them. Granted, the first chapter of recipes is pretty basic. I wouldn't necessarily call them recipes, as much as they are s'more suggestions- using chocolate grahams with white chocolate instead of regular grahams and milk chocolate isn't that novel of an idea to me. Her recipe's include using different types of candy such as peanut butter cups or chocolate caramels in place of the milk chocolate. Tasty? yes. But I need more substance. Luckily, this book has several chapters of s'more goodness including Cakes and Pies, Cookies, Brownies and even s'mores for breakfast. If that's not you're thing, perhaps a S'mores milkshake will cure your cravings. 


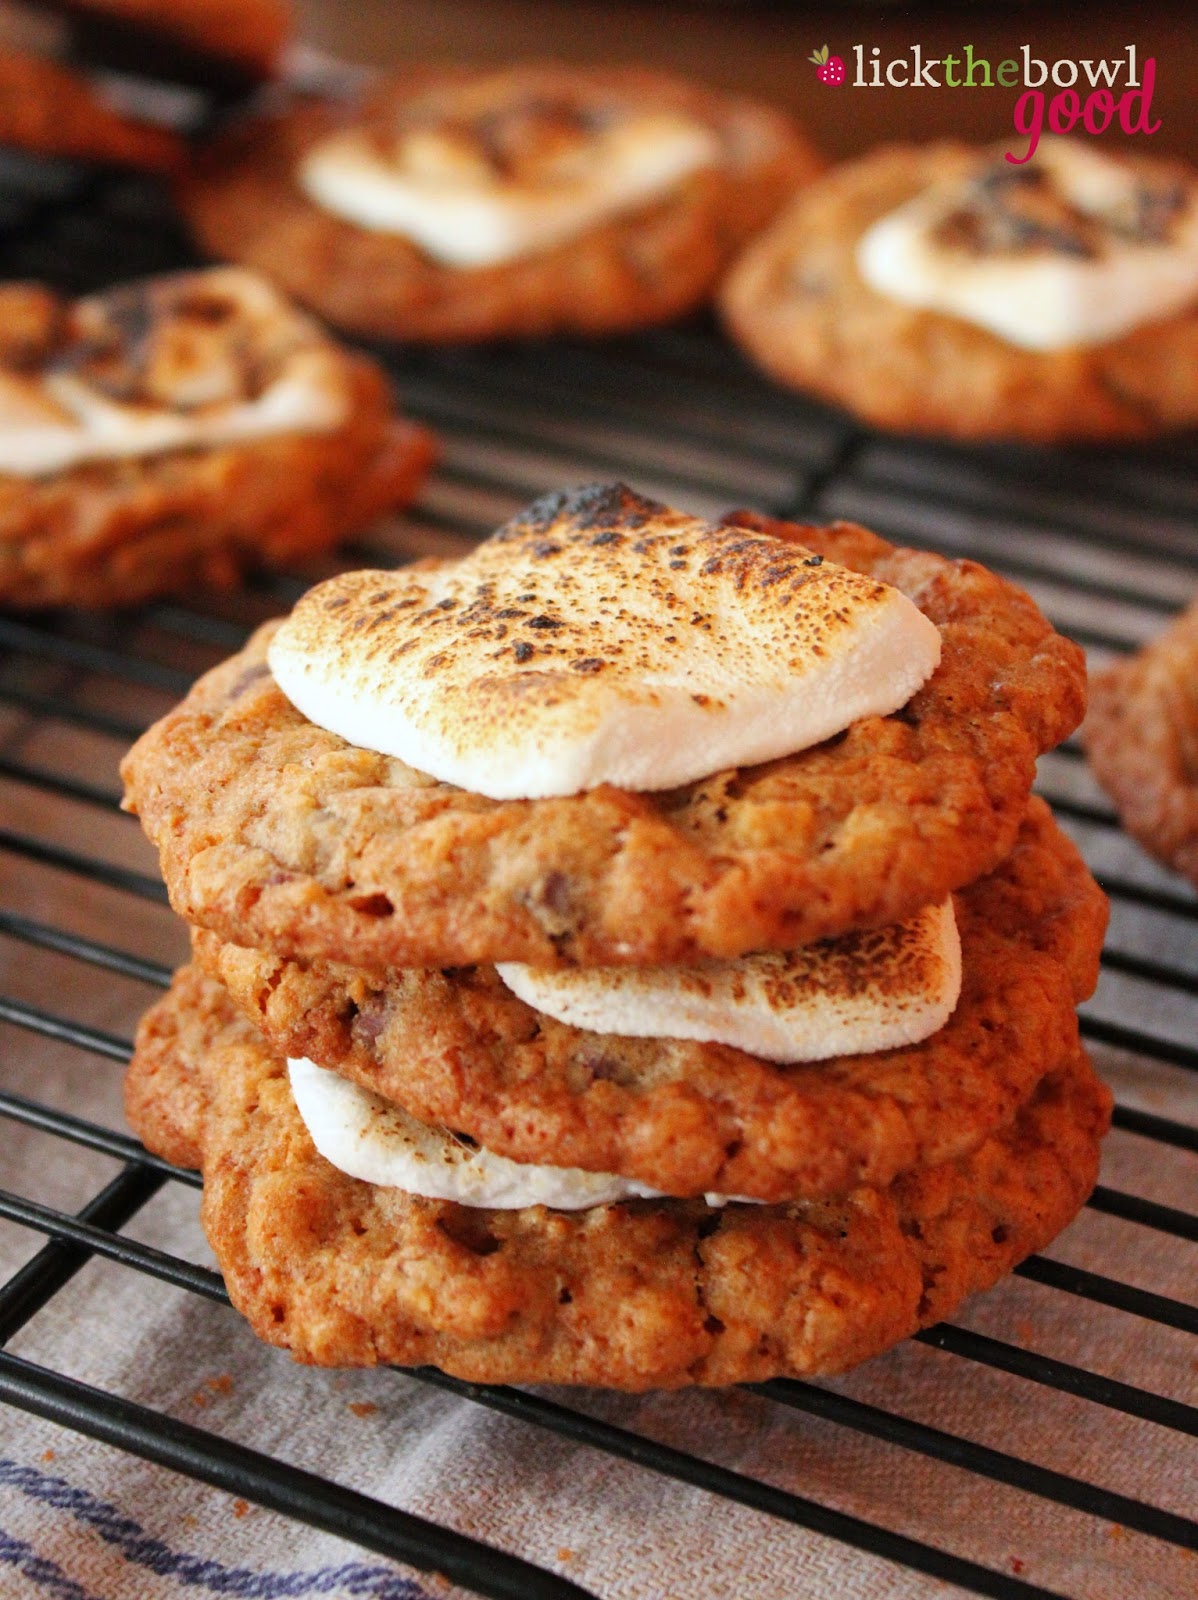
I opted for oatmeal chocolate chip S'more cookies as the first recipe I made. I also wanted to make S'more Frappuccinos but was out of marshmallow cream- that was a sad day. These cookies made it better though. I made a couple minor changes, but it didn't not affect the taste or outcome of the recipe. I used regular sized morsels instead of mini chips and used Stacker marshmallows instead of cutting large marshmallows into thirds. I didn't want to change anything about the recipe so I left it as is and just made my notes in red below. I would definitely make these cookies again because my husband LOVED them. I packed a couple in his lunch box. He's on the road a lot, so he left his cookies on the dash board to warm them and he said they tasted like they had just come out of the oven. They were crispy yet chewy, sweet and gooey. If you like S'mores you'll love these slightly less messy cookies. 

Hayden loves stars so I cut out a few star shaped marshmallows for him. 

Other recipes from this book I'd like to try are Toasted Marshmallow S'more Ice Cream, S'more Frappuccino, S'more Danish and the Chocolate Graham Pancakes. There's even a section on Giftable S'mores and ideas on how to package them. Every recipe has a full size color photo and there are lots of options for the S'more lover. In fact I know someone who would love this book. Hey Heather! I'm talking to you :-)


Oatmeal Chocolate Chip S'mores Cookies 
from The S'mores Cookbook  from Susan Whetzel

  • 1 cup softened salted butter
  • 3/4 cup dark brown sugar
  • 3/4 cup white sugar
  • 2 eggs
  • 2 teaspoons vanilla extract
  • 1 1/4 cups all-purpose flour
  • 1/2 teaspoon baking soda
  • 1/2 teaspoon salt
  • 1/4 cup graham cracker crumbs
  • 2 1/2 cups quick oats
  • 2 cups mini semisweet chocolate chips (I used regular chocolate chips)
  • 12 giant marshmallows, sliced into thirds (I used the small stacker marshmallows)

Preheat oven to 325 degrees F. Prepare a baking sheet with parchment paper; set aside. 

Using a stand mixer fitted with a beater attachment, cream the butter and sugars at medium-low speed until well combined. Add in the eggs, one at a time, beating well after each addition. Add in the vanilla; combine well. 

In a separate bowl, combine the flour, baking soda, salt and graham cracker crumbs. 

Add the dry ingredients to the wet batter. Mix on low until just combined. Stir in the oats and chocolate chips. 

Scoop rounded balls of batter onto the prepared sheets. (The directions don't say what size scoop to use to make the balls of dough. I used a medium ice cream scoop and got 40 cookies). The batter will spread, so be sure to leave ample space between. Bake for 13-15 minutes, or until the edges are very lightly browned. 

Remove from the oven, and immediately top with a slice of marshmallow. Allow to cool on baking sheets. Before serving, place the pan under the oven broiler or use a kitchen torch to toast the marshmallows. (This step was a little strange to me because the recipe makes 36-40 cookies. And it doesn't make sense (to me) to put a pan of cookies under the broiler every time you want a cookie, unless you're serving them to a crowd all at once. It's easier to use your torch, but not everyone has a kitchen torch. So I went ahead and toasted all the marshmallows at once after they were done baking. When we wanted a cookie, I just popped it into the microwave for 10 seconds to warm the chocolate and make the marshmallow gooey, and since they were pre-toasted, they still had that slightly charred toasted flavor.) 

The winner of the $50 Novica Giveaway is commenter #118 The Mommy from Long Daze Short Years. Congratulations! Please email me to claim your prize!


Thursday, December 13, 2012

Hot Cocoa Cupcakes for People.com!


I still haven't made any Christmas cookies, but I made these adorable cupcakes for People.com. As in People Magazine!!! Outside I'm calm and collected, inside I'm jumping up and down with glee! How exciting is that? I was asked to contribute a kid friendly holiday cupcake photo and I didn't have anything on my blog that was quite right, so I came up with these hot cocoa cupcakes that were not only cute but tasty and full of holiday flavors. 

I started off with my favorite chocolate cupcake recipe and substituted prepared hot cocoa in place of the water and added a handful of chocolate chips for extra richness and flavor. Then instead of frosting, I used an array of cocoa toppings that included fresh whipped cream, mini marshmallows, mini chocolate chips and crushed peppermints. Since these cupcakes are essentially mugs of hot cocoa, I finished them off with edible mini candy cane handles. I loved how these turned out! If you like chocolate and mint, these are sure to be a hit with your little elves. 

Hot Cocoa Cupcakes from Monica h


For The Cupcakes:
  • 1 1/2 cups all-purpose flour
  • 1 1/4 cups sugar
  • 1/4 cup unsweetened cocoa powder
  • 1 teaspoon baking soda
  • 1/2 teaspoon baking powder
  • 1/2 teaspoon salt
  • 1/3 cup canola oil
  • 1 cup prepared hot cocoa, cooled
  • 1 teaspoon vanilla extract
  • 2 eggs, lightly beaten
  • 1/2 cup mini chocolate chips
For The Whipped Cream
  • 1 1/4 cups heavy cream
  • 1/3 cup powdered sugar
  • 1/2 teaspoon vanilla extract
Garnishes:
  • mini marshmallows
  • mini chocolate chips
  • crushed peppermints
  • 18 mini candy canes

For The Cupcakes: Preheat oven to 350 degrees.  Line cupcake tins with 18 paper liners and set aside.

In a large bowl, combine flour, sugar, cocoa powder, baking soda, baking powder, and salt. Using a wire whisk, blend the dry ingredients thoroughly.

Add the oil, prepared hot cocoa, vanilla and eggs to the dry ingredients. Whisk until well incorporated and no lumps remain. Stir in the chocolate chips. 

Evenly divide the batter between the lined cupcakes tins.

Bake the cupcakes for 18 to 20 minutes, or until a toothpick inserted into the center comes out clean. Allow to cool for 10 minutes; then place them on a rack to cool completely.

For The Whipped Cream: In a medium bowl, combine heavy cream, powdered sugar and vanilla extract. With an electric mixer on medium speed, beat until thick, creamy, and slightly stiff, being careful not to overbeat. 

To Assemble The Cupcakes: Pipe or mound the sweetened whipped cream onto the cooled cupcakes. Garnish with a sprinkling of mini marshmallows, mini chocolate chips and crushed peppermints. Add a mini candy cane tucked into the side of the cupcake, to make a handle for the "mug" of hot cocoa. 
Serve immediately. Cover and refrigerate any leftovers. 

Makes 18 cupcakes. 

Saturday, July 21, 2012

Browned Butter- Making Rice Krispie Treats Better!


I  used to think my mom made the best rice krispie treats. That is, until I made these. Now don't get me wrong, I still love my mom's version because she doesn't measure anything and keeps on adding more butter or marshmallows as she sees fit, which makes them extra buttery and gooey to the point where the marshmallows stretch apart well after they've cooled. They're so good. But these are different. I've made them 4 times already and have yet to blog them because they disappear so quickly and there's never any left. Today is your lucky day!

Golden Browned Butter- see the solids stuck to the pan?
These rice krispie treats are made with browned butter. Browned butter is exactly what is sounds like. It is butter that has been browned. You start off by melting the butter in a pot, as it boils, sputters and foams slightly, the milk solids cook, resulting in brown bits at the bottom of the pan and the butter turns a lovely hue of gold and it smells rich and nutty. You can use in in place of regular butter and can be used in both sweet and savory recipes. It just kicks up the regular rice treats to a whole new level-  makes them more than just an after school treat. 
This little stinker tried for weeks, unsuccessfully, to get to Autumn's water bowl. Well he finally got into it and loved every second of it until he turned the bowl upside down and was completely soaked. I love the look on his face!
The addition of the spices makes these special too. The spice is subtle and not overwhelming and compliments the browned butter so nicely. I don't know about you, but spices like cinnamon, nutmeg and ginger are welcome in my kitchen all year round, not just in the Fall. If you're looking for something just a little bit different, give these a try. I promise you will not be disappointed. In fact, now my mom requests I make these for her :-) 

Browned Butter and Cinnamon Spice Rice Krispies Treats adapted from Let's Dish

Printer Friendly Version 
  • 7 cups Rice Krispies cereal
  • 1/2 cup (1 stick) unsalted butter
  • 1- 10 ounce bag (about 5 cups) mini marshmallows 
  • 1 teaspoon ground cinnamon
  • 1/4 teaspoon freshly ground nutmeg
  • 1/8 teaspoon ground ginger
Coat a 9x13 inch pan with butter or non-stick cooking spray. Measure out the cereal and set aside. Pour the marshmallows into a large bowl and set aside.  

To make the browned butter: Melt the butter in a small pot over medium heat. Continue to cook, swirling the pan occasionally until the butter boils and turns golden brown and smells slightly nutty. Keep an eye on it because you don't want  it to burn. This could take 5-10 minutes. 

Once the butter is brown and nutty, immediately pour it into the large bowl over the marshmallows- some brown bits may go with it, and that's okay. Stir to combine then place the entire bowl in the microwave for 30 seconds. Stir and reheat for an additional 30 seconds until the marshmallows have completely melted. Be careful because the mixture will be hot. Repeat if necessary.

Stir the cinnamon, nutmeg and ginger into the marshmallow mixture and mix until combined. Quickly add the cereal to the marshmallow-spice mixture and stir until everything is well coated. Working quickly, scrape the mixture into your prepared dish. With buttered hands, press the cereal evenly into the corners and smooth the top. 

Let cool completely and cut into bars. 


Thursday, January 20, 2011

S'mores In Cake Form

It's Cake Slice time again! Today I have a graham cracker-chocolate chip snacking cake with marshmallow buttercream frosting. Whew! That's a mouthful! I was really excited to try this cake because I'm a huge fan of s'mores and cake, but it wasn't everything I hoped it would be. It was by no means bad, but it certainly was not like a traditional s'more. Recently I made s'more bars and now this and neither have wowed me and it's leaving me questioning my love for s'mores. Or maybe I'm just a s'more purist and like them the old fashioned way.

This cake was really simple to make and contains graham cracker crumbs in place of most of the flour in the cake. It then has chocolate chips folded into the batter (which was really yummy!) and baked. I opted to use mini chocolate chips instead of the regular morsels since all the pictures I saw had the chips sink to the bottom- I didn't want that. Once cooled it's topped with a silky marshmallow buttercream. I thought the frosting was better the second day, but it didn't really taste like marshmallow. The cake did taste like graham crackers but it had a bit of a spongy texture and was slightly dry, despite under baking it. All in all, this cake was fair, but I wouldn't make it again. Mr. H liked it though so it didn't go to waste, and that's always a good thing.

Graham Cracker-Chocolate Chip Snacking Cake adapted from Cake Keeper Cakes

Printer Friendly Version

For the cake:

  • 8 whole graham crackers, finely ground (about 1 cup)
  • 1/4 cup unbleached all-purpose flour
  • 1 tsp. baking powder
  • 1/4 tsp. salt
  • 6 Tbs. (3/4 stick) unsalted butter, softened
  • 1/4 cup sugar
  • 2 large eggs
  • 1 tsp. pure vanilla extract
  • 1/4 cup milk
  • 1/2 cup semisweet chocolate chips (I used mini chips)

For the frosting:

  • 1/2 cup (1 stick) unsalted butter, softened
  • 1/2 cup confectioners’ sugar
  • 1/2 tsp. pure vanilla extract
  • 1/2 cup Marshmallow Fluff

Make the cake: Preheat the oven to 350ºF. Grease an 8-inch square baking pan and dust it with flour, knocking out any extra.

Combine the graham cracker crumbs, flour, baking powder, and salt in a medium mixing bowl.

Combine the butter and sugar in a large mixing bowl and cream with an electric mixer on medium-high speed until fluffy, about 3 minutes, scraping down the sides of the bowl as necessary.

With the mixer on low speed, add the eggs and vanilla. Scrape down the sides of the bowl and then beat until smooth. With the mixer on low speed, add 1/3 of the flour mixture, then 1/2 of the milk, stirring until combined. Repeat with the remaining flour and milk, ending with the flour. Stir in the chocolate chips.

Scrape the batter into the prepared pan and smooth the top with a rubber spatula. Bake until a toothpick inserted in the center comes out clean, about 35 minutes (Mine was done in 27 minutes). Let the cake cool in the pan for about 10 minutes. Invert it onto a wire rack, and then turn it right side up on a rack to cool completely.

Make the frosting: Place the butter in a medium mixing bowl and beat until creamy. With the mixer on low speed, slowly add the sugar, scraping down the sides of the bowl as necessary. Stir in the vanilla and the Marshmallow Fluff and beat until smooth.

Cut the cake into squares and serve each one with a dollop of frosting on top.

Make Ahead Tips: Store uneaten squares in a cake keeper or wrap in plastic and store at room temperature for up to 3 days. The frosting can be kept in the refrigerator in a bowl covered with plastic wrap for up to 3 days. Bring to room temperature before using.

Tuesday, November 16, 2010

S'more Love

We're smack dab in the middle of November (where did the year go?) and I'm making s'mores! Wacky, I know, but s'mores aren't seasonal to me. They're a perfect treat during the warm summer months around the campfire, but they're perfectly acceptable in the Fall too. And just for the record I've never had a s'more around a camp fire. If I'm having a craving then I just toast a marshmallow with my blow torch, or I use my gas burner to get the job done. When I'm feeling lazy, the microwave works just fine.

This is a s'more bar and while it has all the components of a traditional s'mores but it was different. It was more sophisticated in presentation but I don't think it's nearly as fun as a gooey Jet-Puff marshmallow stuck between two crisp graham crackers. Though it is a portable treat and it gets bonus points for that. The flavors were delicious, but for me, what makes the s'more is the charred marshmallow. These bars used marshmallow fluff, and I missed the burnt bits. I like burnt bits :-)

Don't let my opinion of these bars deter you from making them. Many people love them and they are awesome right out of the oven when they're piping hot and the chocolate is molten. That first stolen bite was the best, especially with an ice cold glass of milk. If I make these again I'd bake them just a couple minutes longer to toast up the graham topping a little more- I think mine were a tad underbaked. If you make them, let me know how you like them! BTW, is anyone else still out of whack from the time change?

S'more Bars from Lovin' From The Oven

  • 1/2 cup butter (1 stick), room temperature
  • 1/4 cup brown sugar
  • 1/2 cup sugar
  • 1 large egg
  • 1 tsp vanilla extract
  • 1 1/3 cups all purpose flour
  • 3/4 cup graham cracker crumbs
  • 1 tsp baking powder
  • 1/4 tsp salt
  • 5 regular Hershey's milk chocolate bars or 2 king-size bars
  • 1 1/2 cups marshmallow creme/fluff (7 1/2 oz. jar)

Preheat oven to 350°F. Grease an 8-inch square baking pan.

In a large bowl, cream together butter and sugar until light. Beat in egg and vanilla. In a small bowl, whisk together flour, graham cracker crumbs, baking powder and salt. Add to butter mixture and mix at a low speed until combined.

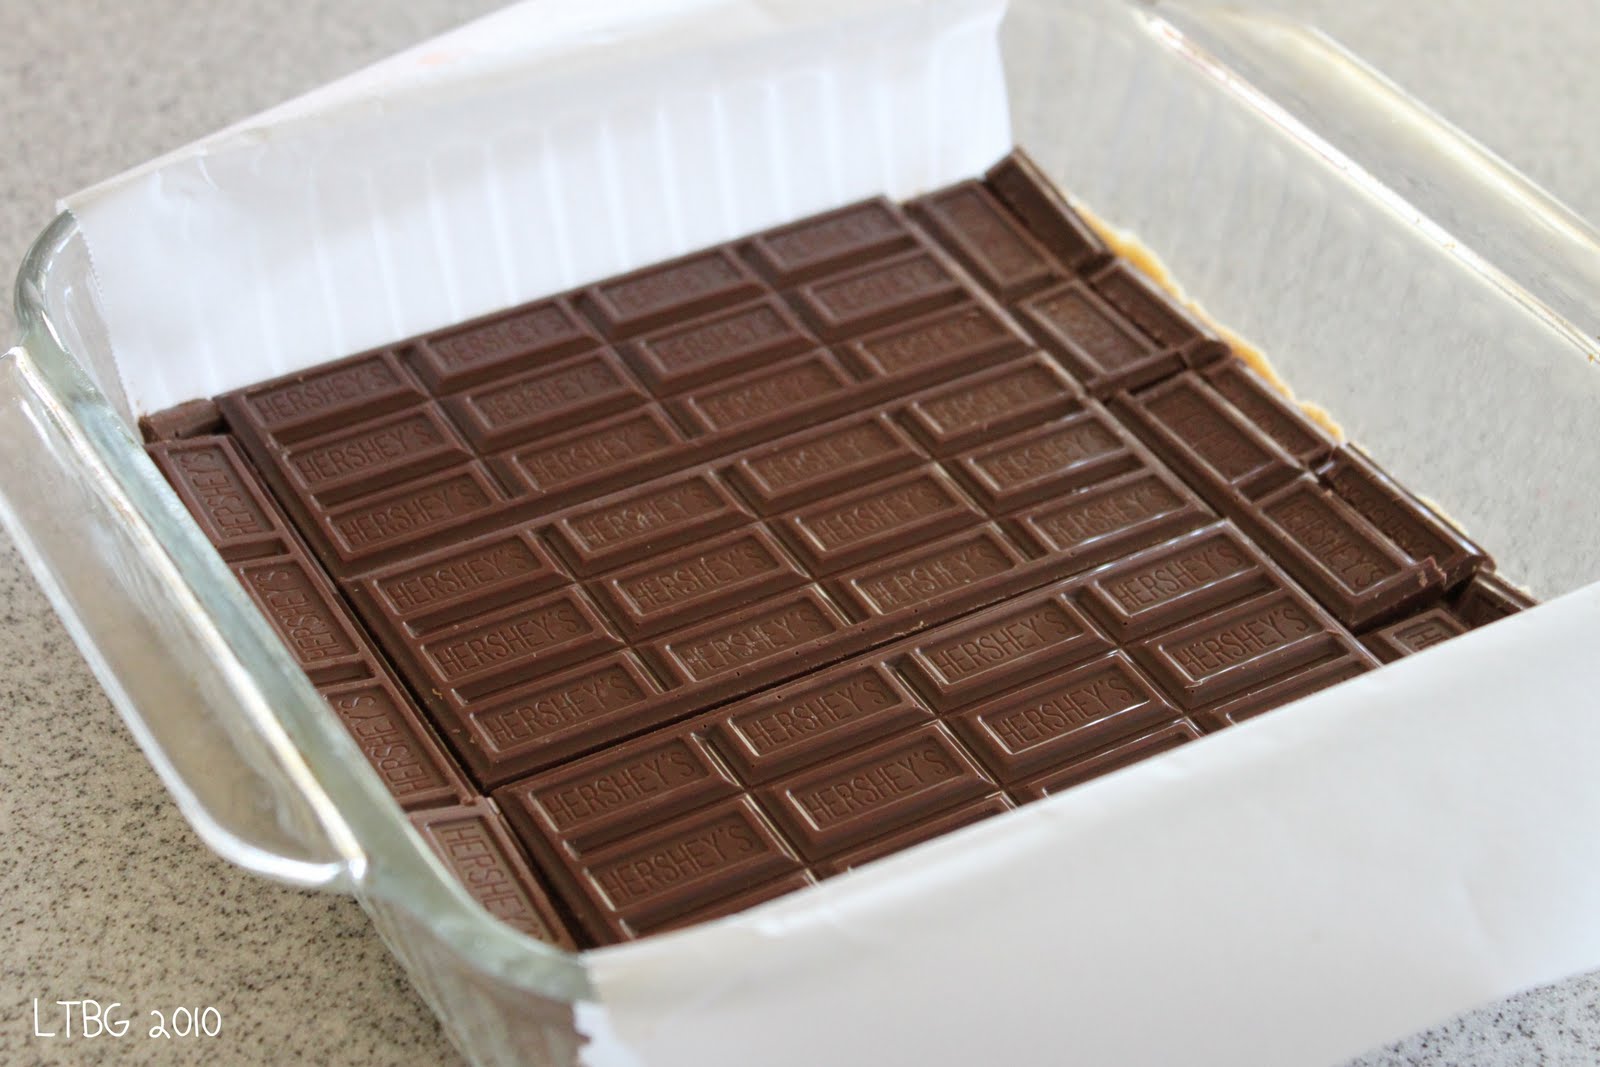
Divide dough in half and press half of dough into an even layer on the bottom of the prepared pan. Place chocolate bars over dough breaking the chocolate (if necessary) to get it to fit in a single layer no more than 1/4 inch thick. Spread chocolate with marshmallow creme or fluff.

Place remaining dough in a single layer on top of the fluff (most easily achieved by flattening the dough into small shingles and laying them together like patchwork).

Bake for 30 to 35 minutes, until lightly browned. Cool completely before cutting into bars.

Friday, October 8, 2010

Mocha Memories

Continuing on with another Pillsbury dessert, today I share with you a vintage pie recipe. Every once in awhile when I'm at my in-laws house, I'll grab a cookbook off the shelf and start reading, looking for inspiration. My cookbook of choice was the Pillsbury's Bake-Off Dessert Cook Book, copyright 1968. There were a lot of good looking recipes in there and surprisingly quite a few of them included marshmallows. Apparently in 1968, marshmallows were the big thing!

I chose this recipe for Mocha Frappe Pie for a reason, other than because it made me salivate. When Mr. H and I were first dating (11 years ago) he introduced me to Starbucks Mocha Frappuccinos- it was love at first drink. If for some reason, you live on another planet and have never had a Mocha Frap, it's a blended coffee drink with chocolate syrup- it's frosty and addicting. But before I ever had the icy treat from the coffee shop, I had the milky bottled variety. We used to distinguish the two by calling the blended version, the "fresh" Frap.

A typical date night for us consisted of dinner at T.G.I.Friday's or Chili's, because as teenagers that's all we knew, as well as a sappy romantic movie at the theater. Afterwards we'd grab a "fresh one" for dessert and drive around town wasting gas without a care in the world. They were perfect evenings. On school days, he used to pick me up and greet me with a cinnamon raisin bagel or a Power Bar and a Frap for breakfast. These days we just grab one while we're out and about running errands, but making this pie reminded me of our growing love for eachother. This was my way of giving him the freshest Mocha Frappe of all.

The combination of flavors brought back some good memories. This pie is creamy and sweet with an almost mousse-like filling, which is a contrast from the sticky, gooey chocolaty marshmallow layer on the bottom of the crust. The original recipe called for a pastry crust but I knew a chocolate cookie crust would be a perfect match for the mocha- it was fantastic. I also may have added a bit more of espresso powder because I like a pronounced coffee flavor. Topping off the pie was a fluffy ring of unsweetened cream and chopped toasted pecans. This was a special pie, for a special man.

Mocha Frappe Pie adapted from Pillsbury

Printer Friendly Version

Crust:
  • 1-1/4 cups chocolate cookie crumbs
  • 3 Tablespoons sugar
  • 1/3 cup butter, melted

Filling:

  • 1/2 lb. (about 35-40) large marshmallows
  • 3 Tablespoons sugar
  • 1/2 cup evaporated milk
  • 3 teaspoons instant coffee or espresso powder
  • 1 cup (6 oz.) semi-sweet chocolate chips
  • 1 cup heavy whipping cream

To make the crust: Preheat oven to 375 degrees F. In a medium bowl, mix all ingredients until well blended.

Press firmly onto bottom and up side of 9-inch pie plate.

Bake 8 to 10 minutes until set. Cool completely.

To make the filling: In top of a double boiler, combine marshmallows, sugar, evaporated milk and instant coffee/espresso powder.

Cook over boiling water, stirring occasionally,until marshmallows are melted. Remove from heat. (This can be done in the microwave, but be sure to keep a close eye on it so it doesn't boil over.)

Stir in chocolate chips until well blended. Cool completely.

Spread 3/4 cup of the cooled filling into the bottom of the cooled crust.

In a separate bowl, beat heavy cream until thick. Fold whipped cream into the remaining chocolate mixture. Pour over chocolate layer.

Chill at least 2 hours before serving.

Top with additional whipped cream, chocolate curls or chopped pecan if desired.

Collage pie!

Thursday, June 10, 2010

Aye, Aye Cap'n! A Father's Day Two-fer

A couple weeks ago a reader named Katherine from Pennsylvania left me a comment with a request for a recipe containing Cap'n Crunch Cereal. This is what she said "I'm a regular reader and always looks forward to your unique recipes and posts. Therefore, I come to you with a recipe void I am in need of filling, and I hope you can help me out. My father loves Cap'n Crunch cereal, I mean LOVES it. So with father's day coming up, I would love to bake him something special...something with Cap'n Crunch cereal in it! Aside from just having the cereal as an ingredient, I want this item to truly TASTE like the cereal - that's key here :) So, I hope you can use your special baking skills and think up something yummy for the most important man in my life, my father. Thank you for your time!" How could I not come up with something for her?

I've never really gotten a request like this before. Sure I've had people email me and ask if I have certain types of recipes but no one has ever asked for such a unique recipe. So off to the Google Gods I went, then I asked Mr. H if he'd help eat the remaining cereal if I were to buy a box and luckily he agreed. Katherine was originally thinking of a cake or cookie recipe to make for her father but today I have two recipes for you and her but neither are cake or cookies. I wanted to make something that I would want to eat so that I didn't waste any ingredients and I came up with Cap'n Crunch French Toast and Cap'n Crunch Peanut Butter Cereal Bars. yum!

I want to be honest and say that I did not create either of these recipes. The French Toast recipe comes from Blue Moon Cafe in Maryland that was featured on Diners, Drive-In and Dives. I love french toast so I was excited about this one. And the second recipe is a kicked up marshmallow cereal bar. It has the addition of peanut butter and M&M's to make them extra sweet and fun. I wasn't sure how well I'd like these because I thought they'd be too sweet but these were very good. I ate most of them myself :-P The only thing I'd change next time is to use the mini M&M's. They had a nice crunch to them from the cereal but they were gooey and buttery and had a nice contrasting flavor from the creamy peanut butter and chocolate.

The toast was awesome! I used day old French bread that I cut about an inch thick and dipped it into the custard. The trick to getting fluffy french toast is to not soak the bread completely, otherwise you'll end up with wet and dense toast- that took me a few years to figure out :-) I omitted the extra sugar in the custard because the cereal is so sweet already. It was sweet and crispy on the outside but light and soft on the inside. It tasted like Cap'n Crunch but it wasn't overly sweet. The original recipe calls for sweetened whipped cream but we opted for syrup and fresh fruit. This was a winner!

Cap'n Crunch French Toast from Blue Moon Cafe via Diners, Drive-Ins and Dives Cookbook

Printer Friendly Version

French Toast:

  • 3/4 cup heavy cream
  • 3 large eggs, lightly beaten
  • 2 tablespoons sugar (I omitted this)
  • 1 teaspoon pure vanilla extract
  • 3 cups cap’n crunch cereal
  • 8 to 10 slices bread, such as Texas toast or French bread
  • Butter for cooking

Topping: (optional)

  • 1 cup heavy cream
  • 2 tablespoons confectioners’ sugar
  • 1 teaspoon pure vanilla extract
  • 2 cups assorted fresh seasonal berries

Mix the cream, eggs, sugar, and vanilla in a large bowl and whisk until combined.

Put the cereal in a storage bag and use a rolling pin to crush cereal until it resembles cracker meal. Transfer the cereal to a shallow dish.

Dip a couple slices of the bread into the cream mixture until soft but not completely soaked. Let excess liquid drip from the bread, then press into the cereal crumbs to coat evenly. Place on a sheet pan and repeat with the remaining slices.

Heat a large skillet or griddle over medium heat, add butter as needed, and cook the bread until caramelized on both sides, about 6 to 8 minutes total.

For the whipped cream topping: Beat the cream, confectioners’ sugar, and vanilla in a large bowl with a hand mixer to soft peaks. Dollop on top of the French toast and serve with the berries.

NOTE: I cut this recipe in half and made 4 slices of toast and omitted the whipped cream topping.

__________________________________________________

Cap'n Crunch Peanut Butter Bars adapted from Spark Recipes

Printer Friendly Version

  • 3 Tbsp butter
  • 3 Tbsp creamy peanut butter
  • 30 large marshmallows
  • 6 cups Cap'n Crunch Cereal
  • 1 1/2 cups M&M's

Spray a 9 x 13 pan with cooking spray, set aside.

In a large pot on the stove melt butter, peanut butter and marshmallows on medium low heat, stirring occasionally (I did this in the microwave in a glass bowl).

Once mixture is melted and all combined, remove from heat. Add cereal and M&M's quickly and stir quickly to well coat. As the marshmallow mixture cools will become harder to mix.

Pour into prepared pan. Coat your hands with a little extra butter and press down the mixture into the pan to get it as even as possible. Allow to cool completely and cut into squares.

Makes 24 bars.

NOTE: I only made 1/3 of this recipe.

Katherine I hope these recipes will make your father happy this Father's Day!

Related Posts with Thumbnails