Wednesday, May 25, 2011

Very Vanilla Bundt For My Baby Brother

My baby brother's birthday was a couple weeks ago. Only he's not a baby anymore, he's 16 years old! It's amazing how fast they grow up. I was looking at wedding photos the other day while cleaning out the guest room (preparing it for the nursery) and I saw this little boy who was my ring bearer. A sweet boy who was no more than 4 feet tall and now he's my height. His birthday fell on a weekday, but that didn't stop him from getting his birthday wish. He wanted all of his family to get together and have dinner together at The Olive Garden. And so we made it happen. I brought the cake.

I wasn't really planning on baking him a cake, but I had plenty of time that day to make it so I started texting my mom, asking what he'd like. I had several elaborate cakes in my head, some with tunnels of cheesecake running through it, others covered in a silky ganache. My mom said he mentioned something about a pineapple upside down cake a few days prior, I could do that. But then she said she'd just pick up a cake at the grocery store so I didn't have to bake anything. Um, no. Not gonna happen! So I text my brother while at school and asked him what his dream cake would be like. His response was not what I was expecting. It was only one word: vanilla.

It just so happens I made a vanilla bean cake for my old boss' mother about a week prior, only she wanted peaches in it, so I made it into a Peach Upside Down Cake. It looked and smelled great, the batter tasted amazing, but I didn't get a chance to taste the final product. I licked a beater, gave another to Mr. h and vowed to make that cake again. I just didn't think it would be so soon after the other. If I was going to make a vanilla cake, I wanted it to be loaded with vanilla flavor. The cake and glaze contains both vanilla extract as well as vanilla beans, speckled throughout. It is positively vanilla!

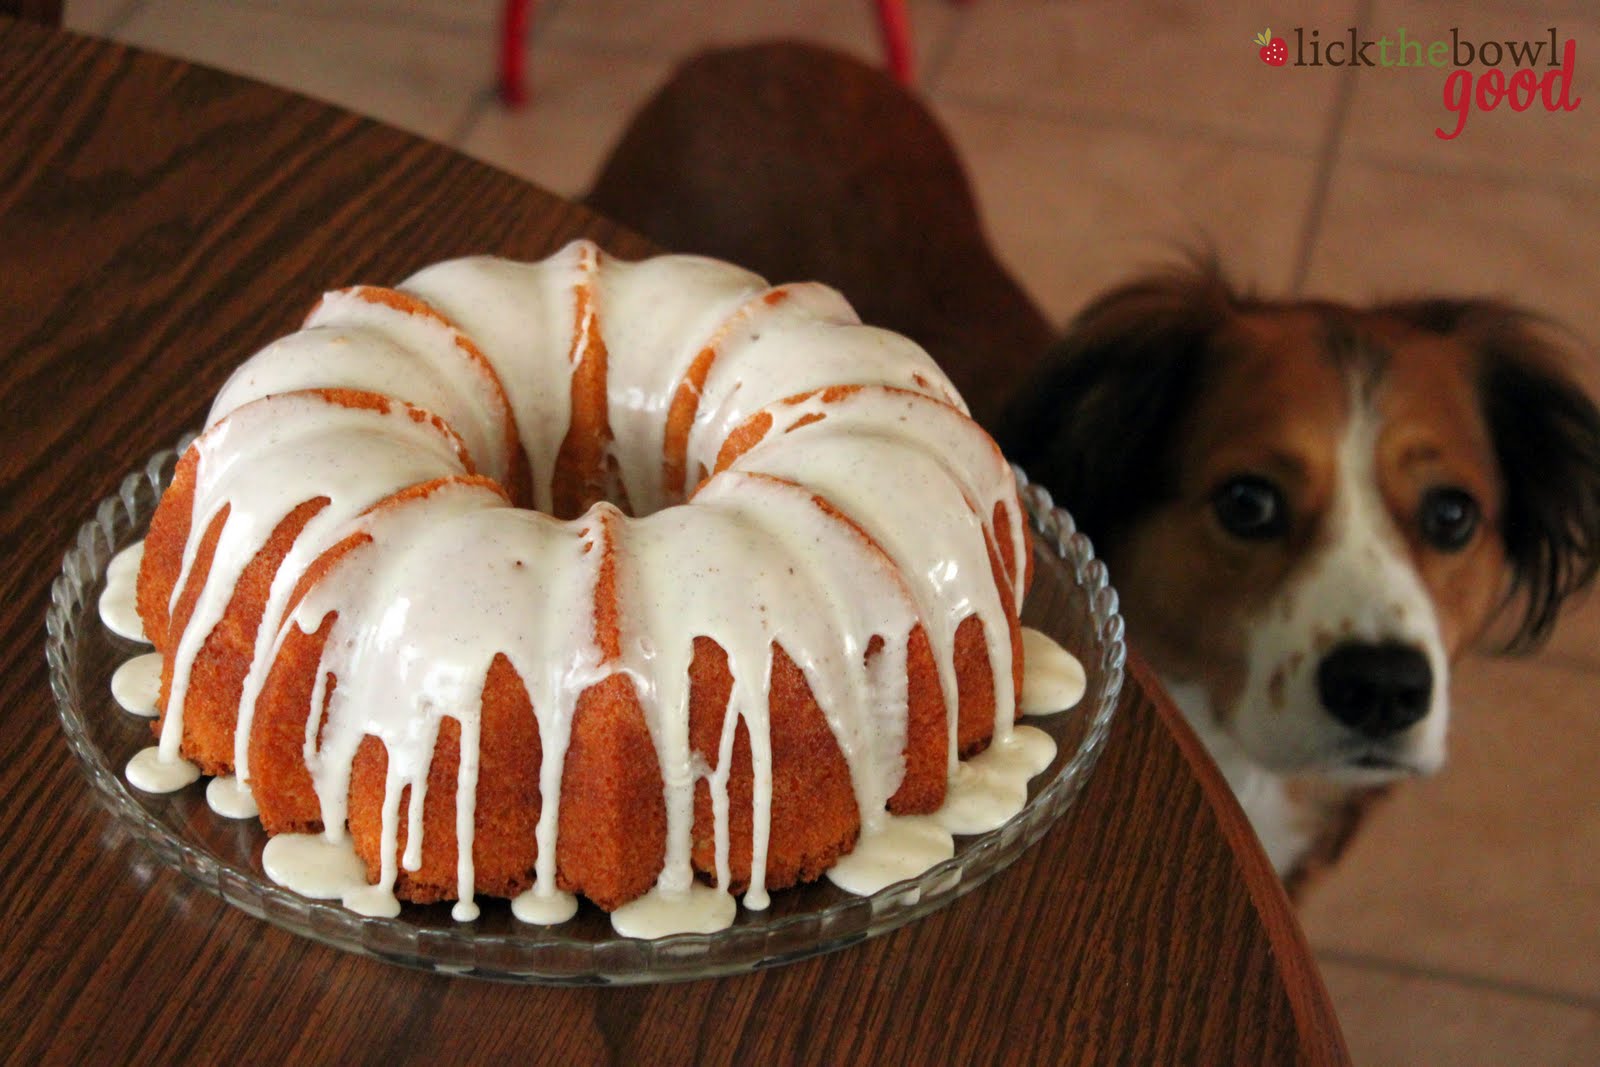
Mr. H is a huge chocolate fan and will pass up almost anything vanilla, but even he liked this cake. It was wonderfully aromatic and tasty to boot. It had a light, tender and moist crumb which I was thrilled about, because it seems so many "yellow" or butter cakes turn out dense or dry. I wanted a slightly larger cake so I increased the recipe by one and a half times and baked it in my 15 cup Anniversary Bundt. The birthday boy was pleased with his cake and even more thrilled that his family got together to celebrate his birthday. That just tells you the kind of young man that he is growing into, to wish for something like that. That's why I love him so much. Happy birthday Aaron!

Vanilla Bean Bundt Cake adapted from Bon Appetit

Printer Friendly Version

Cake:

  • 1 teaspoon bourbon
  • 1/2 teaspoon vanilla extract
  • 1 vanilla bean, split lengthwise
  • 1 1/2 cups all purpose flour
  • 2 teaspoons baking powder
  • 1/4 teaspoon salt
  • 1/2 cup plus 6 tablespoons unsalted butter (1 3/4 sticks), room temperature
  • 3/4 cup sugar
  • 1/4 cup (packed) golden brown sugar
  • 2 large eggs
  • 1 large egg yolk
  • 1/2 cup buttermilk

Glaze:

  • 1 cup powdered sugar
  • 2 teaspoons (or more) whole milk
  • 1 teaspoon vanilla extract
  • 1/2 vanilla bean, split lengthwise

For the cake: Position rack in center of oven and preheat to 325°F. Butter and flour a standard Bundt pan, then spray pan with nonstick spray. Pour bourbon and vanilla extract into small bowl. Scrape seeds from vanilla bean into bourbon-vanilla mixture; stir to blend well (reserve scraped vanilla bean for another use). (If you don't have or want to use bourbon, just substitute with vanilla extract).

Whisk flour, baking powder, and salt in medium bowl to blend.

Using electric mixer, beat butter and both sugars in large bowl until light and fluffy. Add eggs and egg yolk 1 at a time, beating until well blended after each addition. Beat in bourbon-vanilla mixture.

Add flour mixture in 2 additions alternately with buttermilk in 1 addition, beating just until blended after each addition. Transfer batter to prepared pan; smooth top evenly (batter will come only halfway up sides of pan).

Bake cake until tester inserted near center comes out clean, about 55 minutes. Cool in pan on rack 15 minutes. Invert cake onto rack and cool completely.

For the glaze: Whisk powdered sugar, 2 teaspoons milk, and vanilla in small bowl to blend, adding more milk by 1/4 teaspoonfuls if glaze is too thick to drizzle. If glaze is too thin, add a little more sugar until it's the consistency desired. Scrape the seeds from the vanilla bean into the glaze and whisk until the seeds are incorporated throughout the glaze.

Place cooled cake on serving dish. Using spoon, drizzle glaze over cake in zigzag pattern. Let cake stand at room temperature until glaze sets, about 15 minutes.

NOTE: Cake can be made up to 1 day ahead. Cover with cake dome and let stand at room temperature.

P.S. My fabulous friend gifted me with a new logo for my blog. I'll tell you all about it in the next post.

I hope everyone has a safe Memorial Day Weekend!

Friday, May 20, 2011

Hit and Miss

Two posts in one week?! Yes, because it's Cake Slice Time! I can't believe it's already been a month since I last made a cake for The Cake Slice Bakers. Where does the time go? Last month's cake was a dense cream cheese pound cake, this time it's a light upside down cake. I have to admit being a little skeptical about this cake. Yes, I like oranges, and almonds and caramel, but I've never had them all together. Did it work? Yes and no.

I thought the cake part of this recipe was excellent. In fact I think I'd make it again and just nix the topping. It was super moist, tender, delicate and full of orange flavor. I had a little cake batter left and decided to mix it with a few chocolate chips and baked it in a cupcake tin. I ate it just warm out of the oven- oh so good! It's not too sweet either and would make an excellent muffin with fruit folded in.

I even liked the flavor of the topping and the crunch from the almonds but there was just something about the recipe that just didn't quite work. Firstly you cook the brown sugar and butter then layer it in a pan with sliced almonds and honey. I think the topping would have been better, uncooked and mixed all together because when it came to turning it out, the topping seperated from the cake. The caramel was just too hard and chewy, almost like a praline. it tasted good, but it was hard to eat. We ended up peeling off the topping and eating the cake seperately, taking a few bites of the nutty caramel in between bites. All in all, I liked this cake, it just needs a little tweaking. Below is the original, unadapted recipe. Keep that in mind if you make this cake.

Orange Almond Upside-Down Cake from Cake Keeper Cakes

For The Topping:

  • 1 cup sliced almonds
  • 6 Tbsp. unsalted butter
  • 2/3 cup packed light brown sugar
  • 1/4 cup honey

For The Cake:

  • 1 1/2 cups unbleached all-purpose flour
  • 1 teaspoon baking powder
  • 1/2 teaspoon baking soda
  • 1/4 teaspoon salt
  • 1/2 cup sour cream
  • 2 large eggs
  • 1/4 cup fresh orange juice
  • 1 teaspoon pure vanilla extract
  • 1/2 cup unsalted butter
  • 3/4 cup granulated sugar
  • 1 Tbsp. grated orange zest

Make the topping: Preheat the oven to 350 degrees F. Grease a 9-inch round nonstick cake pan and dust with flour. Line the bottom of the pan with a circle of parchment paper and grease and flour the parchment.

Spread the nuts on a baking sheet and toast until golden, 8-10 minutes. Heat the butter in a medium saucepan over medium heat until foaming. Whisk in the brown sugar, turn the heat to low, and cook, whisking for 2 minutes. Scrape the mixture into the prepared pan and smooth with a spatula, Drizzle with the honey. Scatter the toasted almonds over the honey. Set aside.

Make the cake: Combine the flour, baking powder, baking soda, and salt in a medium mixing bowl. Combine the sour cream, eggs, orange juice, and vanilla in a glass measuring cup and lightly beat.

Combine the butter and granulated sugar in a large mixing bowl and cream with an electric mixer on medium-high speed until fluffy, about 3 minutes, scraping down the sides of the of the bowl once or twice as necessary. Stir in the orange zest.

With the mixer on medium-low speed, pour the egg mixture into the bowl in a slow stream, stopping the mixer once or twice to scrape down the sides.

Turn the mixture to low speed and add the flour mixture, 1/2 cup at a time, scraping down the sides of the bowl after each addition. After the last addition, mix for 30 seconds on a medium speed.

Pour the batter over the almonds, gently spreading it into an even layer with a spatula.

Bake until the cake is golden and a toothpick inserted into the center comes out clean, 35-40 minutes. Transfer the pan to a wire rack and let stand for a couple minutes.

Holding the pan and a plate together firmly with oven mitts, immediately invert the hot cake onto the plate. Peel away the parchment paper. If necessary, replace and almonds stuck to the bottom of the pan. Let the cake cool for 20 minutes and serve warm, or at room temperature.

Store uneaten cake in a cake keeper at room temperature, or wrap loosely in a plastic and store at room temperature for up to 2 days.

NOTE: This recipe makes quite a bit of batter. Be sure not to overfill your pan or you’ll have overflow. Bake any excess cake batter in a separate tin.

Have you made any recipes lately that tasted good, but didn't quite work?

Monday, May 16, 2011

Like The Ones From San Francisco

These are the Mother's Day pancakes I promised you. Yes, I'm a week late, but you can save this recipe for next year. Or for brunch this weekend, or a special birthday breakfast or just because. Just be sure to make them because they really are delicious and they're a twist on the typical pancake. They're not big and heavy, they're light and mini (which means you can have more) and go perfectly with the tart lingonberries on top.

If you've never had lingonberries, they're similar to a cranberry but not quite as tart and just the slightest bit bitter. They're also smaller berries and usually come sweetened and jarred like preserves. I've purchased them from IKEA as well the local grocery store in the canned fruit aisle at the top of the shelf, near the canned cherries. Now I've eaten Swedish Pancakes from IHOP before and they're served with lingonberry jam and butter, in a crepe style pancake but these are a little different. I got the recipe from a NordicWare silver dollar pan, I purchased a while back. The pan was a little difficult to use but it was a good recipe, so I decided to follow through with the same concept and just make them on a non-stick griddle.

I made these to resemble the pancakes we ate in San Francisco last November. The ones we ordered at Sears Fine Food were much thinner and came a whopping 18 (!) pancakes per order. Granted they were very thin and mine are thicker but they still have that same appeal and tanginess thanks to the buttermilk. Mr. H gladly had 2 helpings and said "mmm, those were good". Then had them again the very next day. I'd call that a success. Now that I think of it, these would be great for Father's Day breakfast too. Just be sure to leave the pink flowers and lace napkin off the breakfast-in-bed tray, unless that's his thing :-)

Swedish Pancakes adapted from NordicWare

  • 1 cup flour
  • 1 tsp. granulated sugar
  • 3/4 tsp. baking powder
  • 1/2 tsp. baking soda
  • 1/2 tsp. salt
  • 1 egg
  • 1 cup buttermilk
  • 1 Tbsp. melted butter
  • Lingonberries, for serving

Preheat griddle over medium heat.

Stir together dry ingredients. Beat egg until lighter in color and slightly foamy, then stir into dry mixture, along with buttermilk and butter. Mix until just blended, but do not over mix or you'll have tough pancakes. It's okay if there are a few small lumps.

Spoon 2 Tbsp. of batter onto a lightly buttered (or nonstick) griddle. Once edges are slightly dry, flip pancakes over til golden. Serve with fruit, syrup or lingonberry jam.

Makes 12-15 mini pancakes.

Tuesday, May 10, 2011

Slice And Bake Shortbread & A Pregnancy Update

Hope everyone had a great Mother's Day weekend. I was going to share some yummy pancakes with you before the weekend, but as you can see I didn't quite make it. No worries though because these shortbread cookies more than make up for it. I got this recipe from Coleen's Recipes and she declared them "absolutely perfect".

These cookies were delicious, melt-in-your mouth and so buttery. The full recipe called for a full pound of butter and that scared the bujeesus out of me so I cut the recipe in half. The halved recipe (below) still made a substantial amount of cookies but if you want/need more, then just double it. The fun thing about this cookie is that you can roll the chilled dough in non-pareils, or colored sugar and coordinate with any holiday or celebration that you need. I used blue sprinkles for half of the dough and rolled the other half in raw sugar. It's not necessary but it adds a nice textural element to the tender cookie and it makes them extra pretty. The dough can be made ahead of time, then when you're ready for them, just slice and bake.

Now on to the pregnancy update. I reached 20 weeks last Wednesday and had an anatomy scan of the bambino. Of course he was curled up and sleeping the entire time so we didn't see much. The baby's growth is right on target, it's brain is growing and the heart was beating away. He's about 10 inches long and weighs about 12 ounces. I also felt the little one kick this weekend for the first time, which was quite the wonderful Mother's Day gift. It's such a strange, but incredibly awesome feeling. I've said it once and I'll say it again, but I am so blessed to be where I am. For another update, see below...

Ultimate Shortbread Cookies adapted from Coleen's Recipes

  • 1 cup of unsalted butter, room temperature
  • 1/2 cup of granulated sugar
  • 2 cups all purpose flour
  • 1 teaspoon vanilla extract
  • 1/2 teaspoon coconut extract
  • non-pareils, coarse sugar, or chopped nuts (optional)

In a stand mixer, beat the room temperature butter, sugar and extracts until the mixture is light and fluffy (2-3 minutes on high).

Add the flour, half a cup at a time, beating well between each addition.

Roll the dough a log and wrap tightly in plastic wrap, then chill until very firm or up to three days.

After "logs" are very firm, roll them in sprinkles or nuts (optional) and slice into ¼" slices. Bake on ungreased baking sheet in a 350 degree oven for 18 to 20 minutes Cool on baking rack.

Makes about 24 cookies. Recipe can be doubled.

For the winners of the Simply Suppers giveaway, go HERE.

"Simply Suppers" Giveaway Winners!

The winners of the "Simply Suppers" cookbook are:

  1. 24- Topher at Hurry Slowly
  2. 53- Sadie at Sadie's Kitchen Adventures
  3. 80- WoolieGirl at Woolie Girl

Congratulations to you all! Please contact me via email with your address so the publishers can get your book out to you!

~Monica

Tuesday, May 3, 2011

"Simply Suppers" Cookbook Review and Giveaway!

I have a delicious and simple side dish recipe for you today. A couple months ago I was contacted by Katherine at Thomas Nelson and she wanted to send me a cookbook for review. The book was titled Simply Suppers by Jennifer Chandler. This sounded perfect for me because at the time, I just had surgery and was recovering. I didn't have much energy or the desire to cook. But when my body was feeling up to it again, I grabbed this book off the shelf and read each and every page, mentally bookmarking recipes and drooling along the way.

This book is categorized into several chapters including, but not limited to Soups, Meat, Pasta, Sandwiches, Grains and Vegetables. It is mostly comprised of savory meals and sides, but there is a section of Sweet Endings which has recipes for Double Decker Peach Cobbler, Banana Pudding Pie, Tarts and Cakes. Every single recipe is accompanied by a photo so you'll know what your food is supposed to look like. That also helps when trying to decide what to make. A few other useful sections in this book are 30 in about 30 (you guessed it, 30 recipes made in about 30 minutes), 10 Leftover Chicken Makeovers (recipes in the book you can make using a rotisserie chicken) and 20 Freezer Go-To's (recipes from the book that freeze well).

I chose to make Parmesan Roasted Tomatoes (p.189) as a side dish to brown rice and Pesto Parmesan Chicken. It was a fantastic meal if I do say so myself. Even Mr. H agreed with me and he's not a big fan of Parm. I made a couple adaptations to the recipes but rather than altering the recipe, I just made my changes in italics below. This would be a great recipe to make any time of year because roasting them makes them sweeter and taste like Summer even if the tomatoes aren't so ripe. After roasting, the tomatoes became soft and the flavor intensified. The tomatoes burst in your mouth, but the topping was crispy and garlicky. I could eat a whole bowl of just crumbs, they were that good! I'm looking forward to trying other recipes from this book, because if they're half as good as these tomatoes, I'm in for a treat.

Parmesan Roasted Tomatoes from Simply Suppers by Jennifer Chandler

Printer Friendly Version

  • 1/2 cup panko bread crumbs
  • 2 Tablespoons freshly grated Parmesan cheese
  • 1 garlic clove, minced
  • 2 Tablespoons finely chopped fresh flat-leaf parsley (I used 1 Tablespoon dried parsley)
  • 1/2 teaspoon dried oregano
  • 6 large ripe tomatoes, cut in half horizontally
  • kosher salt
  • fresh ground pepper
  • 2 Tablespoons olive oil

Preheat oven to 395 degrees.

In a medium mixing bowl stir together the bread crumbs, Parmesan cheese, garlic parsley and oregano until well combined.

Place the tomato halves in a shallow baking dish, sliced side up. Season the tomatoes with salt and pepper to taste. (I added the salt and pepper to the bread crumb mixture).

Sprinkle the tops of the tomatoes with the Parmesan bread crumb mixture. Drizzle the olive oil evenly over the tomatoes. (I mixed the olive oil in with the bread crumbs so they'd stick together and create a crisper topping).

Bake until the topping is golden, about 20 minutes. Serve warm.

NOTE: Since this recipe was part of a cookbook review I didn't want to alter the original recipe. Instead I added my changes to the recipe in blue italics.

Katherine from Thomas Nelson also wants to give away 3 copies of Simply Suppers for you to enjoy! All you have to do is leave me a comment on this post telling me what your favorite side dish is.

Anyone and everyone is eligible to win. Just be sure to leave me your contact info so I can contact you if you win. One entry per person please.

I'll reveal the (3) winners next Tuesday, May 10. Good luck!

Related Posts with Thumbnails