Today I bring you cinnamon swirl raisin bread. I've wanted to make this for Mr. H for years! I'm not sure why I never did, though I think it's because Sun-Maid raisin bread is so much easier to buy. That said, I definitely think that the fresher loaf, toasted and slathered with salted butter was MUCH better. Need proof? Mr. H and I finished off a loaf in two days. I made the mistake of sharing the other loaf with my in-laws. It wasn't a mistake on their behalf because they got to eat it, but we were left wanting more.
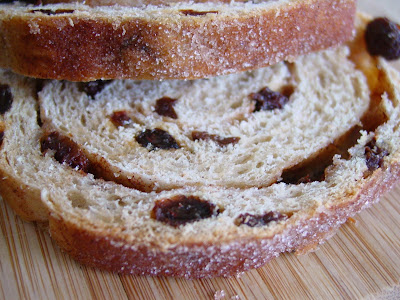
I made these loaves of cinnamon swirl raisin bread with Michelle and Ingrid. Neither one of them like raisins so theirs will just be cinnamon swirl, but we really liked the additions of raisins, leave 'em out if you don't. Or you could add dried cranberries or other fruit or nuts if you'd like. I then topped off this warm loaf with melted butter then sprinkled it with even more cinnamon sugar. Delish!

We never tasted the bread fresh out of the oven, so we only had it toasted. It wasn't too sweet, but the cinnamon flavor really came through since it's in the dough, in the center and on top of the bread, creating a nice crunch. It's not a difficult recipe but it does require some time to allow the yeast to do it's job. If you're a fan of breakfasts breads, I'd definitely give this one a try. Don't forget the butter!
Cinnamon Swirl Raisin Bread adapted from BBA
Printer Friendly Version
Mix Time: 20 mins Total Rise Time: 3½ hours Bake Time: 50 mins
For the bread:
- 3½ cups unbleached bread flour
- 4 teaspoons granulated sugar
- 1¼ teaspoons salt
- 2 teaspoons instant yeast
- 1¼ teaspoons ground cinnamon
- 1 large egg, slightly beaten
- 2 tablespoons shortening, melted or at room temperature
- ½ cup buttermilk or whole milk, at room temperature
- ¾ cup water, at room temperature
- 1½ cups raisins, rinsed and drained
For the cinnamon sugar swirl:
- 1/2 cup Granulated Sugar
- 2 tbsp ground Cinnamon
For the topping:
- 2 tablespoons butter, melted
- 1/4 cup granulated sugar
- 1 tbsp. ground cinnamon
1. Stir together the flour, sugar, salt, yeast, and cinnamon in a mixing bowl (or in the bowl of an electric mixer). Add the egg, shortening, buttermilk, and water. Stir together with a large spoon (or mix on low speed with the paddle attachment) until the ingredients come together and form a ball. Adjust with flour or water if the dough seems too sticky or too dry and stiff.
2. Sprinkle flour on a counter, transfer the dough to the counter, and begin kneading (or mixing on medium speed, switching to the dough hook). The dough should be soft and pliable, tacky but not sticky. Add flour as you knead (or mix), if necessary, to achieve this texture. Knead by hand for approximately 10 minutes (or by machine for 6 to 8 minutes). Sprinkle in the raisins during the final 2 minutes of kneading (or mixing) to distribute them evenly and to avoid crushing them too much. (If you are mixing by machine, you may have to finish kneading by hand to distribute the raisins evenly.) The dough should pass the windowpane test and register 77 to 81 degrees F. Lightly oil a large bowl and transfer the dough to the bowl, rolling it to coat it with oil. Cover the bowl with plastic wrap.
3. Ferment at room temperature for approximately 2 hours, or until the dough doubles in size.
4. Divide the dough into 2 equal pieces and form them into loaves. Gently press each part out into a rectangle (about 8" by 5") I pressed out my dough into an 8" x 15" rectangle so I could get more of a swirl in the center., with the long side facing you. Sprinkle the cinnamon sugar over one side of the rectangle. Now tightly roll, starting from the long side facing you. Seal the end and place in a loaf pan, seam side down. Repeat for the other rectangle.
5. Place each loaf in a lightly oiled 8½ by 4½-inch pan, mist the tops with spray oil, and cover loosely with plastic wrap.
6. Proof at room temperature for 60 to 90 minutes, or until the dough crests above the lips of the pans and is nearly doubled in size.
7. Preheat the oven to 350 degrees F with the oven rack on the middle shelf. Place the loaf pans on a sheet pan, making sure they are not touching each other.
8. Bake the loaves for 20 minutes. Rotate the pan 180 degrees for even baking and continue baking for another 20 to 30 minutes, depending on the oven. The finished breads should register 190 degrees F in the center and be golden brown on top and lightly golden on the sides and bottom. They should make a hollow sound when thumped on the bottom.
9. Immediately remove the breads from their pans. Mix together the granulated sugar and ground cinnamon for the topping in a shallow plate. Brush the tops of the loaves with melted butter as soon as they come out of the bread pans, and then roll them in the cinnamon sugar. Cool loaves on a rack for at least 1 hour, preferably 2 hours, before slicing or serving.
Yield: 2 loaves

Now onto the winner of my giveaway...
Susan In Texas!
Susan was recently laid off and has been filling up her time baking for others. Susan, I hope you bake lots of cakes and continue to provide a "lift" for those who need it. Enjoy your new Anniversary Bundt pan and cake carrier.
Thank you to all of you who entered the contest and who left recipes! I'm so looking forward to making some of those delicious cakes.