Showing posts with label Coffee. Show all posts

Monday, May 12, 2014

Dunkin Donuts Coffee Giveaway! (CLOSED)


I have an early Mother's Day giveaway for you! If you're not jumping up and down in excitement you should be because this one is mighty generous and tasty! 

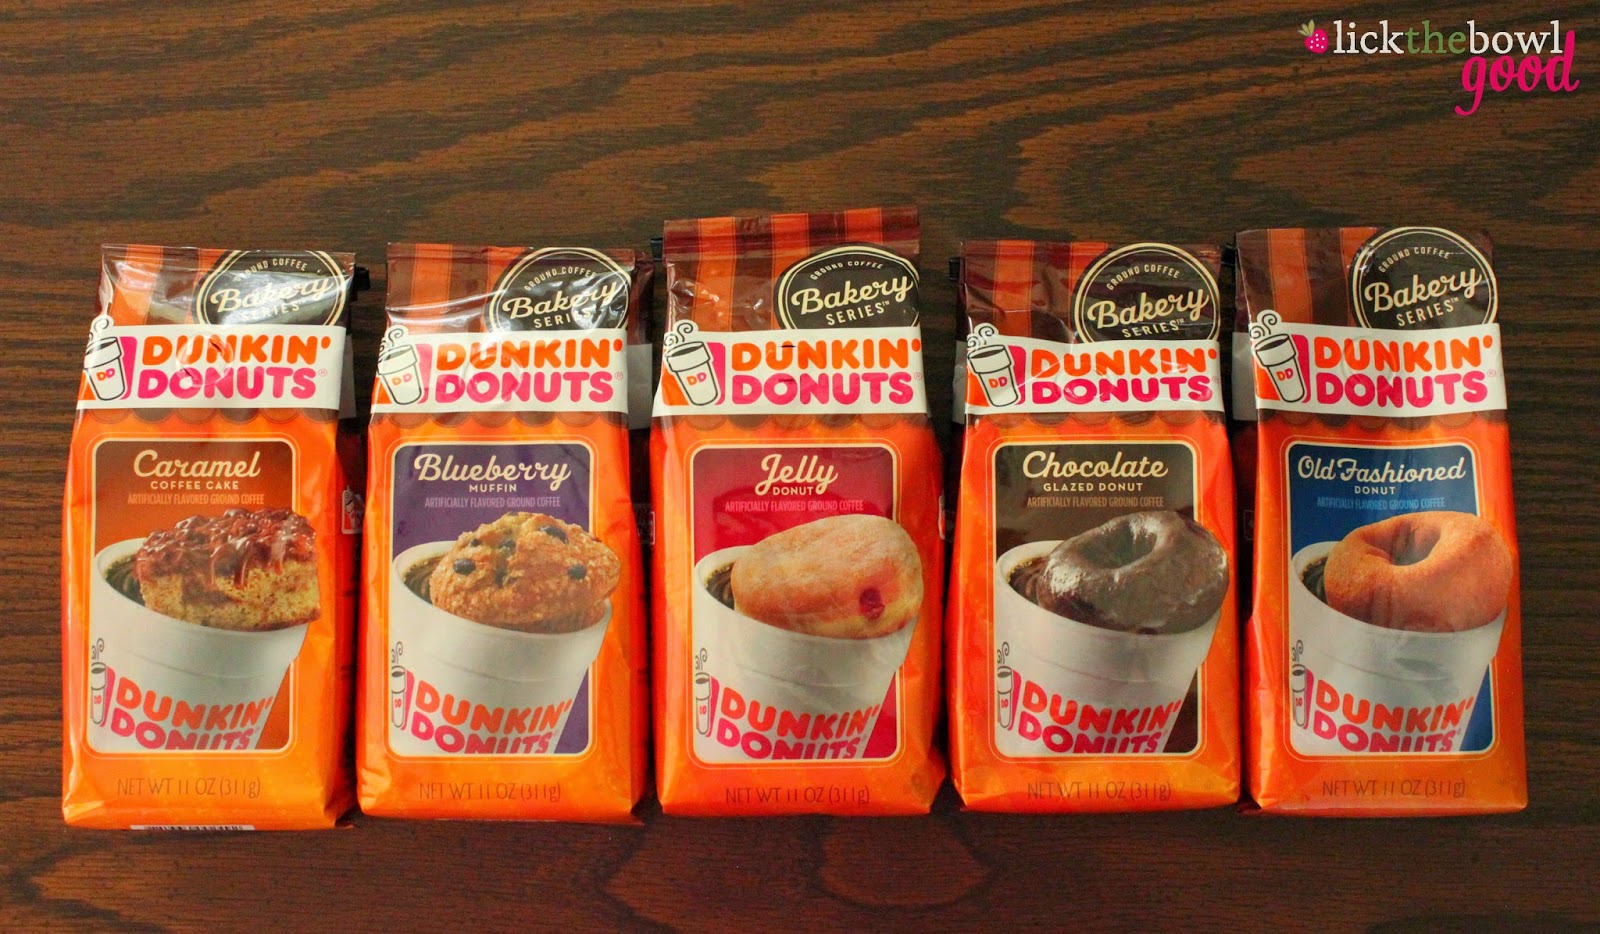
Dunkin Donuts® sent me some of their new Bakery Series coffee to try out. I served it at our Easter brunch and it was delicious. The flavors I received are: Caramel Coffee Cake, Blueberry Muffin, Old Fashioned Donut, Chocolate Glazed Donut and Jelly Donut. If you like flavored coffees, you will love these. To complete the Dunkin Donuts experience, I served Dunkin Donuts creamer in their original flavor and a Cinnamon Swirl Buttermilk Pound Cake for dessert. 


Okay, here's the awesome part... As part of the giveaway, you not only get all five of these Dunkin Donuts Bakery Series coffees to try, you also get a generous sized mug, a Mr Coffee coffee maker and a $250 Visa gift card! Wowzer! I really wish I could be like Oprah and hand out coffee gift baskets to everyone but I can't. However, one lucky duck winner will be chosen at random to receive this fabulous prize pack. 

You can win all of this! 

The Rules: Giveaway open to residents of the USA only. You have two chances to win. 

First and mandatory entry, please visit the www.dunkinathome.com and tell me which flavor of the Bakery Series coffee you're most excited to try or if you already have a favorite flavor tell me which one. 

Second, since this is a Mother's Day giveaway, share something special or unique about the mother figure in your life. This can be something special about YOU, your wife, mother, step mother, grandmother, aunt, sister, daughter, whomever. Just tell me something funny or heartwarming about that special woman in your life. Let's celebrate Mom!

Leave your comments on this blog post to enter. Please don't forget to leave your email or a link back to your blog so I can contact you in you win. Winner will be chosen at random on Monday, May 12, 2014. 


Thank you all for entering this giveaway. And a special thank you to Cohn&Wolfe and Dunkin Donuts who provided me with samples and compensation and asked me to share this tasty product with you.


And because I am a proud mother, here is my greatest curly haired accomplishment enjoying his playscape on Easter Sunday. He has my whole heart. I wish you all a Happy Mother's Day!

Friday, August 2, 2013

A Special Anniversary- The Cake Slice Turns 5!


My boy turned 23 months today. That's exciting and terrifying all at the same time. One more month to go til his 2nd birthday! But that's not what I'm writing about today. August 1st is the 5th anniversary for The Cake Slice Bakers. I joined the the cake baking group in April of 2009 and have baked dozens of cakes through 5 different cookbooks and with many talented and amazing women. 

My very first cake that I baked with the group was Chai Cake with Honey-Ginger Cream from Sky High Cakes from Alisa Huntsman and Peter Wynne. I'm not a big fan of chai or ginger but I found this group helped me open my eyes and made me try different techniques and flavors that I wouldn't have otherwise tried. And I've made friends with these awesome women- we support and encourage each other, which is far better than cake. 

In celebration of our 5th anniversary, we decided to bake a special cake to help celebrate. I went back to the original and my favorite cake book of all and made a cake I've wanted to try for quite some time- Mocha Cake with Espresso Drizzle from Sky High Cakes. The cake is three delicious layers of dense, fudgey mocha cake, reminiscent of a flourless chocolate torte. In between the layers is a generous amount of a white chocolate, sweetened condensed milk, sticky espresso infused glaze. It was definitely a celebration cake. I'm so glad this baking group is around and I hope to bake along with them for many more years. 

Happy 5th Anniversary Cake Slice Bakers! If you're interested in keeping up with us, follow The Cake Slice Bakers on Facebook for baking tips, recipes and cake!


Mocha Cake with Espresso Drizzle 


Mocha Cake: 
  • 1 cup freshly brewed espresso or double-strength coffee
  • 2/3 cup unsweetened cocoa powder
  • 4 eggs
  • 2/3 cup buttermilk
  • 1 1/2 teaspoons vanilla extract
  • 2 2/3 cups cake flour
  • 2 2/3 cups sugar
  • 3/4 teaspoon baking powder
  • 1/2 teaspoon salt
  • 2 sticks (8 ounces) unsalted butter, at room temperature

Espresso Drizzle: (see note below)
  • 12 ounces good-quality white chocolate
  • 3/4 cup sweetened condensed milk
  • 6 tablespoons freshly brewed espresso or double-strength coffee

Preheat the oven to 350 degrees F. Butter the bottoms and sides of three 8-inch round cake pans or coat with vegetable cooking spray. Line the bottom of each pan with a round of parchment or waxed paper and grease the paper.

To make the cake: In a medium bowl, combine the hot espresso and cocoa powder, stirring to dissolve the cocoa. Let this mocha mixture stand until cooled to body temperature. Meanwhile, in another bowl, beat the eggs lightly.Whisk in the buttermilk and vanilla until well mixed.

Place the flour, sugar, baking powder, and salt in a large mixing bowl. With the mixer on low, evenly blend the dry ingredients. Add the butter and the mocha mixture, beating until well blended. Raise the mixer speed to medium and beat until light and fluffy, then add the buttermilk-egg mixture in 3 additions, scraping well and blending only to incorporate. Divide the batter among the 3 prepared pans.

Bake the cake layers for 35 to 38 minutes, or until a cake tester or wooden toothpick inserted in the center comes out almost clean but still moist. Let cool in the pans for about 10 minutes, then invert onto wire racks. Carefully peel off the paper liners and let the layers cool completely.

To make the espresso drizzle: (This makes a lot of glaze and could easily be halved- I had quite a bit leftover). Melt the white chocolate in a double boiler or in a medium heatproof bowl over a pan of very hot water.

Whisk in the sweetened condensed milk and espresso and continue whisking until smooth. Use while warm.

NOTE: The white chocolate didn't really want to melt and seemed rather stiff though it was still warm. Once I added the condensed milk and espresso it all came together. I had a few lumps but strained them out before pouring the glaze over the cake. I had a lot of glaze leftover. Next time, I would just make half a recipe.

To assemble the cake: Place one layer, flat side up, on a cake stand or serving plate. Pour 1/2 cup of the Espresso Drizzle onto the center of the layer and spread all the way to the edge, allowing it to drip slightly over the sides. Repeat with the second layer. Set the third layer in place, then pour the remaining drizzle on top and spread to the edges, making sure the glaze drips down the sides, covering all the edges.


Monday, December 3, 2012

Latte Cheesecake and Wacky Weather


Happy December! I always wondered what Christmastime in a tropical climate was like. Wondered if people decorated their palm trees with C-9 bulbs and tinsel garland while wearing flip flops and tank tops, stopping to take a break to beat the heat with an icy beverage. Then I realized that 2012 would be the year that I got to experience that, only I'm still in Texas! This weather is so strange. It was 80 degrees today and does not feel the least bit like winter. I had lunch with a friend today (hi L!) and went to pick up Hayden at my mom's house, only to find him wearing nothing but a diaper helping Grandma stick candy canes in the ground. It was a sweet image, but nekkid babies playing outside in December??? It's unreal!

Needless to say, I have yet to start  my holiday baking. There has not been a single cookie to grace my Silpat lined sheets but I will get there. In the meantime, I hope you'll enjoy this recipe for Brownie Latte Cheesecake.  I made it last month as part of the Cake Slice Bakers and it was delicious.  Cheesecake is holiday-ish, right? It probably won't be a part of any cookie trays this year but sometimes you need a nice centerpiece dessert and this is it. 


Instead of a typical cookie crumb crust, this cheesecake has a thick, dense, fudgy, chocolate rich base. In contrast, the filling is ultra creamy and light in texture. The flavors of chocolate, espresso, vanilla, and Kahlua compliment each other so well. This is definitely one for sharing and a little sliver goes a long way but that's what makes it ideal for holiday gatherings and celebrations, that and it can be made a couple days in advance. I'll get my act together, paint the windows with a can of fake snow and flip the switch on my fireplace to get me in the butter baking mood. If y'all have any great holiday cookie recipes for me, please share!

Brownie Latte Cheesecake adapted from The Cake Book


For The Brownie Layer: 
  • 4 oz. semisweet chocolate, coarsely chopped
  • 1/2 cup (1 stick) unsalted butter, cut into tablespoons
  • 1 Tablespoon instant espresso powder
  • 1 teaspoon vanilla extract
  • 1/4 teaspoon salt
  • 1 cup granulated sugar
  • 2 large eggs
  • 1/2 cup all-purpose flour
For The Latte Filling: 
  • 1 1/2 pounds (24 oz.) cream cheese, softened
  • 1 1/2 cups granulated sugar
  • 1 Tablespoon vanilla extract
  • 2 teaspoons espresso powder, dissolved in 1 Tablespoon hot water
  • 2 Tablespoons Kahlua
  • 1/8 teaspoon salt
  • 1/2 cup sour cream 
  • 1 Tablespoon cornstarch
  • 4 large eggs
To make The Brownie Layer: Position a rack in the center of the oven and preheat the oven to 325 degrees F. Lightly grease the bottom and sides of a 9x3-inch springform pan. Cut an 18-inch square of heavy duty aluminum foil and wrap around the outside of the pan. 

In the top of a double boiler, melt the chocolate with the butter over barely simmering water, stirring occasionally. Transfer the mixture to a medium bowl and stir in the espresso powder, vanilla extract and salt. Whisk in the sugar until combined. Whisk in the eggs one at a time, until blended. Stir in the flour until no traces remain. 

Scrape the batter into the prepared pan and smooth it into an even layer. Bake the brownie for 25-30 minutes, until a toothpick inserted into the center comes out with a few moist crumbs attached to it. Place the pan on a wire rack and let cool while you make the filling. Leave the oven on. 

To Make The Latte Filling: In the bowl of an electric mixer, using the paddle attachment, beat the cream cheese at medium-low speed until creamy and smooth, about 2 minutes. Gradually add the sugar and beat until blended. Add the vanilla extract, espresso mixture, Kahlua, salt, sour cream and cornstarch and mix until well blended. At low speed, add the eggs one at a time, mixing well after each addition and scraping down the sides of the bowl with a rubber spatula as needed. 

Scrape the batter onto the brownie layer and smooth the top. Place the springform pan in a roasting pan or a large baking pan. Pour enough hot water into the roasting pan to come about 1 inch up the sides of the springform pan. Bake the cake in the water bath for 70-80 minutes, until the center is set but slightly wobbly (the cheesecake will continue to set up as it cools). Turn the heat off and crack the door, allowing the cake to cool in the oven for about 30 minutes. Remove the cake from the water bath and place on a rack and cool to room temperature. 

Refrigerate the cheesecake for at least 4 hours or overnight before serving. 


Sleeping Beauty

Saturday, November 17, 2012

Homemade Pumpkin Spice Lattes and A Winner!


Just a quicky post today. This is a recipe I've shared before but I've tweaked it a bit so that it serves two, rather than one. Because a pumpkin spice latte needs to be shared. My version of this ever popular drink contains real pumpkin and spices, not flavored syrup. It's just as easy to make as it is to drive to Starbucks, but it's much less expensive and better for you! Thanks Maranda for making and reminding me of this delicious beverage. 


Pumpkin Spice Latte from Monica H

Printer Friendly Version 
  • 2 cups strong brewed coffee
  • 3/4 cup half-n-half
  • 1/4 cup pumpkin puree
  • 4 Tablespoons sugar in the raw
  • 1/2 teaspoon pumpkin pie spice
  • 1 teaspoon vanilla extract
  • whipped cream and cinnamon for garnish

Combine coffee, half-n-half, pumpkin, sugar and pumpkin pie spice in a small saucepan. Bring to a high simmer (just before boiling), whisking occasionally. Remove from heat and stir in vanilla.

Pour into two mugs and top with whipped cream and a sprinkling of cinnamon, if desired.

Makes two large servings.


And the winner of the Chinet Bakeware is commenter #40 Melody J. Congratulations! Thank you to all that entered the giveaway. And thank you Chinet for being so generous!

Thursday, August 23, 2012

Zebra Stripes and Instagram

Last month, The Cake Slice Bakers made White Chocolate Espresso Icebox Cakes. It had been on my list to make since I got The Cake Book by Tish Boyle last Fall, but last month was such a busy time for me that I just didn't get to it. And then this month, the cake of choice was a lemon roll and that didn't get baked either. It seems the 20th of every month (when we're supposed to share our cakes) comes and goes and I end up cakeless. Well being cakeless is never a good thing, so I decided to make the Icebox Cake- perfect for this hot weather we're having because I didn't even have to turn the oven on!


I've made an icebox cake before and while it was tasty, this one was so much better because it's frozen. The white chocolate espresso mousse that gets sandwiched between the chocolate wafers is so darn creamy and smooth. It's almost like a giant ice cream sandwich but with a hint of espresso and obviously way better than those fake vanilla novelties you get from the grocery store. Another great thing about this cake is that is can be made up to 2 weeks in advance, so all you need to do is pop it out of the freezer, cut off a slice or three and pop it back in the freezer. The first bit was as good as the last. Are you supposed to feed this kind of sugar laden espresso dessert to an almost one-year old? Probably not, but Hayden loved it! 

Speaking of Hayden, his first birthday is in 8 days! Where does that time go? I am so unprepared and have nothing planned for his big day. NOTHING. There will be cake, that I know. What kind? How big? What color? no clue! We may do something small for him on his actual day then have family over the following weekend for a celebration. I can't believe he has grown up so fast. I just started playing around on Instagram and am addicted already! I'm having so much fun sharing pics of Hayden on there. My Instagram name is Monica_h30 if any of you are insterested!


White Chocolate Espresso Icebox Cake adapted from The Cake Book

Printer Friendly Version
  • 1/4 cup water
  • 1 1/2 tsps powdered gelatin
  • 2 1/4 cups heavy cream, divided
  • 1 teaspoon instant espresso powder
  • 8 oz. high quality white chocolate, finely chopped
  • 2 tsps vanilla extract
  • 1 Tbsp Kahlua or Frangelico liqueur 
  • 1 box Nabisco Famous Chocolate Wafers  (you may not use the entire box)
Line a 9x5-inch loaf pan with plastic wrap, letting it extend a few inches over each short end. 

Pour the water into a small heatproof cup. Sprinkle the gelatin over the water and let it soften for 5 minutes. 

In a small saucepan, combine 1/2 cup of the heavy cream along with the instant espresso powder and bring the cream to a boil over medium-high heat. Stir until espresso dissolves. Remove the pan from the heat and let mixture infuse for 15 minutes. 

Meanwhile put the cup of gelatin in the microwave and heat for 8-10 seconds. Stir until the gelatin granules have completely dissolved. Reheat for 5-10 more seconds if necessary. 

Place the white chocolate in a large bowl. Pour the hot cream  and the hot gelatin over the white chocolate. Let the mixture stand for about 30 seconds to melt the chocolate, then whisk gently until the chocolate is completely melted and smooth. Whisk in the vanilla extract and the liqueur (if using). Set aside to cool to tepid, about 15 minutes. 

In the bowl of an electric mixer, using the whisk attachment, beat the remaining 1 3/4 cups heavy cream to soft peaks. Gently whisk about one-third of the cream into the cooled white chocolate mixture. Using a rubber spatula gently fold in the remaining whipped cream in tow additions. 

To assemble the cake: Scrape about 1 1/2 cups of the mousse into the lined pan and smooth it into an even layer. Using a small spatula spread a chocolate wafer with about 1 tablespoon of the mousse. Stand the wafer upright in the mousse about 1/4-inch from the short end of the pan, with the coated side of the wafer pressing lightly against the long side of the pan. 

Spread another wafer with the same amount of mousse and position it so that it forms a sandwich with the first wafer. Repeat until you have created a row of wafers and mousse. (I used 15 chocolate wafers per row x 3 rows = 45 chocolate wafers). Make two more rows of sandwiched wafers to fills the pan. Scrape the remaining mousse on top of the wafers, letting it fill all the gaps between the wafers and the sides of the pan, and spread the mousse into an even layer with a spatula. Cover it with plastic wrap, pressing it gently against the mousse. Freeze thee cake for at least 4 hours, or until firm. 

To Serve: Peel off the plastic wrap, invert it onto a platter, slice and serve. 


Wednesday, June 20, 2012

Tall, Dark, Rich and Handsome


This past Sunday was Father's Day. And there's nothing better than a tall luscious chocolate cake to celebrate with so I was thrilled when The Cake Slice Bakers chose this cake to bake for the month of June. Mr. H is a true chocolate lover and this cake hit the spot on so many levels. There's light and fluffy cake loaded with cocoa, a fudgy chocolate pudding to fill the layers and then it's lovingly swathed in dreamy chocolate buttercream. And just to gild the lily, you take some of the cake, crumble it up and pat it into the frosting. This is a true man's cake. 

We celebrated Father's Day with my family at my mom's house this year. My aunt, uncle and cousin were there as well as my in-law's. In total there were about 12 of us and 5 dogs- it was a full house! We had 4 different kinds of quiche (because real men eat quiche), a fresh fruit salad, Parmesan roasted tomatoes, fresh squeezed orange juice, coffee, this Brooklyn Blackout Cake (click the link to read the history) and a cheesecake that my MIL made. I'll share that one later on! There was so much food and I ate a big honkin' piece of cheesecake that I filled up and didn't get to taste the cake until the next day. But the slice pictured in this post, was all mine :-)


It just dawned on me as I was thinking of past Father's Day celebrations and June 20th, that this day in 2004 is when Mr. H asked me to marry him. I had been working that day and was tired, my feet hurt and I was hungry. Mr. H picked me up from work to take me back to his parent's house for Father's Day dinner. I remember calling my Dad on the way over there to wish him a happy day when I realized that we weren't going to his parents house. Mr. H made a detour and we were headed to Mount Bonnell (click the link to read about it)- one of my favorite places and also the place where we went on our first date 13 years ago. Mr. H was very nervous and I had an idea of what he was going to do but I wasn't totally sure. Shortly there after, overlooking the lake and a beautiful sunset, he asked me to marry him. All these years later, we have a sweet boy named Hayden Bonnell. 

Mr. H, Hayden and GrandBob
Brooklyn Blackout Cake from The Cake Book 

For the Chocolate Blackout Cake:
  • 1½ cups (6.4 oz/181 g) all purpose flour
  • 1 cup (2.9 oz/85 g) natural (not Dutch-processed) cocoa powder
  • 1½ teaspoons baking powder
  • 1½ teaspoons baking soda
  • 1 teaspoon salt
  • 2 cups (14 oz/400 g) granulated sugar
  • 2 large eggs
  • 1 large egg yolk
  • 1 cup (240 ml) buttermilk
  • ½ cup (1 stick/4 oz/113 g) unsalted butter, melted
  • 2 teaspoons vanilla extract
  • 1 cup (240 ml) hot brewed coffee

For the Chocolate Pudding Filling:
  • 4 large egg yolks
  • 2/3 cup (4.6 oz/132 g) granulated sugar
  • 2 tablespoons plus ½ teaspoon cornstarch
  • 1/8 teaspoon salt
  • 1 cup (240 ml) water
  • 2/3 cup (160 ml) heavy cream
  • 3 ounces (85 g) semisweet or bittersweet chocolate, finely chopped
  • 1 teaspoon vanilla extract

For the Fudgy Chocolate Frosting:
  • 4 ounces (113 g) unsweetened chocolate, coarsely chopped
  • 11 tablespoons (5.5 oz/156 g) unsalted butter, softened
  • 1 2/3 cups (6.7 oz/191 g) confectioners sugar
  • 2 teaspoons vanilla extract

MAKE THE CAKE

1. Position a rack in the center of the oven and preheat the oven to 350°F. Grease the bottom and sides of two 9" round cake pans. (see me NOTE below.) Dust the pans with flour.

2. Sift together the flour, cocoa powder, baking powder, baking soda, and salt into the bowl of an electric mixer. Add the granulated sugar and, using the paddle attachment, mix at low speed until blended.

3. In a medium bowl, whisk together the eggs, egg yolk, buttermilk, melted butter, and vanilla extract. At low speed, add the egg mixture to the dry ingredients in a steady steam. Scrape down the sides of the bowl with a rubber spatula, then beat at medium speed until well blended, about 1 minute. Add the hot coffee, mixing just until blended. Remove the bowl from the mixer stand and stir the batter up from the bottom of the bowl a few times to thoroughly blend it. Scrape the batter into the prepared pans, dividing it evenly and smoothing the tops.

4. Bake the cakes for 30 to 35 minutes, until a cake tester inserted into the center comes out clean. Cool the cakes in the pans on wire racks for 10 minutes.

5. Invert the cakes onto the racks and cool completely.

MAKE THE FILLING

6. In the bowl of an electric mixer, using the paddle attachment, beat the egg yolks, sugar, cornstarch, and salt at medium speed until pale, about 1 minute.

7. In a medium heavy saucepan, combine the water and cream and bring to a boil over medium heat. Remove the pan from the heat and whisk about half of the hot cream mixture into the yolk mixture. Whisk this mixture back into the remaining cream mixture in the saucepan. Cook over medium heat, whisking constantly, until the mixture comes to a boil. Continue to boil, whisking, for 1 minute. Remove the pan from the heat and whisk in the chocolate until completely melted.

8. Pass the filling through a fine-mesh sieve into a small bowl. Stir in the vanilla extract. Cover the surface of the pudding with plastic wrap and refrigerate for at least 2 hours, until chilled.

MAKE THE FROSTING

9. Put the chocolate in a medium stainless steel bowl and place over a pot of barely simmering water. Heat, stirring frequently, until the chocolate is completely melted. Remove the bowl from the pot and set the chocolate aside to cool until tepid.

10. In the bowl of an electric mixer, using the paddle attachment, beat the butter at medium speed until creamy, about 1 minute. Add the confectioners’ sugar and beat at medium-high speed for 2 minutes, scraping down the sides of the bowl as necessary. Beat in the vanilla extract and melted chocolate, then beat until well-blended and creamy, about 1 minute.

ASSEMBLE THE CAKE

11. Using a long serrated knife, cut each cake layer in half horizontally, to make 4 layers. Reserve one layer. Place another cake layer, cut side up, on a serving plate. Whisk the chilled filling until smooth. Using a small offset metal spatula, spread half of the filling over the layer. Top with another cake layer and spread it with the remaining filling. Top with a third cake layer, smooth side up. (See my NOTE below.)

12. Break half of the reserved cake layer into large pieces and place them in the bowl of a food processor (save the remainder of the cake layer for snacking). Process the cake to fine crumbs, and set aside.

13. Using a narrow metal spatula, frost the top and sides of the cake with the frosting. Pat a generous amount of cake crumbs onto the sides of the cake, pressing them lightly into the frosting. Sprinkle the remaining cake crumbs over the top of the cake. Serve at room temperature or slightly chilled.

STORE in the refrigerator, loosely covered, for up to 2 days.


Yield : Makes one 9-inch cake, serving 10 to 12

NOTE: This recipe had you bake a cake in 2 9-inch layer then once baked and cooled, you slice them in half to make 4 equal layers. The cake uses 3 of those layers then half of the remaining cake layer is crumbled and patted into the frosting. Instead of having to cut the cake into equal layers and worrying about all the crumbs, I simply baked the cake into 3 layers and used about 1 cup of batter to make cupcakes for the crumbs on the outside of the cake. You can make it however you want, this was just simpler and less messy in my opinion and there wasn't any cake wasted. 

Hope you all had a delicious Father's Day!

Thursday, March 29, 2012

A Birthday Cake For My Hubs!

Between February 17th and March 30th, there are 6 birthdays and an anniversary in my family to celebrate- that's about one a week...and a lot of dessert! For my brother's birthday, I made him peanut butter marbled brownies, for Jack, I made a cherry almond Bundt cake, my FIL got an icebox lemon pie, my sister got a strawberry celebration cake and my hubby got this Tiramisu layer cake. Whew! 5 birthdays down, one more to go!

This cake was the winning cake for The Cake Slice Bakers for the month of January. I was way behind on making it, but it finally got done. I really liked it and it was impressive looking (in my opinion) but it was expensive and I had major issues with the cake part of the recipe, which meant I had to make it twice at 2 in the morning. I've never made a chiffon cake before and it was looking pretty perfect until I added the butter and the batter completely liquefied and deflated my egg whites. I wasn't sure what it was supposed to look like so I forged on and baked it anyway. A few minutes later, a rubbery flat cake emerged from the oven. The second attempt was better though not perfect. If I were to make it again, I'd use a different recipe for the cake part, but the espresso syrup and the mascarpone filling/frosting were delicious.

This cake almost made me cry and I almost scrapped it and tossed it all in the trash. I would have, if I hadn't already used up 18 eggs and promised this cake to my deserving husband! This layer cake version of tiramisu is great for a special occasion and tasted just like the original, but the chiffon had a little lemon zest in it that brightened up the flavor. I really liked that addition, but Mr. H did not. If I ever have a craving for tiramisu again, I'll just stick with the classic version that uses ladyfingers, and if necessary, plop a candle in it. I'm not sharing a recipe today simply because I'm too lazy to type it out and it has so many steps and also because I did a few things differently that the original recipe called for. You can click on over to Anabel's blog for a simplified recipe, if you'd like.

Anyway, for Mr. H's 32nd birthday this year, he requested filet mignon, shrimp, cheddar cheese risotto and roasted asparagus. His wish was my command. While I played in the kitchen, Daddy and Hayden took a little snooze together on the couch. This cake was the perfect ending to a relaxed day with my family. Happy birthday, my love!

Friday, December 30, 2011

Chocolate Celebration Cake

We are just hours away from the new year and I'm rushing to get one last recipe onto this blog before the clock strikes 12. Why? Because I'll be doing my top 12 recipes of 2011 soon and this cake will be on the list! I bake several cakes a year and I've made and tasted several recipes for chocolate cake in my lifetime and this is one of the best I've ever eaten. The recipe was given to me by my cyber friend, China, (hi China!) and I'm so grateful for it. Her husband made this cake for her birthday this summer and she raved about it. I read the reviews online and so did everyone else.

Happy Birthday M!

I baked this chocolate cake for a very special lady, my mother-in-laws' ex sister-in-law. Let's call her M. M was married to Mr. H's uncle many years ago. Got that? He (the uncle not Mr. H) is kind of a loser (haha!) so we ditched him and kept her after their divorce. She really does feel like part of the family. Scratch that, she is part of the family and this year for her birthday she decided to spend it with us, which gave me the opportunity to bake a birthday cake. Together with my mother-in-law we prepared dinner and dessert. She requested "anything chocolate" so I turned to this recipe by Gale Gand.

This cake makes a lot of batter and produces a large cake. The one thing that makes this cake unique is that it is made with all brown sugar- 3 cups to be exact. Yes, that's a lot of sugar but it makes a lot of cake too. It was mighty tasty and moist thanks to the addition of sour cream. It also has hot coffee in the batter, but you could substitute hot water if you like. The coffee just brings out the intensity of the chocolate without actually tasting it. I happen to like coffee and chocolate together so I paired it with a mocha cream cheese frosting. The combination was killer good. And as I mentioned it's making my top 12 list of 2011 so you know it's a good recipe. If you're needing a new chocolate cake recipe, I sincerely hope you'll give this one a try. You don't even need to use my frosting recipe, any frosting will do or heck, just eat it plain. But please put it on your list of things to make this upcoming year, hopefully sooner than later.

Chocolate Layer Cake from Gale Gand via Food Network

Printer Friendly Version
  • 1 cup (2 sticks) unsalted butter, softened at room temperature
  • 3 cups light brown sugar, packed
  • 4 eggs
  • 2 teaspoons pure vanilla extract
  • 3/4 cup unsweetened cocoa powder
  • 1 tablespoon baking soda
  • 1/2 teaspoon salt
  • 3 cups sifted cake flour
  • 1 1/3 cups sour cream
  • 1 1/2 cups hot coffee

Preheat the oven to 350 degrees. Butter and flour 3 (9-inch) cake pans. Cut 3 circles of waxed paper or parchment paper to fit the bottoms of the pans, then press them in.

In a mixer fitted with a whisk attachment (or using a hand mixer), cream the butter until smooth. Add the sugar and eggs and mix until fluffy, about 3 minutes. Add the vanilla, cocoa, baking soda and salt and mix. Add 1/2 of the flour, then 1/2 of the sour cream and mix. Repeat with the remaining flour and sour cream. Drizzle in the hot coffee and mix until smooth. The batter will be thin.

Pour into the prepared pans and bake until the tops are firm to the touch and a toothpick inserted into the center comes out clean (a few crumbs are okay), about 35 minutes. Halfway through the baking, quickly rotate the pans in the oven to ensure even baking, but otherwise try not to open the oven.

Let cool in the pan 10 minutes. Turn out onto wire racks and let cool completely before frosting.

Mocha Cream Cheese Frosting by Monica h

  • 1/2 cup (1 stick) unsalted butter, room temperature
  • 8 ounces cream cheese, room temperature
  • 1 teaspoon espresso powder
  • 1/2 cocoa powder
  • 2 teaspoons vanilla
  • 3-4 cups powdered sugar
  • 2-3 Tablespoons heavy cream

In a large bowl, cream butter and cream cheese and mix until light and fluffy. Scrape down the bowl if necessary.

Add the cocoa and espresso powder and beat on low until just combined then add the vanilla and mix thoroughly.

Gradually add powdered sugar one cup at a time, scraping down the bowl if necessary. Start with 3 cups adding more if necessary. Once frosting is sweetened, thick and creamy add the heavy cream and mix on medium speed- the frosting will thicken slightly. Don't overwhip once you've added the cream.

Frost cooled cake layers. Refrigerate any leftover frosting. Refrigerate any frosted cake, but eat at room temperature for best flavor and texture.

Thank you for making 2011 such a memorable year for Lick The Bowl Good. I'm looking forward to another year of baking and licking bowls with you all. Happy New Year!

Oh, and the winner of the Shabby Apple apron is Julie of Fruitcake In The Kitchen. Congrats Julie!

Related Posts with Thumbnails