Friday, January 28, 2011

Sloppy Joe, Slop, Sloppy Joes

Anyone remember that song by Adam Sandler on SNL- Lunch Lady Land? If you don't know what I'm talking about go HERE - it's totally hilarious! Go ahead, go watch it, I'll wait...

Okay, funny right? I'm not one to watch much SNL (then or now) but I loved Adam Sandler on that show. He's such a classic. And everytime I make sloppy joes I can't help but think of that song. It's like "Lunch Lady Land" is a theme song for standing over the stove, browning ground beef and sandwiching it between a bun. My apologies if you find yourself singing that song the rest of the day :-)

When I was a kid my mom used to make Manwich. You know that canned red sauce you mix with ground beef? As a kid, I didn't love it. I don't know what about it I didn't like, I just didn't. But I find myself as an adult wanting to eat those things that remind me of my childhood. Except I don't make it from a can. I have no problem with the can and if that's what you like, that's fine, but I find my version just as simple and much tastier and I happen to like that I know the ingredients going into it.

This recipe came about by chance one day. I just added some ketchup and salsa together and it tasted familiar...like sloppy joes.Then I added spices and came up with a version I liked. I recommend toasting your bun so the bread doesn't soak up all the sauce leaving you with a soggy bun. Otherwise just enjoy it and sing along with with Adam Sandler and you chomp down on your sloppy joe, slop, sloppy joe.

Sloppy Joes by Monica H

Printer Friendly Version
  • 1 pound ground beef
  • 3-4 Tablespoons chopped onion, optional
  • 2 garlic cloves, minced
  • 1/2-1 teaspoon kosher salt (if you use table salt- use 1/4-1/2 tsp)
  • 1/2 teaspoon ground cumin
  • 3/4 cup jarred salsa
  • 1/4 cup ketchup

In a large skillet over medium high heat, brown your ground beef and onions, breaking up into tiny bits. Cook til meat is cooked through and onions are tender. Drain off any excess fat.

Add garlic, salt, and cumin and stir around pan til fragrant. Be careful not to burn your garlic!

Stir in your salsa and ketchup until thick and saucy. Lower the temp to low and simmer for about 10 minutes. If it gets too thick, and a bit of water to thin it out. If too thin, then let it simmer a bit longer, uncovered.

Check for seasoning, add more salt if necessary and sandwich between a toasted bun or white bread.

Serves 4

Monday, January 24, 2011

400th Post!

Today is my 400th post and I have a special cake for you today! I made this for the boys I nanny. They both have birthdays one week apart so for the last couple years they've shared a birthday party and cake. The oldest turned 4 years old and the youngest turned 2. Last year I made them a Wonder Pets Cake and this year they wanted to go with a dinosaur theme. raaar!

When I'm trying to design a cake, I google what I'm looking for then gather ideas I like or I sketch it out and let my imagination run wild. I was more concerned with the cake and how it tasted than the actual dinosaurs so I used toy dinosaurs the boys already had for decoration. The client requested vanilla buttermilk cake with instant fudge icing (from Sky High Cakes) for one tier and I chose chocolate cake with vanilla cream cheese icing for the other. The vanilla cake had a nice tight crumb and was firm but tender and the chocolate is my favorite go-to recipe. These are both of my favorite frostings too.

I didn't slice the cake so it's a little sloppy, but I wanted you to see the insides.

I made the palm trees by trial and error. I hope I never have to make them again. ha! I made the leaves out of fondant and for the trunks I used pretzel rods. Royal icing held it all together. I made enough leaves for 5 palm trees, many broke so I only had enough to make 4. Then as they dried overnight, I had 2 catastrophes and only 2 survived. I was hoping for 3, but I think it turned out fine. The border around the cake was done with chocolate rocks. They're chocolate chunks that are textured and colored to look like rocks. Fun stuff and the kids loved them!

The bottom tier is fudge frosting and the top tier was tinted with green coloring. It's also the same icing I used to pipe the "grass" border and the lettering on the bottom layer. And lastly the cake board was wrapped in white cake board paper, then I painted it with white royal icing and dusted it with a mixture of graham cracker crumbs and brown sugar to create the appearance of sandy soil. I wanted to wrap the edge of the cake board with ribbon but I didn't have enough to wrap all the sides and I ran out of time to go out and get some. Oh well, I'm pretty sure it would have wound up in the trash anyway :-) Hope you enjoy it and thank you for being here through all 400 posts!

Front of cake

I'm too lazy to type out the recipes, so here are the links:

Back of cake

Thursday, January 20, 2011

S'mores In Cake Form

It's Cake Slice time again! Today I have a graham cracker-chocolate chip snacking cake with marshmallow buttercream frosting. Whew! That's a mouthful! I was really excited to try this cake because I'm a huge fan of s'mores and cake, but it wasn't everything I hoped it would be. It was by no means bad, but it certainly was not like a traditional s'more. Recently I made s'more bars and now this and neither have wowed me and it's leaving me questioning my love for s'mores. Or maybe I'm just a s'more purist and like them the old fashioned way.

This cake was really simple to make and contains graham cracker crumbs in place of most of the flour in the cake. It then has chocolate chips folded into the batter (which was really yummy!) and baked. I opted to use mini chocolate chips instead of the regular morsels since all the pictures I saw had the chips sink to the bottom- I didn't want that. Once cooled it's topped with a silky marshmallow buttercream. I thought the frosting was better the second day, but it didn't really taste like marshmallow. The cake did taste like graham crackers but it had a bit of a spongy texture and was slightly dry, despite under baking it. All in all, this cake was fair, but I wouldn't make it again. Mr. H liked it though so it didn't go to waste, and that's always a good thing.

Graham Cracker-Chocolate Chip Snacking Cake adapted from Cake Keeper Cakes

Printer Friendly Version

For the cake:

  • 8 whole graham crackers, finely ground (about 1 cup)
  • 1/4 cup unbleached all-purpose flour
  • 1 tsp. baking powder
  • 1/4 tsp. salt
  • 6 Tbs. (3/4 stick) unsalted butter, softened
  • 1/4 cup sugar
  • 2 large eggs
  • 1 tsp. pure vanilla extract
  • 1/4 cup milk
  • 1/2 cup semisweet chocolate chips (I used mini chips)

For the frosting:

  • 1/2 cup (1 stick) unsalted butter, softened
  • 1/2 cup confectioners’ sugar
  • 1/2 tsp. pure vanilla extract
  • 1/2 cup Marshmallow Fluff

Make the cake: Preheat the oven to 350ºF. Grease an 8-inch square baking pan and dust it with flour, knocking out any extra.

Combine the graham cracker crumbs, flour, baking powder, and salt in a medium mixing bowl.

Combine the butter and sugar in a large mixing bowl and cream with an electric mixer on medium-high speed until fluffy, about 3 minutes, scraping down the sides of the bowl as necessary.

With the mixer on low speed, add the eggs and vanilla. Scrape down the sides of the bowl and then beat until smooth. With the mixer on low speed, add 1/3 of the flour mixture, then 1/2 of the milk, stirring until combined. Repeat with the remaining flour and milk, ending with the flour. Stir in the chocolate chips.

Scrape the batter into the prepared pan and smooth the top with a rubber spatula. Bake until a toothpick inserted in the center comes out clean, about 35 minutes (Mine was done in 27 minutes). Let the cake cool in the pan for about 10 minutes. Invert it onto a wire rack, and then turn it right side up on a rack to cool completely.

Make the frosting: Place the butter in a medium mixing bowl and beat until creamy. With the mixer on low speed, slowly add the sugar, scraping down the sides of the bowl as necessary. Stir in the vanilla and the Marshmallow Fluff and beat until smooth.

Cut the cake into squares and serve each one with a dollop of frosting on top.

Make Ahead Tips: Store uneaten squares in a cake keeper or wrap in plastic and store at room temperature for up to 3 days. The frosting can be kept in the refrigerator in a bowl covered with plastic wrap for up to 3 days. Bring to room temperature before using.

Tuesday, January 18, 2011

Some Call It Crack

For my 100th post (2 years ago) I shared a recipe for Graham Break-Aways. It's a layered snack of graham crackers, buttery toffee, chocolate with a sprinkling of nuts on top. It's a decadent treat that my husband adores. I like them too, but I saw this recipe for saltine toffee and thought I'd give it a try. It's basically the same concept with salty crackers on the bottom instead of the grahams. And since we bought a case of Saltines from Sam's Club, I thought this was a good idea!

I did make a boo-boo when it came to the recipe though. It calls for 1 cup one butter, and I mistook that as 1 stick even though I read the recipe about 3 times as I was making it. I didn't realize my mistake until after I had taken them out of the oven- my bad! The saltine toffee was good but I'm sure it could have been better with the extra stick of butter...that's a no brainer! I liked these but still prefer the the ones made with grahams simply because of the texture of the cracker. Definitely super sweet and addicting though- some have even refereed to it as crack. Try it and decide for yourself!

Saltine Toffee from All Recipes

Printer Friendly Version

  • 35 saltine crackers (4 ounces)
  • 1 cup butter
  • 1 cup dark brown sugar
  • 2 cups semisweet chocolate chips
  • 3/4 cup chopped pecans

Preheat oven to 400 degrees F.

Line a cookie sheet with foil and spray with non-stick cooking spray. Spread out saltine crackers in single layer.

In a saucepan combine the sugar and the butter. Bring to a boil and boil for 3 minutes. Immediately pour over saltines and spread to cover crackers completely.

Bake at 400 degrees F for 5 to 6 minutes. Remove from oven and sprinkle chocolate chips over the top. Let sit for 5 minutes. Spread melted chocolate and top with chopped nuts.

Cool completely and break into pieces.

Friday, January 14, 2011

Perfecting The Pancake

I understand why people buy frozen waffles, because if you don't have a waffle maker, you can't make waffles. But I'll never understand why people buy frozen pancakes or pancake mix. Making pancakes from scratch is so simple and you probably already have all the ingredients already in your pantry. But I want to share with you a recipe that makes perfect pancakes everytime as well as a couple tips on keeping them fluffy.

First off, I have made this recipe countless times. I like to mix up the full batch (6 cups) of pancake mix, then portion the dry ingredients into Ziploc bags, that way at a moments notice I can whip up a batch of fresh pancakes without having to measure anything or look up the recipe. The recipe has you mix 2 egg yolks with melted butter in one bowl and 2 egg whites with buttermilk in another, before adding them to the dry ingredients. I was being lazy one day and decided to just throw everything together in a bowl and what resulted was a thin tough pancake. Don't do that.

Another thing I've learned over the years is that you should not overmix pancakes. If there are a few lumps, and there will be, don't try and work them out. Overmixing the batter will over develop the gluten and you'll have tough, not tender, pancakes. You want tender pancakes, right? Another thing I've learned is that you shouldn't spread the batter on the griddle. I used to do this so I could have bigger pancakes, but later realized that doing that meant my pancakes were thin and not fluffy. For fluffy pancakes, make sure your baking soda is fresh (not expired) and ladle or scoop the batter onto the griddle. Allow it spread on it's own and rise into a golden pancake, untouched.

In summary:

  1. Read and follow the recipe directions.
  2. Use fresh baking soda.
  3. Don't overmix your batter.
  4. Ladle the batter and leave it alone.

I hope you'll give this recipe a try. I usually make the full batch then freeze what we don't eat in a Ziploc bag (2 at a time) to reheat later on. I've also had great success with adding fruit (blueberries and bananas) to the batter. I hope you'll make and like them!

Homemade Pancake Mix adapted from A. Brown

Printer Friendly Version

  • 6 cups all-purpose flour
  • 1 1/2 teaspoons baking soda
  • 3 teaspoons baking powder
  • 1 tablespoon kosher salt
  • 3 tablespoons sugar

Combine all of the ingredients in a lidded container. Shake to mix.

Use the mix within 3 months.

NOTE: I like to mix all the ingredients in a large container, then divide into 3 equal portions. I divide the mix up into 3 Ziploc bags then make the pancakes as directed (see below).

"Homemade Pancake Mix" Pancakes

  • 2 eggs, separated
  • 2 cups buttermilk
  • 4 tablespoons melted butter
  • 2 cups Homemade Pancake Mix, recipe above
  • 1 stick butter, for greasing the pan

Heat an electric griddle or frying pan to 350 degrees F.

Whisk together the egg whites and the buttermilk in a small bowl. In another bowl, whisk the egg yolks with the melted butter.

Combine the buttermilk mixture with the egg yolk mixture in a large mixing bowl and whisk together until thoroughly combined. Pour the liquid ingredients on top of the pancake mix. Using a whisk, mix the batter just enough to bring it together. Don't try to work all the lumps out.

Check to see that the griddle is hot by placing a few drops of water onto to the griddle. The griddle is ready if the water dances across the surface.

Lightly butter the griddle. Wipe off thoroughly with a paper towel. (No butter should be visible.) (I skip this step since I use a non-stick griddle).

Gently ladle the pancake batter onto the griddle. When bubbles begin to set around the edges of the pancake and the griddle-side of the cake is golden, gently flip the pancakes. Continue to cook 2 to 3 minutes or until the pancake is set and golden.

Serve immediately.

Makes 12 pancakes

Hope you all have a great weekend!

Wednesday, January 12, 2011

Ripe Banana Remedy

What do you do with speckled overly ripe bananas? I'm sure many of you are thinking banana bread, right? I don't love banana bread (gasp!) so I usually toss them into fruit smoothies or make this strawberry Jell-o salad. I like bananas as a snack, but I like them firm with a little green still on them. Once they turn brown, I'm out! Usually if they're really black they get thrown away. Don't hate me banana bread lovers! I've tried freezing them with and without the peel but wasn't not a pretty site, in fact it made me dislike ripe bananas even more.

This is one recipe that I don't get tired of though and it calls for 2 overly ripe mashed bananas. Since I usually only buy 3 at a time, this works out perfectly so I can eat one and not worry about the others turning colors. And my husband loves it and requests it all the time so it's a win-win situation. I featured this Jell-O salad before on LTBG a couple years ago but it had one lone picture and it was ugly so no one ever commented. ha ha! I'm sharing it again because it really is good and I think you'd like it.

I usually make this in a Pyrex bowl, but I've made them in small clear glasses for a prettier, single-serving presentation as well. Either way you serve it, it tastes the same. The gelatin is more substantial and has body from the banana and crushed pineapple that are mixed into it. The frozen strawberries kinda break things up a bit so not everything is too smooth and baby food like. But it's the sour cream layer that I love. It's not sweetened at all but when you eat it with the strawberry Jello it almost tastes like cream cheese. I hope you'll give this one a try- it's nothing fancy, just good stuff.

Strawberry Jell-O Salad previously seen HERE

Printer Friendly Version

  • 1 6 oz. box strawberry jell-o
  • 1 1/2 c. boiling water
  • 8 oz. can crushed pineapple, drained
  • 2 ripe bananas, mashed without lumps
  • 10-12 whole frozen strawberries
  • 1 c. sour cream

In a medium bowl pour boiling water over strawberry jello. Mix til gelatin is fully dissolved. Add in crushed pineapple, and bananas. Add in strawberries and mix.

In a small bowl, stir sour cream til creamy and loosened a bit.

In a medium bowl, pour half the gelatin mixture (see note). Carefully ladle the sour cream over the jell-o, then pour the rest of the mixture over the sour cream.

Cover and refrigerate for at least 3 hours.

NOTE: To help the jello set up a bit quicker, I put the bowl in freezer for 5 minutes before adding the sour cream layer and the additional jello on top. This just helps keep the layers separated but it's not necessary.

____________________________________________

And just because I think it's funny, here's a picture of Mr. H and Autumn sharing a father/daughter moment while taking a break from varmint hunting in our backyard*.

*No animals were harmed in the making on this Jello :-)

Saturday, January 8, 2011

Top 24 Recipes of 2010

I know many bloggers did their year end recap of the recipes they made in 2010. Some narrowed it down to ten and twelve recipes, but I just can't do that! I made far too many yummy recipes last year to narrow it down to 10 recipes, so today you get my top 24 favorites of 2010- that's 2 recipes per month. Enjoy!

Here they are in no particular order:

  1. Pumpkin Cream Cheese Swirl Bread
  2. Baked Corn Dog Muffins
  3. Homemade Soft Pretzels
  4. Banana Pudding Pie
  5. Ferrero Rocher Cupcakes
  6. Carrot Cake Cookies
  7. Coffee Chocolate Chip Muffins
  8. Lemon Meringue Pie
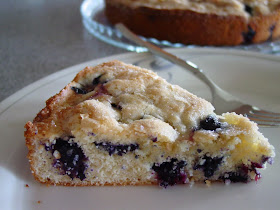
  9. Blueberry Cake
  10. Bacon Brown Sugar Waffles
  11. Bruscetta Burgers
  12. Pecan Pie Cupcakes
  13. Cinnanon Swirl Raisin Bread
  14. Garlic Chile Chicken Legs
  15. Peanut Butter Cookies
  16. Planters Punch Cake
  17. Grape Salad
  18. Apple Cake with Brown Sugar Glaze
  19. Chocolate Zucchini Cake
  20. Turkey Pesto Meatballs
  21. Mocha Frappe Pie
  22. Cranberry Orange Bread
  23. Golden Rum Cake
  24. Rustic Tomato Tart

That's it! I hope you'll make and enjoy some of my favorites. If you do, I hope you'll let me know how they turn out!