Sunday, August 29, 2010

Baking With My Mom and A Mini Giveaway

Before I tell you about these muffins I wanted to apologize for not checking in on your blogs over the past few days. I will get to them I promise, but I've been so sick that I haven't really been on the computer much. A couple weeks ago I noticed wheezing in my chest but I felt fine. I went to the doctor a few days later and was diagnosed with bronchitis. A took antibiotics, cough syrup and used an inhaler for a week and with each passing day I felt worse, not better. I went to get a chest x-ray and now I have pneumonia and I'm feeling pretty rotten. On top of all that I've developed a drug allergy and keep randomly breaking out in a rash all over my body. Fun times people.

Okay, enough of the pity party. I made these muffins with my momma! My mom is not much of a baker, mostly because she doesn't have the patience to follow a recipe. She just like to throw things in a pot and see how it turns out. That works out well if her creations aren't so great because she can't replicate them, but if something turns out really well and we all love it, she can never reproduce it. ha! Gotta love her. Anyway, I mentioned to her that I'd like to have her over to bake with me and she was so excited and knew just what she wanted to make. She saw a recipe in Parade Magazine for Dorie's lemon sour cream muffins and clipped it right away. It just so happens that I clipped the same recipe and I had all the ingredients to make them.

My mom mentioned that she painted her finger nails and I was teasing her telling her that she painted them for her guest appearance on my blog. I asked her to show them to me (so I could show them to you) and this is what she gave me. ha ha! Guess I asked for that one :-) Love you mom.

The recipe came together really quickly. We wanted them extra lemony so I added more lemon zest and juice. And I added a lemon sugar topping to them which made the tops super delicious but the muffin itself was mediocre at best and not very lemony. They were not very sweet and were very biscuit-like in texture and taste. The batter was very thick so I added a couple tablespoons of buttermilk to thin it out and that worked well. To make these more flavorful, we sliced them in half, buttered them and slathered on some tangy lemon curd. Besides baking with my mom, that was the best part. Then again you can slather just about anything with butter and lemon curd and it'll be good!

Lemony Sour Cream Muffins adapted from Dorie Greenspan via Parade

Printer Friendly Version
  • 2 cups all-purpose flour
  • 2/3 cup sugar
  • 2 tsp baking powder
  • 1/4 tsp baking soda
  • 1/4 tsp salt
  • 1 lemon, zested and juiced (I used 2- see note)
  • 3/4 cup sour cream
  • 2 large eggs
  • 1 tsp vanilla extract
  • 1/8 tsp lemon extract
  • 1 stick unsalted butter, melted
  • 2 Tbsp. buttermilk (see note)

Lemon Sugar:

  • 6 teaspoons sugar
  • Zest of one lemon

In a small bowl, combine the 6 tsp. of granulated sugar and zest of one lemon. Mix together and set aside while you make the batter.

Whisk the dry ingredients, including the lemon zest, together in a large bowl. In another bowl, whisk the remaining ingredients, including the lemon juice.

Pour the wet ingredients over the dry. Gently but quickly stir everything together. Don’t worry if you have a few lumps—they’re better than an overmixed batter.

Spoon batter into paper-lined or greased tins. Divide batter between 12 cups. Top each muffin with about 1/2 tsp. lemon sugar.

Bake at 400ยบ for 18 to 20 minutes, until muffins are golden. Cool 5 minutes before unmolding.

NOTE: My batter was super thick so I added the juice of an extra lemon and a couple tablespoons of buttermilk to help thin it out.

Now on to the mini giveaway. When I said mini, I meant mini. My mom helped me pick these out and I thought they were too cute to pass up so I wanted to share with you. I liked them because their textures were so realistic.

Since I have 3 kitchen timers, I will choose 3 winners. Please let me know which one you'd prefer and I'll do my best to accommodate you. If you'd rather opt out of the giveaway, just say so in the comments section. One comment per person please.

Giveaway open to US residents only. The winners will be revealed on Wednesday. Be sure I can contact you if you win!

Wednesday, August 25, 2010

A Recipe With A Story

As with most great recipes, this one comes with a story. When I was a kid, I lived with my grandma. We were poor, though I didn't know it then-- it was just how we were. It wasn't often, but I do remember going in the early cool mornings to stand in line at the bull barn with my grandma to collect our welfare staples. We'd grab a box, then go down the long buffet tables collecting our family sized cans of fruit cocktail and green beans, processed cheese and tubs of creamy peanut butter.

The peanut butter came in giant white containers with black lettering that said 'Peanut Butter' - it was as generic as could be and took a family of 8 about a year to get through it all. I liked the idea of baking but my grandma didn't have cookbooks, she just cooked by taste. If we had dessert, it was usually a boxed cake mix or red jello. And the internet was non-existent, so there was no googling recipes. If I wanted to bake, I had to make due with what I had. And what I had was a tub of peanut butter with a recipe on the back.

This was one of the first recipes from scratch that I ever made, if not the first. I made a full recipe and stacked them high on a plate for my dad. He was picking me up for the weekend and I could not wait for him to try the fresh from the oven cookies. They were nutty, buttery, crispy on the edges, chewy in the center and had the identifying fork marks indented in the tops of them. They were perfect and I was so proud of myself. I beamed in anticipation of my dad trying them. When he did, he said "I don't like peanut butter" and I instantly deflated. I don't know if he ever ate them but all these years later I still remember those cookies and how good they were. I've tried other recipes and none have ever compared. It was not until I did a Google search for "welfare peanut butter cookies" (read this, it's funny!) that I found this recipe again and I'm so glad I did because it took me back to when I was a kidlet in my grandma's kitchen mixing up dough at her kitchen table.

Welfare Peanut Butter Cookies

Printer Friendly Version
  • 2-1/2 cups flour
  • ½ teaspoon salt
  • ½ teaspoon baking soda
  • 1 cup fat (margarine, butter, or shortening)*(see note)
  • 1 cup peanut butter
  • 1 cup white sugar
  • 1 cup brown sugar, packed
  • 2 eggs

Mix flour, salt, and baking soda. Set aside.

Mix fat and peanut butter. Add both kinds of sugar. Mix well. Add eggs and beat well.

Stir flour mixture into peanut butter mixture.

Drop dough from a teaspoon on baking pan. Flatten with a fork.

Bake at 375 ° (moderate oven) 10 to 15 minutes until lightly browned.

Makes 4 to 5 dozen cookies.

NOTE: This recipe calls for "fat". I used half amounts of butter (for crispness) and shortening (for chew).

Monday, August 23, 2010

Not So Puffy Puff Pastry

Where shall I begin? I'll start off by saying I made puff pastry. kinda. I made this along with my gal pals Ingrid and Michelle. The recipe was chosen by Ingrid and I was excited about making it because I've always wanted to make puff pastry. Why? Well because I like a good challenge, I like to know that I can make something that I would otherwise just purchase from the store and because that Pepperidge Farm box of puff pastry doesn't actually contain any butter. It's true. And lastly because the real stuff is expensive.

This puff pastry recipe is kind of a shortcut version. It's not made like a typical puff pastry is made. Puff pastry generally starts off like homemade croissants would, by folding dough over a slab of butter. Repeat, repeat, repeat until you end up with layers upon layers of butter and dough. But this recipe has you incorporate the ingredients into a mixer bowl, create a dough, then fold it like an envelope a few times, with refrigeration in between. I didn't have very much success with this method. I had problems from the very beginning. I mixed for the recommended amount of time (I even set a timer) but it quickly became overmixed. Perhaps it was too warm and melded together despite chilling the ingredients??? At this point I should have started over but I was out of butter. So, I added the liquid and it didn't absorb so I added more flour. Then I forgot to refrigerate after the first turn but I proceeded on and while it looked fine, the end result didn't puff up much- it rose then fell.

I can't say this recipe was faulty, because others have had success with it, but I definitely would not try it again. I feel like I wasted my GOOD butter on this, though I don't regret the challenge because I got to bake with my friends. I don't use puff pasty often but if I ever get a wild hair up my butt and want to try again, I'll try a different recipe and method. If you're feeling adventurous and want to give it a go, then by all means do, the recipe is below. In the meantime, I'll just tell you what I did with mine. I scored the edges of the thawed out dough, prebaked it at 400F for 15 minutes, then topped it with pesto, garlic, caramelized onions, Boursin cheese, shrimp, bacon and cherry tomatoes and baked it for another 20 minutes til the pastry was golden. The edges of the pastry were tender, flaky and buttery but the middle was gummy. Overall, this recipe was a disappointment, but at least I walk away from it with knowledge of what to do next time.

  • 4 1/2 sticks (18 oz) cold unsalted butter
  • 3 cups (15 oz) all-purpose flour
  • 3/4 teaspoon salt
  • 6 tablespoons (3 oz) very cold water
  • 1 1/2 teaspoons cider vinegar

Cut the butter into 3/4-inch cubes. Transfer the cubes to the bowl of a stand mixer. Add the flour and salt to the bowl also and use your hands to mix briefly, until the butter is coated with flour. Put the bowl in the refrigerator to chill for 20 minutes. Combine the water and vinegar in a measuring cup and chill this mixture in the fridge for 20 minutes as well.

After 20 minutes, remove the mixer bowl from the fridge and attach to a mixer fitted with the paddle attachment. Mix on low speed for 1 to 1 1/2 minutes. You want the butter to break into smaller pieces of varying sizes (the largest about 1/2-inch square); be careful, however, not to over-mix - if the butter is too small, it will be unable to form flaky layers in your puff pastry.

With the mixer still on low speed, slowly add the water/vinegar mixture to the bowl, drizzling in different points around the bowl. When the dough begins to come together in large chunks (within about 10 seconds), stop the mixer. The dough will be slightly moist but it will not look smooth. Turn the contents of the bowl onto a floured work surface.

Use your hands to shape the dough into a rough rectangle about 6 x 8 inches and 1 1/2 inches thick. Use a rolling pin to roll the dough into a 14 x 16-inch rectangle. You can flour the dough a bit if necessary, but brush the excess flour away once you've finished rolling the dough out. Fold the dough into thirds like a letter. Start with a narrower side facing you and begin by folding the bottom third up. Next, fold the top third down to complete the "turn."

After you complete the first turn, roll your rolling pin across the top of the dough gently 1 or 2 times, just to fuse the dough. Wrap the dough in plastic and refrigerate for 30 minutes. You'll want to repeat this process 2 more times - to create three turns total. Continue to chill the dough for 30 minutes between turns. Once you've completed all 3 turns, chill the dough (wrapped in plastic wrap) for at least 1 hour before using.

Cut the dough into 2 pieces, roll out each piece (my measurements were about 12x15-inches) and double wrap in plastic wrap. The dough can be refrigerated for 2 days or frozen for 4-6 weeks. Thaw frozen dough overnight in the refrigerator.
Refer to your desired recipe for oven temps and cooking times.

Makes 2 1/4 pounds of dough

Hopefully, Michelle and Ingrid had success with theirs. Go visit them to find out!

Friday, August 20, 2010

Our Bunny and A Cake

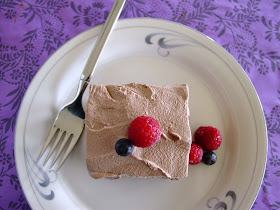
It's Cake Slice Time! And the cake chosen for this month was Tres Leches Cake from Southern Cakes by Nancie McDermott. If you've never had one, a tres leches cake is generally a white sponge cake soaked in a sweetened three milk mixture and topped with whipped cream. I had every intention in making the recipe as the recipe author intended but I have a chocolate loving husband and he turned his nose up to the milky vanilla version. He requested I make a chocolate version and so I did. I made minor changes to the recipe, like substituting cocoa in place of some flour and adding vanilla to the batter instead of lime zest in the milk sauce, but it added a big punch of flavor and changed the cake completely. My husband loved it!

Before I tell you more about this cake, I wanted to thank you all for your kind words regarding the loss of our sweet fuzzy bunny, August. We don't know the cause of his death, all we know is that is happened quickly. All his life he's had respiratory issues but the doctors were always perplexed by him. He'd express mucus from his nose and he'd gasp for air but as soon as he cleared it, he was fine. It happened periodically for really no reason at all and we'd help him along by suctioning and wiping. We changed his diet, we gave him different meds and we eliminated things one by one in his cage thinking it was environmental. This became a part of his life but he wasn't suffering or in pain- it was just an annoyance, kind of like allergies. We tried all kind of things to make his life better and made many midnight trips to the emergency vet and no one ever knew how to "fix" him.

On Wednesday morning he was having another episode. I held him and stroked his fur. He seemed fine then all of a sudden he began to thrash his legs and tried to escape from my grip. We tried to calm him down so he wouldn't hurt himself, but something was wrong. He kicked off of me and fell. I picked him up and noticed he was no longer struggling but he was still breathing. Moments later as Mr. H was holding him, he passed away and it just seemed to happen so fast. We think his passing was a result of being over stressed- they can can work them selves up and give themselves heart attacks along with the fall, though it was a very short one. He was more than a rabbit- he was a member of our family. We got him after the boys died and he's been a joy in our lives when we were at such a low point. His life, as I see it, was cut short, but while he was a part of our family he was very well taken care of and loved wholeheartedly. We miss him so much.

Now it's hard to jump from talking about the passing of our bunny to talking about a cake, so I will just wrap it up by saying that this cake was rich, creamy, delicious and wasn't too sweet. I added chocolate to the milk mixture, but leaving it plain or adding vanilla or almond extract would be great too. The recipe didn't yield enough milk mixture in my opinion so I've increased that amount in the recipe below. I topped my cake with sweetened cocoa cream and served it with berries. The recipe below reflects my changes- I cut the recipe in half and added chocolate, but if you're interested in the larger (9x13) vanilla version, click here.

Chocolate Tres Leches Cake adapted from Southern Cakes

Printer Friendly Version

Adapted from this Original Recipe

Cake:

  • 1 cup + 2 Tbsp. all-purpose flour
  • 6 Tbsp. cocoa powder
  • 2 teaspoon baking powder
  • 1/2 cups (1 stick) unsalted butter, softened
  • 1 cup sugar
  • 2 eggs
  • 1/2 teaspoon vanilla extract
  • 1/2 cup milk

Three Milks:

  • 1 cup milk
  • 1 cup evaporated milk
  • 1/3 cup sweetened condensed milk
  • 1 oz. melted chocolate or chocolate syrup (optional)

Cake: Preheat oven to 350 degrees F. Grease and flour 8x8-inch pan.

In a medium bowl, combine the flour, cocoa and baking powder and stir with a fork to mix.

In a large bowl, combine the butter and sugar and beat with a mixer at high speed to mix well.

Adds the eggs one at a time, beating well each time and stopping to scrape down the bowl now and then until the mixture is light, fluffy and smooth. Add the vanilla.

Add one third of the flour mixture and then half the milk, beating at low speed each time just until the flour or milk disappears into the batter. Add another third of the flour and the remaining milk, then the remaining flour in the same way.

Pour the batter into the prepared pan and bake for 35-40 minutes (mine took 40 mins), until the cake is golden brown, springs back when touched lightly in the center and begins to pull away from the sides of the pan.

While the cake bakes, make the milk sauce. You want the cake to still be warm when you add the milk mixture.

Milk Sauce: Combine the milk, sweetened condensed milk, evaporated milk and the semisweet chocolate or chocolate syrup (if using) in a medium saucepan. Heat gently over medium heat, stirring often until the mixture forms a smooth, steaming hot sauce. Do not let it come to a boil.

Allow to cool for 10 minutes before using.

To Finish: Cool the cake in the pan on a wire rack for 10 minutes. Poke holes with a toothpick all over the cake.

Slowly pour the warm milk sauce over the warm cake, in stages stopping to let the cake absorb the sauce before adding more. You may not need it all but you can add more later if you need it.

Let the cake stand at room temperature for one hour before covering and refrigerating. (I let it chill overnight, but a few hours is plenty). Top with cocoa whipped cream (recipe below) and serve it straight from the pan.

Cocoa Whipped Cream from Monica H

  • 1 cup heavy cream
  • 2 Tablespoons sugar
  • 2 Tablespoons cocoa powder

In a medium bowl, combine heavy cream, sugar and cocoa powder. Mix at medium speed til creamy and fluffy, but don't overbeat or you'll be left with a curdled mess.

Top the cooled tres leches cake with the sweetened cocoa cream. Serve with fruit if desired.

I was going to link this post to The Cake Slice Bakers blog so you could go check out their cakes, but for some unknown reason that blog isn't up and running at the moment. When that issue gets resolved, I'll link it up. Until then, I hope everyone has a nice weekend.

Wednesday, August 18, 2010

RIP August

Our bunny died unexpectedly this morning around 2:45am. We are deeply saddened and miss him terribly.

August

8/25/07 - 8/18/10

Monday, August 16, 2010

Cocktail Umbrella Not Included

I made this cake for my mother in-laws' birthday. In MARCH. Yeah, I know! We're gonna get past that fact and move on straight to this cake. Ever heard of Planters Punch? I never had until I found this recipe in Bundt Classics. There are a ton of really great recipes in this book all made for Bundt pans. Some of the recipes start off with a cake mix and others are from scratch. There are sweet cakes, savory recipes and glazes in this spiral bound book. There aren't many pictures but if you ever come across it, I highly recommend you check it out.

Okay back to this cake. It starts off with a cake mix and then you add some tropical flavors to it, like pineapple, orange rum and grenadine to add a nice rosy color. I'm assuming those are the flavors that are in Planters Punch as well. You just dump everything in the bowl, mix it up and it's in the oven in no time. One of the things that I liked about this cake was that it baked so completely level- meaning it didn't make a hump in the pan as it baked. I don't know why that thrilled me, but it did. It's the little things :-)

As I mentioned this cake starts off with a boxed mix, but it didn't taste like it at all. It had a wonderful tender crumb, was moist and had such a pleasant peachy color. I don't know how to describe the flavor as not one flavor stood out over the other. It was just good! I actually put a little too much glaze on this cake (is there really such a thing as too much glaze?) but my MIL scraped it all up and put it on her piece. I think that meant she liked it. If you're into into fruity umbrella drinks, you definitely need to try this cake!

Planters Punch Cake adapted from Bundt Classics

Printer Friendly Version

  • 1 (18.25 oz.) package yellow cake mix
  • 1/2 cup pineapple juice
  • 1/2 orange juice
  • 1/4 cup light rum (I used coconut rum)
  • 1/4 teaspoon rum extract
  • 3 tablespoons grenadine syrup
  • 1/3 cup butter, softened
  • 2 eggs

Heat oven to 325 degrees F. Grease and flour a 10 or 12 cup Bundt pan.

In a large mixing bowl, mix all the cake ingredients. Mix on medium speed for 2 minutes. Spoon into prepared pan.

Bake for 50-55 minutes or until a toothpick inserted in center of cake comes out clean. Cool 10 minutes then remove from pan. Place on rack and cool completely. If desired, drizzle with Vanilla Glaze (recipe below).

Vanilla-Rum Glaze from Monica H

  • 1 cup sifted powdered sugar
  • 2 Tbsp. butter, softened
  • 1/4 tsp. vanilla extract
  • 1/4 tsp. rum extract
  • 1-2 Tbsp. milk

In a medium bowl, mix sugar and butter. Add vanilla and rum extract. Gradually add milk until desired consistency is achieved. Mix until smooth.

For a thinner consistency, add more milk. For a thicker glaze, add more sugar.

Apply glaze to cake and let it set before serving.

Saturday, August 14, 2010

Just Peachy

Our neighbor has a peach tree in his backyard and he invited us to come over and pick some peaches. Well, no, that's not entirely true. He picked peaches that were ready to be eaten and bagged them up to give us, but we weren't home and they got overly ripe so he said we could come over and pick fresh peaches from his tree. This turned out to be a good thing because I got to pick the ones I wanted AND take pictures of them. They're just so pretty and fuzzy.

Last years we got peaches from Fredericksburg- it's kind of like the peach capitol of Texas. I wondered how I would prepare them when Mr. H informed me not to touch them or I'd "ruin them". Alright then. We ate those peaches, simply sliced in a bowl. And we did the same with most of these peaches from our neighbor's tree. Side note: Have I mentioned before that my neighbor looks like Alton Brown? Because he totally does! Anyway, with a good portion of our fruit I made this wonderful peach ice cream from David Lebovitz- the ice cream guru.

After preparing this ice cream, I realized something. I realized that I've never had peach ice cream- I've only had what I *thought* was peach ice cream. What do I mean by that? Well, what I thought was peach ice cream , was simply vanilla ice cream with peaches in it. THIS ice cream is different and it is definitely peachy. It's icy and creamy at the same time, you can taste the vanilla but it's subtle- almond extract might be nice too. But the peaches take center stage. As it should be. Before Summer ends, pick some peaches from your neighbors tree or get some from a roadside stand and make this ice cream.

Peach Ice Cream from Perfect Scoop

Printer Friendly Recipe

  • 1 1/3 lbs. (600 g) ripe peaches (about 4 large peaches)
  • 1/2 cup water
  • 3/4 cup sugar
  • 1/2 cup sour cream
  • 1 cup heavy cream
  • 1/4 teaspoon vanilla extract
  • a few drops freshly squeezed lemon juice

Peel the peaches, slice them in half, and remove the pits. Cut the peaches into chunks and cook them with the water in a medium, nonreactive saucepan over medium heat, covered, stirring once or twice until soft and cooked through, about 10 minutes.

Remove from heat, stir in the sugar, then cool to room temperature.

Puree the cooked peaches and any liquid in a blender or food processor with the sour cream, heavy cream, vanilla and lemon juice until almost smooth but slightly chunky.

Chill the mixture thoroughly in the refrigerator (overnight is best) then freeze it in your ice cream maker according to manufacturer's instructions.

Variation: To make Nectarine Ice Cream, simply substitute nectarines for the peaches. There's no need to peel the nectarines, since their tender skins soften during cooking.

Summer in a bowl.

This post linked to:

Friday, August 13, 2010

Coming Soon

A few weeks ago I hosted a giveaway sponsored by CSN Stores. I'm happy to announce that they've contacted me again and this time, they've given me the opportunity to review a product!

I'm super excited about this because the product I'm reviewing (it's a secret, I'll share with you soon) has been on my wish list for a while. You see, I have no problem buying gifts for other people, but when it comes to myself I hesitate. I have to really want or need something before I'll get it, and even then I am reluctant. My dear husband usually has to talk me into getting something before I do. He has no problem whatsoever spending money--that's how we balance each other out :-).

I will share my product review with you soon. In the meantime, please go visit the people at CSN. They have over 200 online stores and have everything from bistro sets to Le Creuset cookware to fabulous feather mirrors. They have great prices and offer free shipping on many of their products, go check 'em out.

Thank you CSN!

Tuesday, August 10, 2010

How To Frost A Layer Cake

I promised you a couple weeks ago that I'd show how to frost a cake. And today is that day. Are you ready? I am! Let's get started.

First off, you will need a revolving cake stand (see note below), a large off-set spatula, a leveled and stacked cake on a cake board and an ample amount of prepared frosting at room temperature.

NOTE: The top of the revolving cake stand has a smooth surface to help you to slide the cake off the stand once it has been frosted and decorated. I like to cut a piece of non-stick drawer liner the same size of the round top to place on the top to give me a non-slip surface. When I'm spinning my cake stand around I can be confident in knowing that my cake is not going to fall off of it. Also when looking for a cake stand look for one with a heavy base so that once the top of the cake stand doesn't become top heavy. In a pinch a lazy susan works just fine.

___________________________________________________

Before we start, I want to tell you how important it is to have level cake layers. If your cake baked and domed, that's okay, just use a serrated knife and gently saw off the domed tops until they're level. Fill the layers with jam, frosting, or other fillings and stack them on top of eachother- just be sure to stack the cake layers cut side down. If you're layers aren't level, your cake will be crooked or your cake layers may slide off eachother. I filled these cake layers with jam but if you want to use frosting, 1/2 cup between each layer is sufficient.

Recipe: Lemon Blueberry Marble Cake

1). Place stacked and leveled cake on a cake board and place on the cake stand. Plop (technical term) a substantial amount of frosting on top of the cake. Don't put all of the frosting on top of the cake- reserve a little for decoration and piping if you like.

2). Using your off-set spatula, begin to smooth the top of your frosting, all the while working it down the sides of the cake.

3). With the back of the spatula, guide your frosting down the sides of the cake all the way down to the cake board.

4). If you have too much frosting on your spatula, scrape off the excess into a bowl. If you need more frosting, add it to the sides of the cake and continue to cover the entire cake making sure no crumb is visible. Don't be afraid to use the amount of frosting you need in order to get the job done. You don't want to have too little frosting or you'll be be scraping the cake and getting crumbs in your frosting.

5). You just want the cake covered entirely in frosting. Don't worry about what it looks like at this point. It's OK if it's not smooth and beautiful at this point. It will be, and we'll get there together.

6). Now that the cake is covered in frosting, it's time to smooth it out. I start by holding the off-set spatula at a slight angle over the top of the cake, just touching the frosting. I hold the spatula in place and spin the cake stand. Don't apply too much pressure or the frosting will work it's way down the sides of the cake. Keep spinning til smooth and level but don't worry if it's not perfect.

**All throughout this process you should be scraping off the excess frosting. You'll be more successful if you have clean tools**

7). Now we're moving on to smoothing out the sides of your cake. Hold the spatula upright against the sides of your cake. Rather than pressing the backside of the spatula right up against the frosting, you want to hold it at a slight angle. Hold that in place while you spin the cake stand. This motion will smooth out the sides of your cake. Repeat until you're happy with the appearance.

8). Sometimes when you smooth the sides of the cake, excess frosting will work it's way up around the edge of the cake. This is okay because we're about to smooth it out as well as the top again.

9). Grab your spatula and gently approach your cake (see the position of the spatula in step #8). Gently drag the spatula from the outside edge towards the center of the cake. Do this all around the cake til the edges are smooth.

10). Repeat step #6 in order to smooth the top of the cake once again if needed.

11). If you want to add a border to the edges of your cake, add the reserved frosting to a piping bag fitted with the tip of your choice (this is tip #12). Pipe a border around the top of your cake. If you want to pipe a border along the base of the cake, wipe any smeared frosting off the cake board with a damp paper towel before proceeding.

12). I forgot to take a picture of this, but if you have spikes on your beaded border, then gently press them down, one at a time with a damp finger. This will round them out and give them a more uniform look.

13). If you like, you can use other tips to further decorate the cake. I used some of the reserved frosting and tinted it with gel colors for writing on the cake and for making the smaller polka dots on the side of the cake. (I used #3 tip for this).

14). Using a thin flexible spatula, lift the edge of the cake board from the top of the stand. Slide your hand underneath the cake to support it and transfer it to a cake pedestal or plate. Stick a candle in it in and call it a day. Be proud of what you have done!